Exploit #06: Password Attacks
Introduction
Hmm, I probably should’ve done the assignment on password attacks before moving on to the other topics, but well, it’s not a big deal. It’s not too late anyway. In fact, this topic will really just focus on techniques like brute force and password cracking. I’m not going to cover things like the CIA triad, what passwords are, or what authentication means. If you’ve found your way to this blog, you probably already know these terms by heart, so there’s really no point in me going over all of that again.
There’s one thing I think both you and I often forget or mix up, and it also tends to show up in some exams like Security+ that is the four factors of a validation mechanism. Let’s quickly go over these four factors again.
They are:
Something you know: a password, passcode, PIN, passphrase, etc.Something you have: an ID card, smart card, trusted device/phone, etc.Something you are: biometric characteristics such as fingerprint, face recognition, iris/retina, voice, etc.Somewhere you are: geolocation, IP address, etc.
Yeah, and when we talk about 2FA, you already know what that means: you have to combine two different authentication factors. For example, you might enter your password and then provide a second factor, such as an ID card or a biometric credential.
When you’re doing a black-box engagement, the information provided to you is usually close to zero. You might only get a name or a domain that you’re allowed to access. And real-world engagements aren’t like CTF labs, where there’s always a door left open for you to get initial access. In reality, you won’t always be lucky enough to find a target with a vulnerability that lets you achieve RCE or upload a file, because modern frameworks are doing a pretty good job of preventing these kinds of issues (I’m not saying they’re 100% secure, though). So, one thing I often do is guess passwords or try to brute-force the target’s passwords in order to find valid credentials. But whether either of these approaches actually works depends heavily on how security-conscious the users are. I often say that users are the weakest link in the security chain.
I once conducted a security assessment for a hospital and performed a brute-force attack against user accounts on a healthcare system. The result? The password was simply “123.” Yeah, at this point, you can already see two major problems with the state of security awareness, right? First, the developers who built the software didn’t enforce any password complexity requirements. Even if the system assigns a default password, it should at least be a reasonably long, randomly generated string, and users should be forced to change it the first time they log in. Second, the users themselves weren’t really aware of the security risks. They simply kept using the default password because it was convenient and they didn’t have to remember some long, complicated password.
On top of that, small and medium-sized businesses sometimes don’t have dedicated threat-hunting or security teams to proactively look for threats targeting their organization. As a result, leaked passwords can remain available on the dark web for months or even years without anyone noticing or taking action. As I mentioned, I once found leaked passwords for the system of a company I was working for in a leaked-password database on LeakBase. The record had reportedly surfaced around mid-2024, but even in 2025, I was still able to access the account using that leaked password.
Therefore, if you’re working on a red team, using password attack techniques such as password guessing, brute forcing, searching leaked-password databases, or cracking password hashes is something you should consider as part of your assessment rather than simply skipping it. On the defensive side, implementing proper password security policies is essential. For example, organizations should enforce 2FA/MFA wherever possible. Microsoft has already been moving in this direction by requiring Microsoft 365 users to use stronger authentication methods such as the Authenticator app.
Sometimes, you simply can’t brute-force an account because of mechanisms like account lockout. And sometimes, you may not find any leaked passwords for your target either. Suppose you’ve compromised a system database, or somehow managed to dump or obtain password hashes from a Windows or Linux system. At this point, you’ll need to crack those password hashes. So, I’ll start by talking about password cracking first.
Password Cracking Techniques
Passwords are commonly hashed when stored, in order to provide some protection in the event they fall into the hands of an attacker. Hashing is a mathematical function which transforms an arbitrary number of input bytes into a (typically) fixed-size output; common examples of hash functions are MD5, and SHA-256. Hash functions are designed to work in one direction. This means it should not be possible to figure out what the original password was based on the hash alone.
To hash some data, that data is passed through a hashing algorithm, which produces an output consisting of a seemingly meaningless string of characters, typically represented in hexadecimal. This seemingly meaningless string can be referred to as a hash value, hash code, digest, or simply a hash. All hashing algorithms should meet the following basic requirements:
- Deterministic: At any point in time, the same input should always produce the same output.
- Non-invertible: It should be computationally infeasible to reverse the hashing process and recover the original data from the hash.
- Quick to compute: The hashing process should be fast to calculate.
- Use the Avalanche Effect: Even a small change in the input should cause at least 50% of the output to change.
- Should avoid or eliminate collisions: Since a hash function can accept inputs of virtually any length but typically produces a fixed-length output, it’s possible, although ideally rare, for two different inputs to produce the same output. This is known as a hash collision, so a good hashing algorithm should make collisions as difficult as possible to find.
Let’s take the example shown in the figure. Suppose I’m signing up for an application with the credentials username: zed and password: zed99. Assume the application’s database uses MD5 to hash passwords before storing them. As you can see, in a table such as users, the password column should contain the resulting hash, something like 16e2913364add967bd882e738d956267, rather than storing the actual password, zed99, directly in the database.
So, what happens when I log in? How does the application know that my password, zed99, is correct? When I enter my password, the application hashes the password using the same algorithm it uses for storing passwords. It then compares the resulting hash with the hash stored in the database. If the two hash values match, the application knows that the password I entered is correct. If an application stores passwords in plaintext, stay away from it immediately.
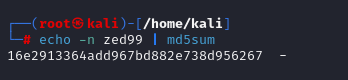
The example above was just a simplified one. Large and more complex systems typically won’t simply store a hash value directly in the database like that. They usually combine hashing with additional mechanisms to produce a more secure stored value, so even if you manage to obtain that value, you may not be able to crack it without understanding how the application handles the encryption and decryption process.
Now I’ll briefly go over a few password-cracking techniques:
Brute-force attack:
A brute-force attack involves attempting every possible combination of letters, numbers, and symbols until the correct password is discovered. Obviously, this can take a very long time – especially for long passwords, however shorter passwords (<9 characters) are viable targets, even on consumer hardware. Brute-forcing is the only password cracking technique that is 100% effective – in that, given enough time, any password will be cracked with this technique. That said, it is hardly ever used because of how much time it takes for stronger passwords, and is typically replaced by much more efficient mask attacks.
Dictionary attack:
Next, we’re going to talk about a more effective technique that’s used more often: dictionary attacks. A dictionary attack, otherwise known as a wordlist attack, is one of the most efficient techniques for cracking passwords, especially when operating under time-constraints as penetration testers usually do. Rather than attempting every possible combination of characters, a list containing statistically likely passwords is used.
Instead of generating an infinite number of combinations like brute force, this technique requires us to prepare a list of passwords, which we call a wordlist, to use during the password cracking process. The password cracking tool will then take each entry from the wordlist, hash it, and compare the resulting hash with the hash we provide. If the hashes match, we’ve found the original password.
How effective this technique is depends heavily on whether the target password is actually present in the wordlist the attacker has. That’s why pentesters and attackers don’t usually rely solely on existing wordlists such as RockYou or SecLists. They’ll often perform thorough reconnaissance on the target, gathering information from publicly available sources such as social media and other online sources. Based on that information, the pentester or attacker can then create a custom wordlist and apply their own rules to make the password-cracking process much more effective.
Rainbow tables attack:
During the hash cracking process, most of the time is spent calculating hashes for password candidates. To address this issue, rainbow tables were developed. A rainbow table is essentially a database containing precomputed password hashes generated using various hashing algorithms. Because of this, rainbow tables can be extremely large, sometimes reaching hundreds of gigabytes in size. To use a rainbow table, you first need to somehow obtain a list containing the password hashes of all users stored in the target’s database. You can then use specialized software to compare the hashes from that list against the hashes in the rainbow table until you find a matching hash.
Because rainbow tables can be very effective, developers have introduced mechanisms to make precomputed attacks much harder. As I mentioned earlier, applications may combine multiple hashing or encoding steps rather than simply hashing a password once and storing the result directly in the database. One technique specifically used to defend against rainbow-table attacks is salting.
A salt, in cryptographic terms, is a random sequence of bytes added to a password before it is hashed. To maximize impact, salts should not be reused, e.g. for all passwords stored in one database. Besides helping protect against rainbow-table attacks, it also addresses another problem: two or more users may use the same password. Without salting, the same password will produce the same hash. This means that if an attacker obtains a list of password hashes and manages to crack the hash belonging to one of the users with that shared password, they can immediately identify the password used by all the other users with the same hash. In other words, one cracked password could potentially compromise multiple accounts.
Identifying hash formats:
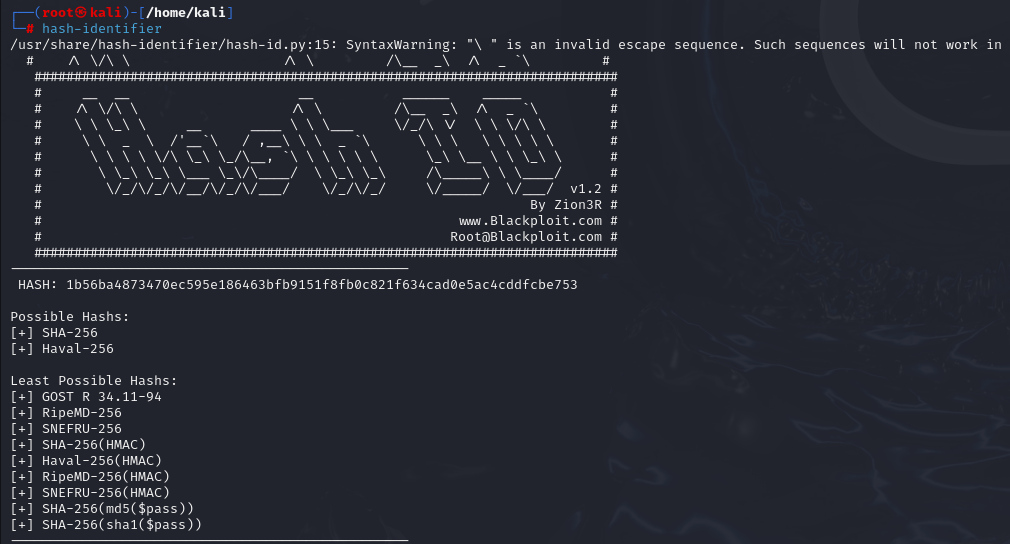
Before we get into password cracking, I want to point out one thing first. Sometimes, the tools I’m about to introduce may not be able to determine which hashing algorithm was used to generate the hash we provide. So, I recommend identifying the hashing algorithm first before starting the password-cracking process. On Kali Linux, we can use the Hash Identifier tool from the command line to identify the hashing algorithm.
It’s very simple to use. Just copy and paste your hash into the “HASH:” prompt and press Enter. The tool will then help you identify the hashing algorithm. I’ll use a SHA-256 hash for this example and we can see that, besides identifying and listing the hashing algorithms it considers most likely to have been used to generate the input hash (Possible Hash), Hash Identifier also lists the algorithms it suspects but isn’t as confident about (Least Possible Hash). And as we can see, SHA-256 is listed under Possible Hashs.
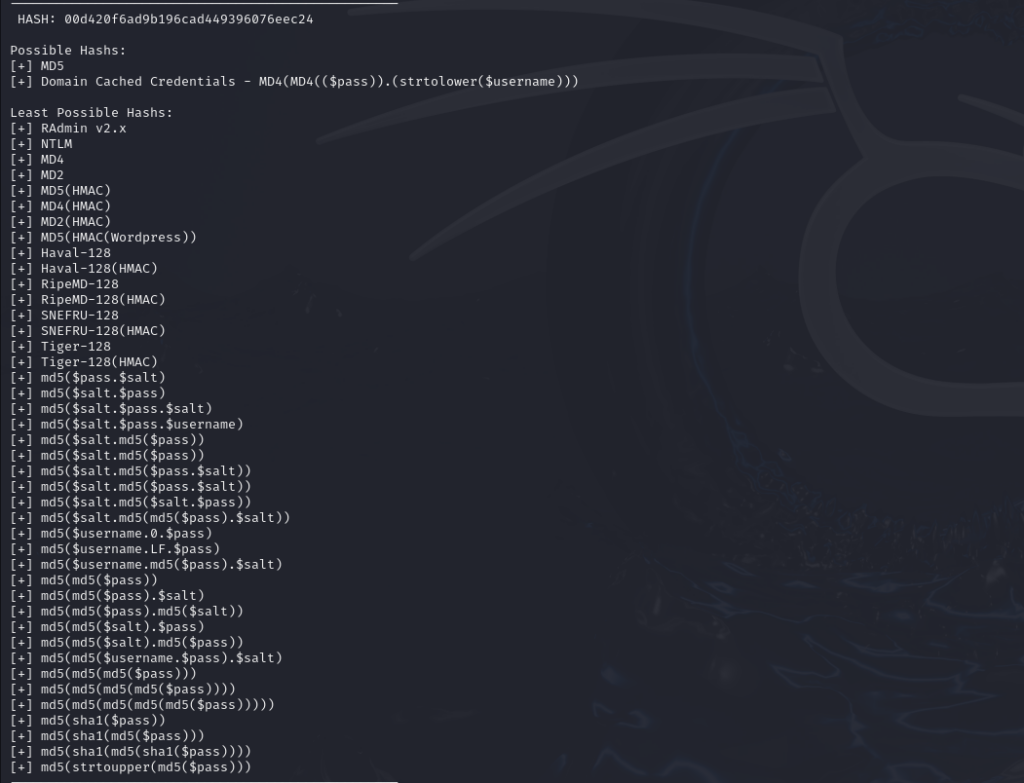
However, nothing is 100% perfect. Sometimes, certain hash formats can produce inaccurate results. For example, in the example below, I’ll prepare an MD4 hash, but when I run it through Hash Identifier, it tells me that the hash is MD5.
The reason is that one of the factors these tools use to identify a hashing algorithm is the length of the input hash. In this case, both MD4 and MD5 produce hashes that are 32 hexadecimal characters long. They differ in how they process the data, but because MD5 is much more commonly encountered than MD4, Hash Identifier assumes that the input hash is more likely to be MD5 than MD4.
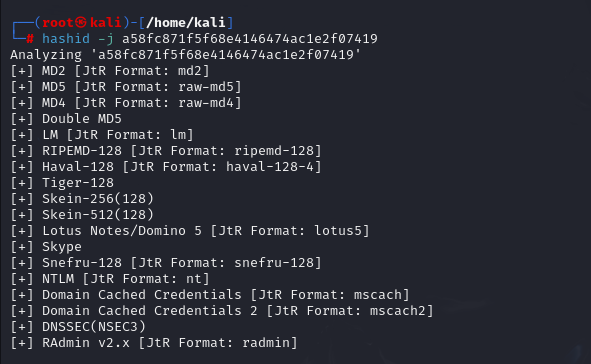
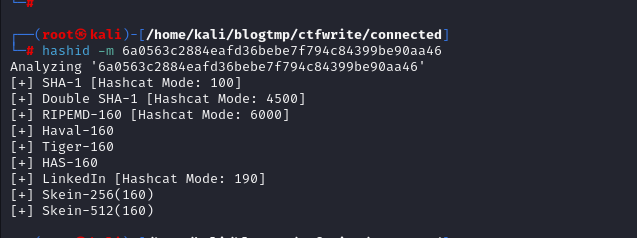
Besides Hash Identifier, there’s another tool called Hashid that you can use to identify the hashing algorithm by running the command shown below.
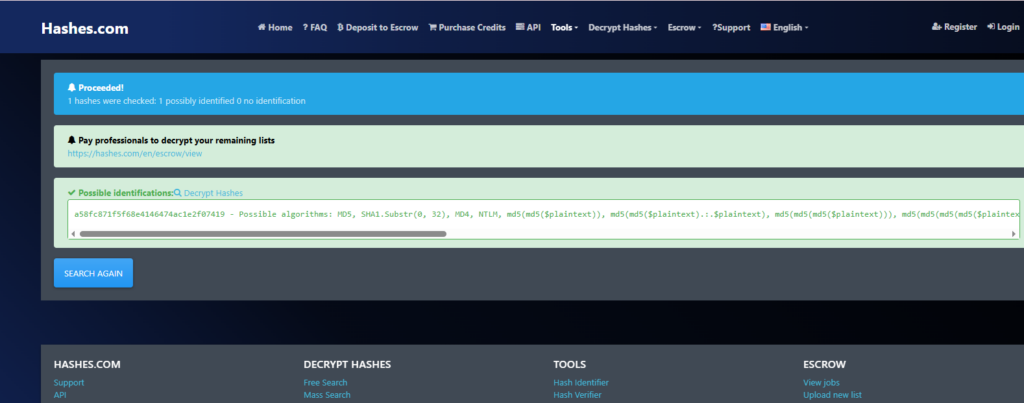
Besides the tools installed directly on the machine, sometimes when I need to quickly check a hash, I’ll use external websites to identify the hashing algorithm. Here are two websites that I often use:
John The Ripper:
John the Ripper (I usually just call it john.) is a well-known penetration testing tool used for cracking passwords through various attacks including brute-force and dictionary. Included with john are various tools for converting different types of files and hashes into formats that are usable by john. Now, let’s go through a few of john’s cracking modes.
Single crack mode is a rule-based cracking technique that is most useful when targeting Linux credentials. It generates password candidates based on the victim’s username, home directory name, and GECOS values (full name, room number, phone number, etc.). These strings are run against a large set of rules that apply common string modifications seen in passwords (e.g. a user whose real name is Bob Smith might use Smith1 as their password).
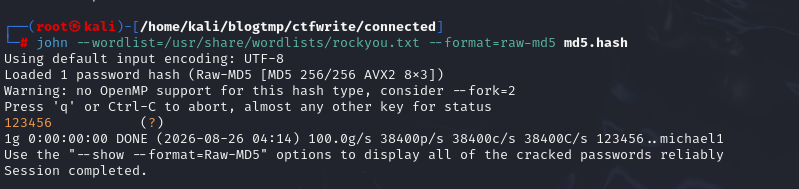
Wordlist mode is used to crack passwords with a dictionary attack, meaning it attempts all passwords in a supplied wordlist against the password hash. The basic syntax for the command is as follows: john --wordlist=<wordlist_file> --format=<hash_format> <hash_file>
To view the list of hashing algorithms supported by John the Ripper, you can use the following command: john --list=formats
The wordlist file (or files) used for cracking password hashes must be in plain text format, with one word per line. Multiple wordlists can be specified by separating them with a comma. Rules, either custom or built-in, can be specified by using the --rules argument. These can be applied to generate candidate passwords using transformations such as appending numbers, capitalizing letters and adding special characters.
Incremental mode is a powerful, brute-force-style password cracking mode that generates candidate passwords based on a statistical model (Markov chains). It is designed to test all character combinations defined by a specific character set, prioritizing more likely passwords based on training data. This mode is the most exhaustive, but also the most time-consuming. It generates password guesses dynamically and does not rely on a predefined wordlist, in contrast to wordlist mode. Unlike purely random brute-force attacks, Incremental mode uses a statistical model to make educated guesses, resulting in a significantly more efficient approach than normal brute-force attacks. The basic syntax is: john --incremental <hash_file>.
By default, john uses predefined incremental modes specified in its configuration file (/etc/john/john.conf), which define character sets and password lengths. You can customize these or define your own to target passwords that use special characters or specific patterns.
It is also possible to crack password-protected or encrypted files with john the ripper. Multiple "2john" tools come with john that can be used to process files and produce hashes compatible with john the ripper. The generalized syntax for these tools is: "<2john_tool> <file_to_crack> > file.hash"
Some of the tools included with john are:

Hashcat:
Hashcat is a well-known password cracking tool for Linux, Windows, and macOS. Featuring fantastic GPU support, it can be used to crack a large variety of hashes. Similar to John the Ripper, hashcat supports multiple attack (cracking) modes which can be used to efficiently attack password hashes. The general syntax used to run hashcat is as follows: hashcat -a 0 -m 0 <hashes> [wordlist, rule, mask, ...]
In the command above:
-ais used to specify theattack mode-mis used to specify thehash type<hashes>is a either a hash string, or a file containing one or more password hashes of the same type[wordlist, rule, mask, ...]is a placeholder for additional arguments that depend on the attack mode.
Hashcat supports hundreds of different hash types, each of which is assigned a ID. A list of associated IDs can be generated by running hashcat --help.
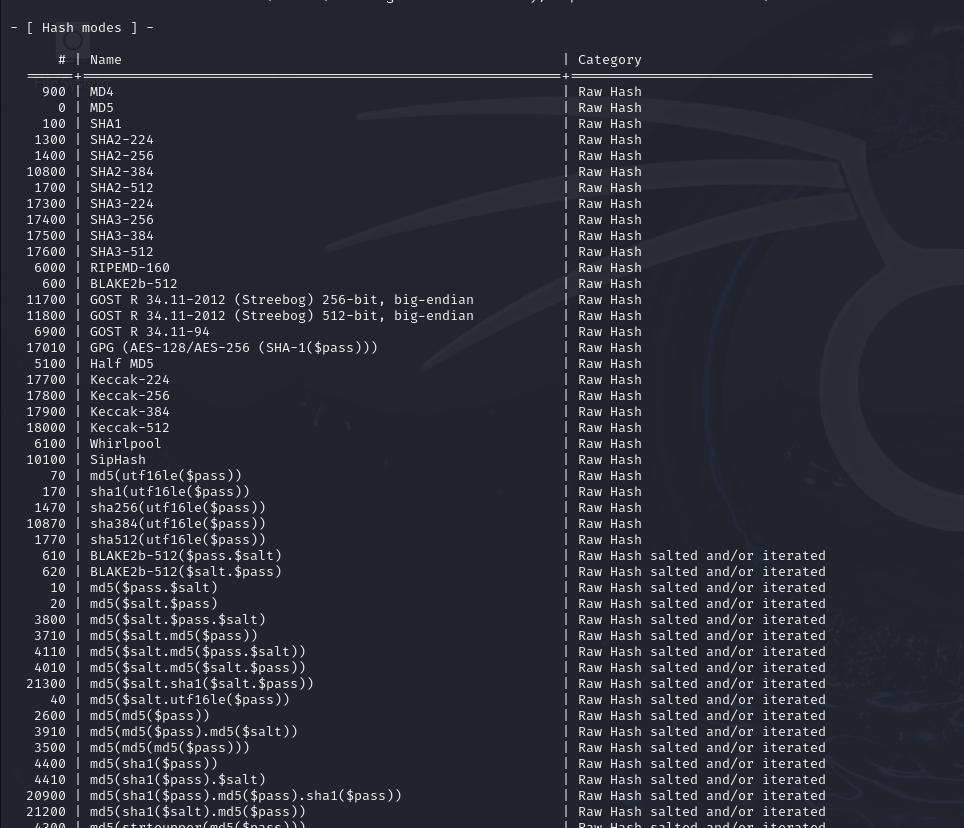
The hashcat website hosts a comprehensive list of example hashes which can assist in manually identifying an unknown hash type and determining the corresponding Hashcat hash mode identifier.
Alternatively, hashID can be used to quickly identify the hashcat hash type by specifying the -m argument.
Hashcat has many different attack mode, including dictionary, mask, combinator, and association. In this post we will go over the first two, as they are likely the most common ones that you will need to use.
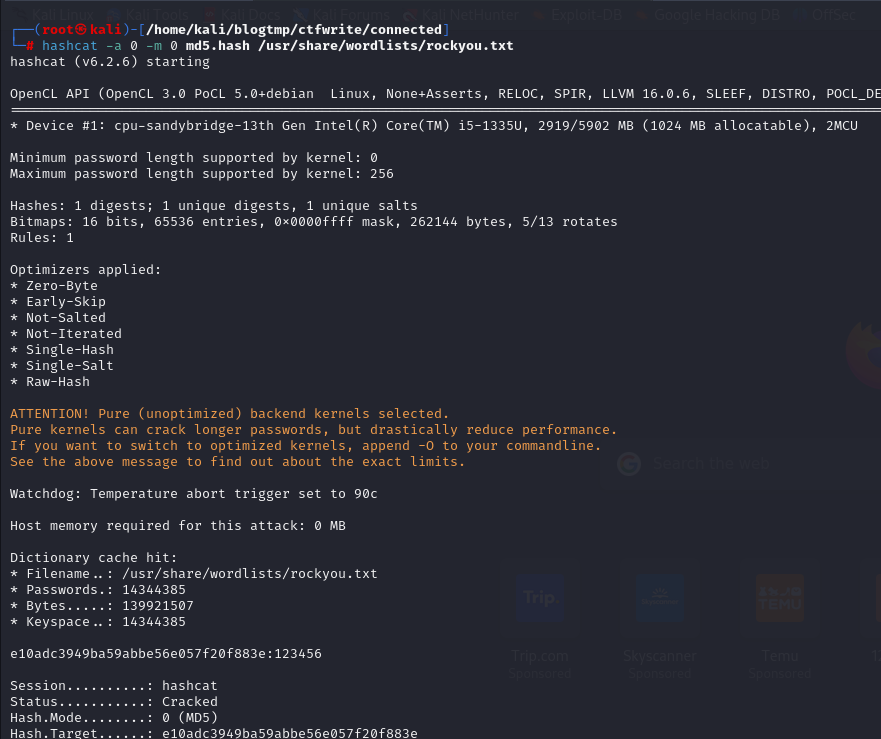
Dictionary attack (-a 0) is, as the name suggests, a dictionary attack. The user provides password hashes and a wordlist as input, and Hashcat tests each word in the list as a potential password until the correct one is found or the list is exhausted.
I’ll use the MD5 hash as an example and crack it using Hashcat.
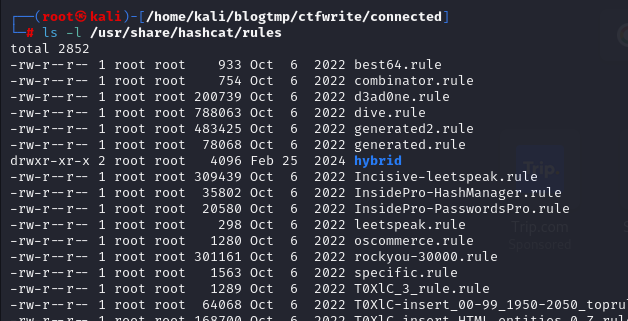
A wordlist alone is often not enough to crack a password hash. rules can be used to perform specific modifications to passwords to generate even more guesses. The rule files that come with hashcat are typically found under /usr/share/hashcat/rules:
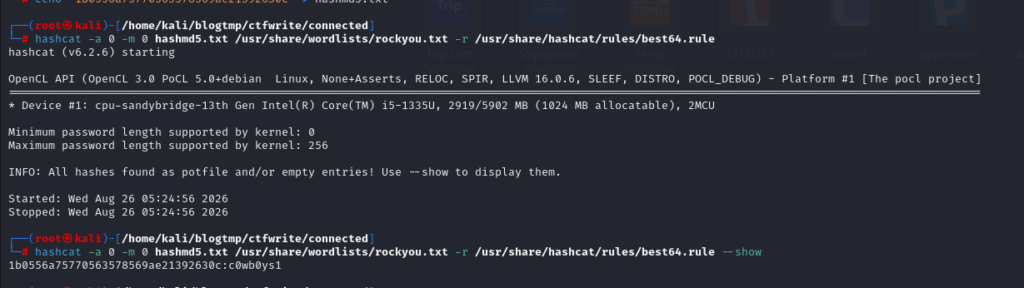
As another example, imagine an additional md5 hash was leaked from the SQL database: 1b0556a75770563578569ae21392630c. We weren’t able to crack it using rockyou.txt alone, so in a subsequent attempt, we might apply some common rule-based transformations. One ruleset we could try is best64.rule, which contains 64 standard password modifications—such as appending numbers or substituting characters with their “leet” equivalents. To perform this kind of attack, we would append the -r <ruleset> option to the command, as shown below:
Mask attack (-a 3) is a type of brute-force attack in which the keyspace is explicitly defined by the user. For example, if we know that a password is eight characters long, rather than attempting every possible combination, we might define a mask that tests combinations of six letters followed by two numbers.
A mask is defined by combining a sequence of symbols, each representing a built-in or custom character set. Hashcat includes several built-in character sets:
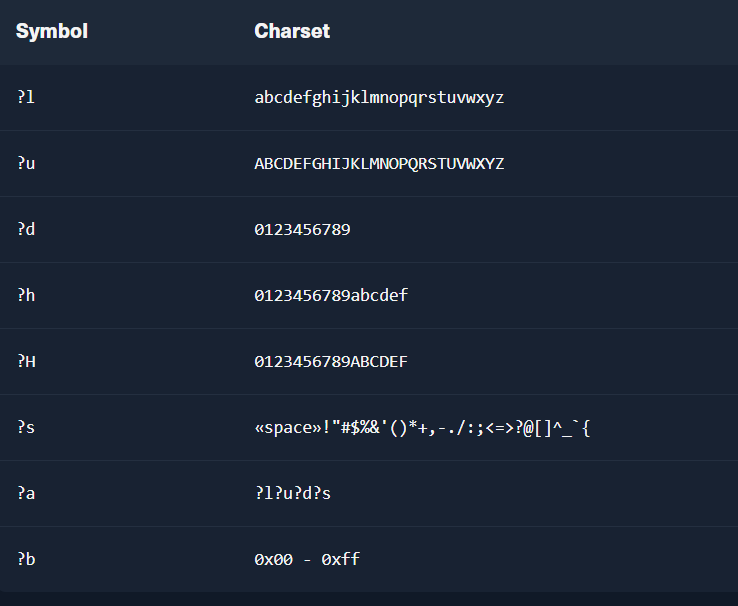
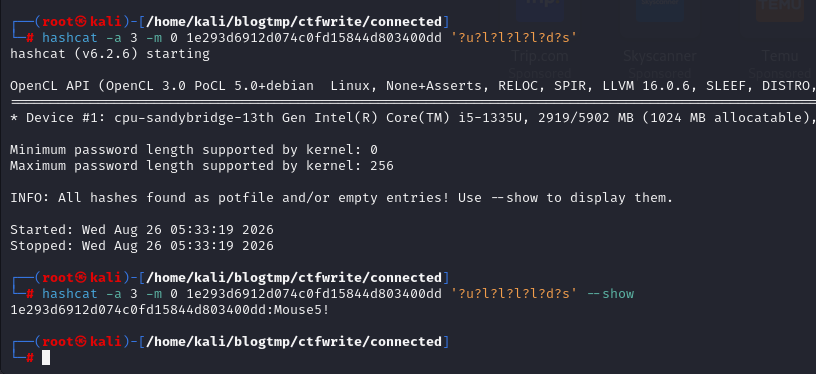
Let’s say that we specifically want to try passwords which start with an uppercase letter, continue with four lowercase letters, a digit, and then a symbol. The resulting hashcat mask would be ?u?l?l?l?l?d?s.
Custom Wordlists and Rules:
From the beginning, we’ve only been using the available password lists. If we’re lucky, the password for the user we’re looking for is in one of them; otherwise, we usually have to look for another wordlist. However, it becomes significantly more challenging to apply these techniques to systems that require users to create more complex passwords. Unfortunately, the tendency for users to create weak passwords occurs even when password policies are in place.
Many users create their passwords based on simplicity rather than security. To mitigate this human tendency (which often undermines security measures), password policies can be implemented on systems to enforce specific password requirements. For example, we manage to figure out the company’s password policy, a system might enforce the inclusion of uppercase letters, special characters, and numbers. Most password policies mandate a minimum length – typically eight characters – and require at least one character from each specified category.
No matter how complex the system’s password requirements are, there will always be employees within the company who follow predictable patterns when creating passwords, often incorporating words closely related to the service being accessed. For instance, many employees choose passwords that include the company’s name. Personal preferences and interests also play a significant role – these may include references to pets, friends, sports, hobbies, and other aspects of daily life. And there’s one more thing: organizations often require users to change their passwords after a certain period of time. However, some users will simply change one character, or, for example, if their password contains a year, they may just increment the year by one. Knowing that users tend to keep their passwords as simple as possible, we can create rules to generate likely weak passwords.
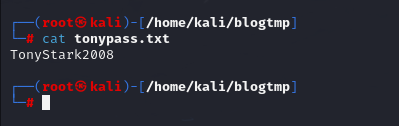
Now let’s move on to an example. Suppose I find a user named Tony Stark and learn that he really likes the year 2008. So, I would create a file with one line containing TonyStark2008.
We can use Hashcat to combine lists of potential names and labels with specific mutation rules to create custom wordlists. Hashcat uses a specific syntax to define characters, words, and their transformations. The complete syntax is documented in the official Hashcat rule-based attack documentation. Hack The Box has provided an example that should be enough to help us understand how Hashcat transforms input words. So, I’ll use Hack The Box’s example to save time, but you should also take a look at the Hashcat link above.
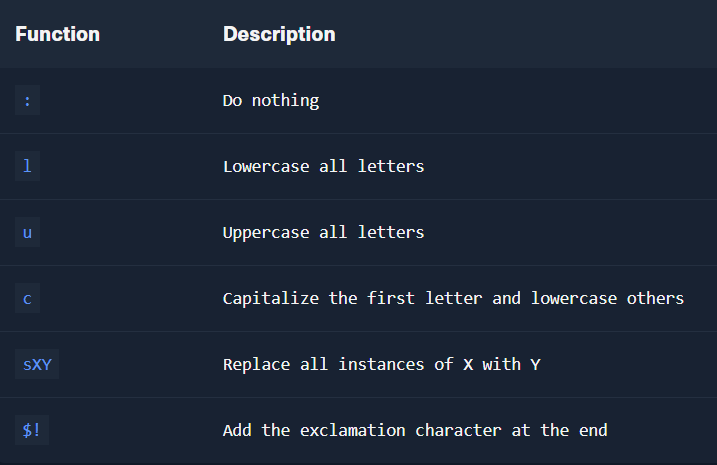
Each rule is written on a new line, and it defines how a word should be transformed. Let’s try writing the functions above into a file.
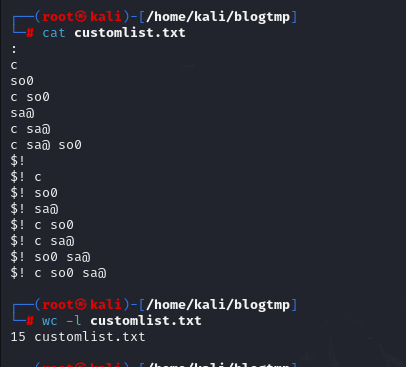
Now we’ll run the Hashcat command shown below to apply the rules we just created to the tonypass.txt file I created earlier, and then save the output to a new password file. In this case, the single input word will produce fifteen mutated variants.
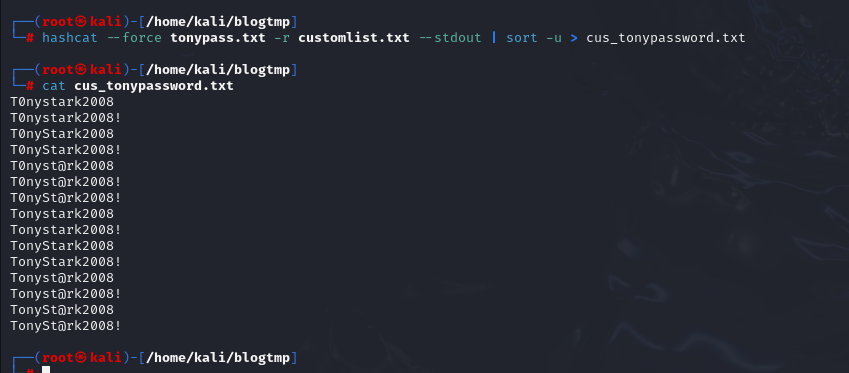
Hashcat and John the Ripper both come with pre-built rule lists that can be used for password generation and cracking. One of the most effective and widely used rulesets is best64.rule, which applies common transformations that frequently result in successful password guesses. It is important to note that password cracking and the creation of custom wordlists are, in most cases, a guessing game. We can narrow this down and perform more targeted guessing if we have information about the password policy, while considering factors such as the company name, geographical region, industry, and other topics or keywords that users might choose when creating their passwords. Exceptions, of course, include cases where passwords have been leaked and directly obtained.
Generating wordlists:
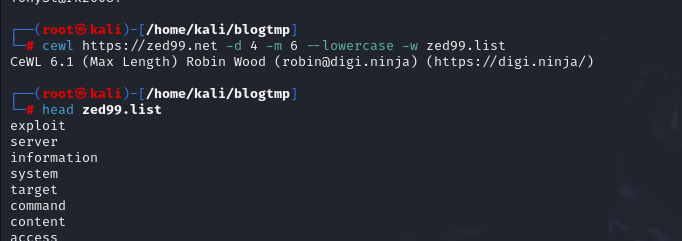
Now let’s try another scenario where we create a wordlist. We’ll use a tool called CeWL to scrape potential words from the company’s website and save them to a separate list. Moreover, We can then combine this list with the desired rules to create a customized password list – one that has a higher probability of containing the correct password for an employee. We specify some parameters, like the depth to spider (-d), the minimum length of the word (-m), the storage of the found words in lowercase (--lowercase), as well as the file where we want to store the results (-w).
Cracking Protected Files:
One thing we often overlook at work is setting passwords or encrypting important files that contain sensitive information. You can see this when banks send out monthly statements—they usually set a password to protect those files. However, in other industries, not everyone thinks about encrypting or password-protecting files because it can be inconvenient, or simply because the company doesn’t have a policy requiring employees to do so.
Imagine HR storing a large number of employees’ personal records without any mechanism to encrypt or protect those files. I witnessed this on a daily basis when I was working as a network administrator. HR staff would sometimes even store employee records on their personal Google Drive without any security measures in place, such as password protection. Even if you’re an IT professional who understands the risks, there’s only so much you can do when higher-level management—or even the executives themselves—don’t really care about security and are more concerned with convenience, speed, and keeping things simple.
we’ve focused on cracking password hashes specifically. In the next section, we will shift our focus to techniques related to attacking password-protected files and archives. As mentioned in a previous section, John the Ripper has many different scripts for extracting hashes from files which we can then proceed to crack.
I’ll use an SSH key as an example. Certain files, such as SSH keys, do not have standard file extension. In cases like these, it may be possible to identify files by standard content such as header and footer values. For example, SSH private keys always begin with -----BEGIN [...SNIP...] PRIVATE KEY-----. We can use tools like grep to recursively search the file system for them during post-exploitation. Some SSH keys are encrypted with a passphrase. With older PEM formats, it was possible to tell if an SSH key is encrypted based on the header, which contains the encryption method in use. Modern SSH keys, however, appear the same whether encrypted or not.
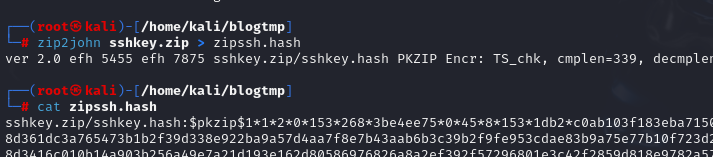
We could use the Python script ssh2john.py to acquire the corresponding hash for an encrypted SSH key, and then use john to try and crack it.
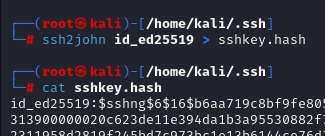
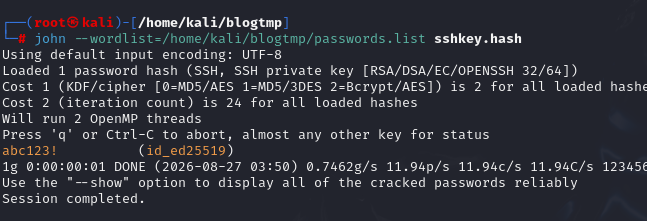
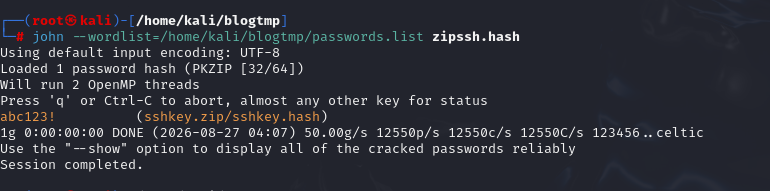
The process for cracking other files is quite similar, so I won’t do another demo. Just remember: we need to convert the encrypted file into the proper format for John, and then run John against it.
One of the primary challenges in this process is the generation and mutation of password lists, which is a prerequisite for successfully cracking password-protected files and access points. In many cases, using a standard or publicly known password list is no longer sufficient, as such lists are often recognized and blocked by built-in security mechanisms. These files may also be more difficult to crack or not crackable at all within a reasonable timeframe because users are increasingly required to choose longer, randomly generated passwords or complex passphrases. Nevertheless, attempting to crack password-protected documents is often worthwhile, as they may contain sensitive information that can be leveraged to gain further access.
Besides standalone files, we will often run across archives and compressed files such as ZIP files which are protected with a password. There are many types of archive files. Some of the more commonly encountered file extensions include tar, gz, rar, zip, vmdb/vmx, cpt, truecrypt, bitlocker, kdbx, deb, 7z, and gzip.
Note that not all archive types support native password protection, and in such cases, additional tools are often used to encrypt the files. For example, TAR files are commonly encrypted using openssl or gpg. For this hands-on section, I’ll use the ZIP format to keep things quick.
The ZIP format is often heavily used in Windows environments to compress many files into one file. The process of cracking an encrypted ZIP file is similar to what we have seen already, except for using a different script to extract the hashes.
Cracking BitLocker-encrypted drives. BitLocker is a full-disk encryption feature developed by Microsoft for the Windows operating system. Available since Windows Vista, it uses the AES encryption algorithm with either 128-bit or 256-bit key lengths. If the password or PIN used for BitLocker is forgotten, decryption can still be performed using a recovery key—a 48-digit string generated during the setup process.
In enterprise environments, virtual drives are sometimes used to store personal information, documents, or notes on company-issued devices to prevent unauthorized access. To crack a BitLocker encrypted drive, we can use a script called bitlocker2john to four different hashes: the first two correspond to the BitLocker password, while the latter two represent the recovery key. Because the recovery key is very long and randomly generated, it is generally not practical to guess—unless partial knowledge is available. Therefore, we will focus on cracking the password using the first hash ($bitlocker$0$...).
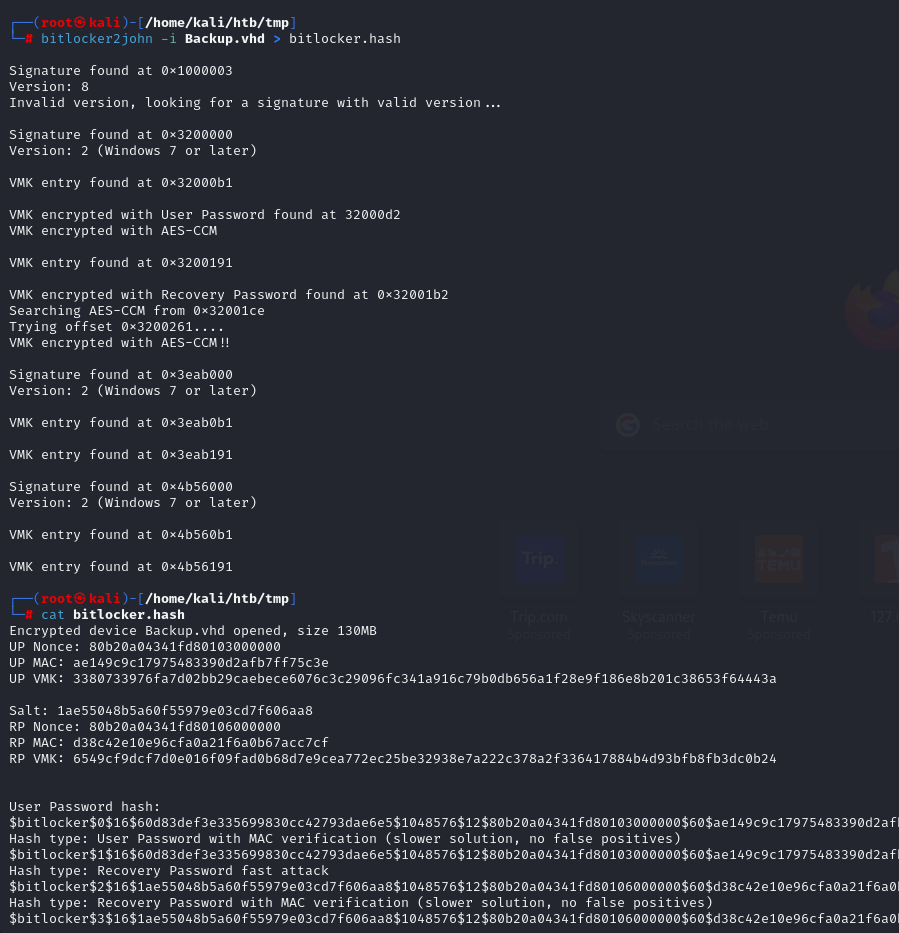
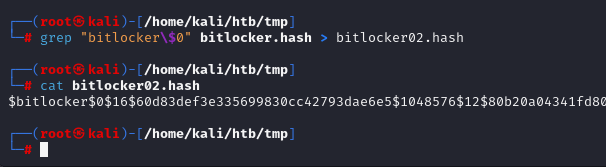
Once a hash is generated, either john or hashcat can be used to crack it. Since this encryption uses strong AES encryption, cracking may take considerable time depending on hardware performance.

The easiest method for mounting a BitLocker-encrypted virtual drive on Windows is to double-click the .vhd file. Since it is encrypted, Windows will initially show an error. After mounting, simply double-click the BitLocker volume to be prompted for the password. It is also possible to mount BitLocker-encrypted drives in Linux (or macOS). To do this, we can use a tool called dislocker, we then use losetup to configure the VHD as loop device, decrypt the drive using dislocker, and finally mount the decrypted volume:
apt-get install dislocker
sudo mkdir -p /media/bitlocker
sudo mkdir -p /media/bitlockermount
sudo losetup -f -P Backup.vhd
sudo dislocker /dev/loop0p2 -u1234qwer -- /media/bitlocker
sudo mount -o loop /media/bitlocker/dislocker-file /media/bitlockermount
Network Services Password Attacks
I wrote an article about what I loosely referred to as “exploiting” some common network services. Although I called them exploits, the techniques described in the article are essentially focused on credential-based attacks against those services, rather than actually exploiting a vulnerability to bypass the authentication process. I’m sure you’re already familiar with these services. They can include FTP, SMB, NFS, SSH, IMAP/POP3, SMTP, RDP, and so on. You can check out the articles about exploiting these common services in Part 01 and Part 02.
Now, let’s assume that you’re pentesting a Windows Server. Typically, on Windows systems, sysadmins and users need services that allow them to access the system, execute commands, or access its contents through a GUI or the terminal. In this case, the most common services that provide these capabilities are RDP, WinRM, and SMB. I’m not mentioning SSH here because it isn’t as commonly found on Windows systems. You’re much more likely to encounter SSH on Linux-based systems.
The services I mentioned all support authentication using a username and password. Of course, some services can also use predefined keys or key-based authentication for the login process, such as SSH. However, for most of the other services, the default authentication mechanism is typically a username and password. Now let’s go through a few of these services. There are plenty of tools and utilities that you can use to perform what is commonly referred to as “password attack”.
Okay, first, I’m going to introduce you to a tool called NetExec, which can also be used for other protocols such as SMB, LDAP, MSSQL, and others. I recommend reading the official documentation for this tool to become familiar with it. You can install NetExec with apt, or clone the GitHub repo and follow the various installation methods, such as installing from source and avoiding dependency issues.
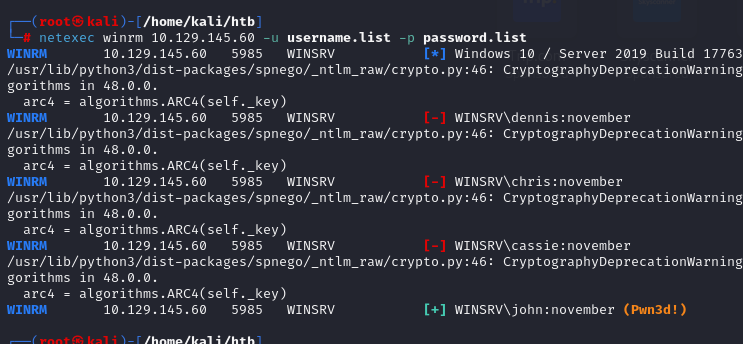
The general format for using NetExec is as follows: netexec <protocol_name> <target-IP> -u <user or userlist> -p <password or passwordlist>
First, I’m going to target WinRM. Before we get into exploiting this service, I’ll briefly explain what it is. Windows Remote Management (WinRM) is the Microsoft implementation of the Web Services Management Protocol (WS-Management). It is a network protocol based on XML web services using the Simple Object Access Protocol (SOAP) used for remote management of Windows systems. It takes care of the communication between Web-Based Enterprise Management (WBEM) and the Windows Management Instrumentation (WMI), which can call the Distributed Component Object Model (DCOM). For security reasons, WinRM must be activated and configured manually in Windows 10/11. Therefore, it depends heavily on the environment security in a domain or local network where we want to use WinRM. In most cases, one uses certificates or only specific authentication mechanisms to increase its security. By default, WinRM uses the TCP ports 5985 (HTTP) and 5986 (HTTPS).
Now I’m going to use NetExec to attack WinRM. The appearance of (Pwn3d!) is the sign that we can most likely execute system commands if we log in with the brute-forced user.
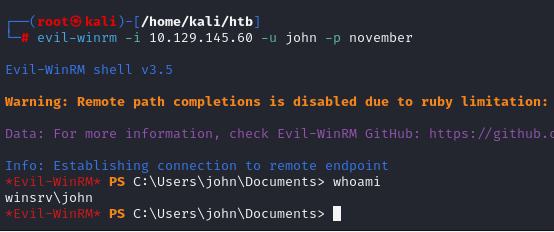
Another handy tool that we can use to communicate with the WinRM service is Evil-WinRM, which allows us to communicate with the WinRM service efficiently. If the login was successful, a terminal session is initialized using the Powershell Remoting Protocol (MS-PSRP), which simplifies the operation and execution of commands.
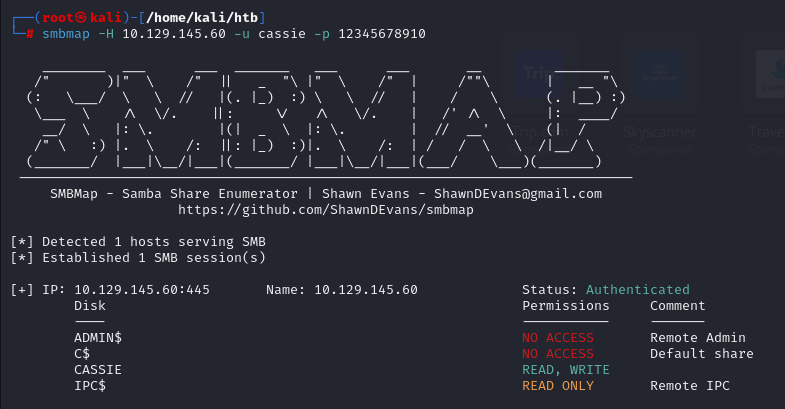
Since I’m already using netexec, I’ll continue using it to target another service, that is SMB. Of course, I’ve previously written an article about this service using tools like Hydra and crackmapexec, but today I’ll be using netexec instead.

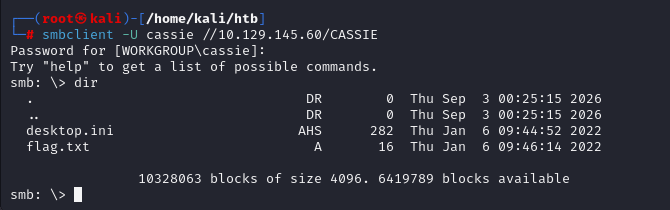
To communicate with the server via SMB, we can use tools like smbclient or smbmap. These tools will allow us to view the contents of the shares, upload, or download files if our privileges allow it.
Next, I’ll move on to two more services: RDP and SSH. In my previous article, Exploit Common Service Part 02, I introduced a tool for attacking RDP, right? This time, I’ll be using another tool that is more popular and more commonly used: Hydra.
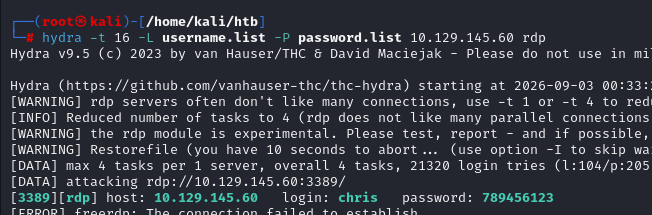
Linux offers different clients to communicate with the desired server using the RDP protocol. These include Remmina, xfreerdp, and many others. For our purposes, we will work with xfreerdp. Similarly, if you want to target SSH, you just need to replace RDP with SSH and run the command. I won’t be demonstrating this part.
Now, before wrapping up this post, I’d like to talk about a few techniques that I mentioned in my previous posts but haven’t explained yet.
Password Spraying:
Password spraying is a type of brute-force attack in which an attacker attempts to use a single password across many different user accounts. This technique can be particularly effective in environments where users are initialized with a default or standard password.
Of course, this technique can be very effective for finding passwords across a large number of users on the target system while avoiding account lockout mechanisms. However, these days, many sysadmins force users to change their passwords the first time they log in, which can effectively counter this technique. That said, it’s still worth trying, so don’t overlook it. I’ve seen that in large organizations such as universities, student accounts are often generated with the same default password. Among thousands of accounts, there will inevitably be students who barely pay attention to their university email unless they are specifically required to use it. Because of this, using a password list can still be extremely effective against targets like these.
Credential stuffing:
Credential stuffing is another type of brute-force attack in which an attacker uses stolen credentials from one service to attempt access on others. Since many users reuse their usernames and passwords across multiple platforms (such as email, social media, and enterprise systems), these attacks are sometimes successful. As I mentioned in the introduction, I’ve previously talked about finding leaked passwords, right? Let’s say you search through dark-web platforms and obtain a leaked file with the following format: user:pass, we can use hydra to perform a credential stuffing attack against an SSH service using the following syntax: hydra -C user_pass.list ssh://10.100.38.23
Default credentials:
Many systems such as routers, firewalls, and databases come with default credentials. While best practice dictates that administrators change these credentials during setup, they are sometimes left unchanged, posing a serious security risk. While several lists of known default credentials are available online, there are also dedicated tools that automate the process. One widely used example is the Default Credentials Cheat Sheet. In addition to publicly available lists and tools, default credentials can often be found in product documentation, which typically outlines the steps required to set up a service. While some devices and applications prompt the user to set a password during installation, others use a default – often weak password.
As mentioned above, developers have updated their products by forcing users to change their passwords during the setup process. However, this technique is still worth trying because you never know when you might come across an old system that has been running for years with default credentials such as admin:admin.
That’s where I’ll wrap up this post. It’s already gotten pretty long, and I don’t really have much more to add, so I’ll see you all in the next topic!