Exploit #05: Exploiting Common Services - Part 2
Introduction
In Part 01, we covered some basic concepts and also went into two services: FTP and SMB. I also mentioned that these are fundamentals you should understand well. They may not be advanced topics, but when you come across services like these, you’ll know what you need to do.
In the next part, we’ll cover a few more services before moving on to a new topic. Okay, let’s get into the main content.
Attacking DNS
I’m sure that if you’ve studied IT, you’ve heard of DNS before, right? It plays a pretty important and convenient role in today’s Internet. So, what exactly is DNS?
The Domain Name System (DNS) translates domain names (e.g., zed99.net) to the numerical IP addresses (e.g., 123.123.123.123). DNS is mostly UDP/53, but DNS will rely on TCP/53 more heavily as time progresses. DNS has always been designed to use both UDP and TCP port 53 from the start, with UDP being the default, and falls back to using TCP when it cannot communicate on UDP, typically when the packet size is too large to push through in a single UDP packet.
Most network applications today rely on DNS. Just imagine having to remember a long public IP address to configure an application. Instead, you can simply remember the domain name and configure the application using that domain name. Then, if the IP address changes, you only need to update it through the domain’s control panel. Because DNS is so widely used across the Internet today, attacks targeting a company’s DNS servers are also a serious threat that should not be overlooked.
Enumeration: I won’t be covering the enumeration process in this section, as I’ve already documented it in detail on my GitHub. That guide walks you through the enumeration phase, explains how to interact with an DNS service, and introduces the common tools you’ll use to enumerate and assess the service. Here, we’ll assume you’ve already completed the enumeration stage and focus on what comes next.
DNS Zone Transfer:
A DNS zone transfer is the process of copying a domain’s database records from a primary Domain Name System (DNS) server to a secondary server so both stay synchronized. Unless a DNS server is configured correctly (limiting which IPs can perform a DNS zone transfer), anyone can ask a DNS server for a copy of its zone information since DNS zone transfers do not require any authentication. In addition, the DNS service usually runs on a UDP port; however, when performing DNS zone transfer, it uses a TCP port for reliable data transmission.
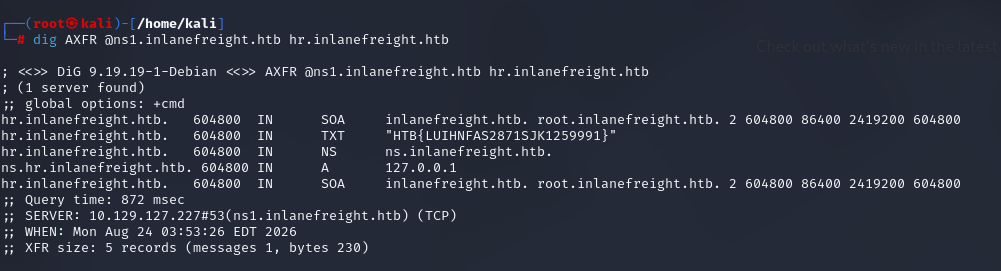
So, what happens if a DNS server is misconfigured to allow zone transfers? In this case, an attacker can take advantage of this vulnerability to transfer the entire DNS zone database to their machine. This allows them to map out the organization’s entire DNS namespace, giving them a much broader attack surface to work with. Now let’s move on to the hands-on section on DNS zone transfers. I’ll be using tools like dig to perform the zone transfer and using an HTB lab for this hands-on section.
For exploitation, we can use the dig utility with DNS query type AXFR option to dump the entire DNS namespaces from a vulnerable DNS server:
Subdomain Enumeration:
Once we’ve identified the target’s main domain, for example, zed99.net, the next step is to determine whether there are any other subdomains associated with it. Sometimes, there may be subdomains such as api.zed99.net that are used for API applications. So, our goal is to discover what other subdomains exist besides the main domain. To do this, we’ll need to perform subdomain enumeration, also known as subdomain brute-forcing.
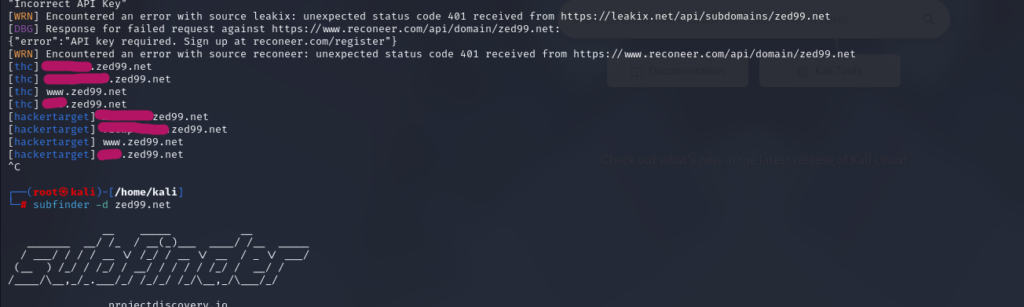
There are many tools that can help with this process. The most important thing is that you have a good wordlist to work with. Here, I’ll be using tools like Subfinder and Subbrute. You can also use ffuf for subdomain enumeration; you can check it out here.
Subfinder tool can scrape subdomains from open sources like DNSdumpster. Other tools like Sublist3r or ffuf can also be used to brute-force subdomains by supplying a pre-generated wordlist:
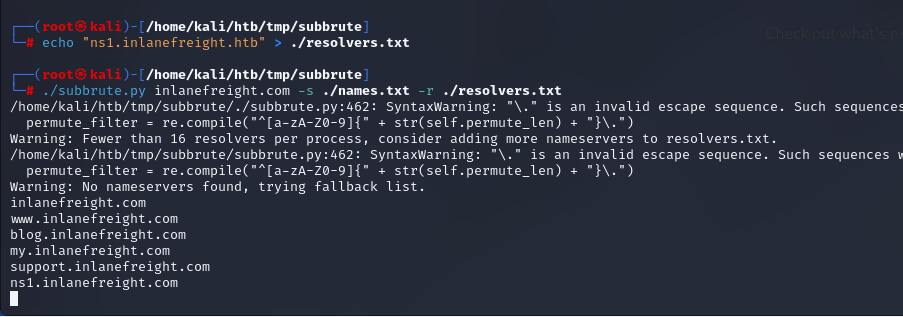
An alternative is a tool called Subbrute. This tool allows us to use self-defined resolvers and perform pure DNS brute-forcing attacks during internal penetration tests on hosts that do not have Internet access. With this tool, we rely more on the accuracy and quality of the wordlist rather than on information gathered from sources across the Internet.
inlanefreight.htb is the target domain for subdomain enumeration, while the resolvers.txt file contains the DNS resolvers that SubBrute will send its queries to. The names.txt file, on the other hand, contains a wordlist of potential subdomain names.
DNS Spoofing:
DNS spoofing is also referred to as DNS Cache Poisoning. This attack involves altering legitimate DNS records with false information so that they can be used to redirect online traffic to a fraudulent website.
Imagine that one day you log in to facebook.com using the same valid credentials you used yesterday, but today it keeps telling you that your credentials are incorrect. Looking at the front end, everything appears to be the Facebook website, but in reality, it’s a fake page created by an attacker and designed to look exactly like the real one.
So, how could this happen? You clearly entered the correct Facebook domain and didn’t click on any suspicious link to access the website. The main issue here could be DNS poisoning. In a corporate environment, there is usually a dedicated DNS server that client machines are configured to use, rather than having each client directly use public DNS servers such as 8.8.8.8 or 1.1.1.1. If that DNS server is compromised, an attacker could modify or create a DNS record for a domain such as facebook.com, but instead of pointing to Facebook’s legitimate IP address, the record would point to the attacker’s IP address. As a result, when users enter facebook.com, they could unknowingly be redirected to the attacker’s fake website – even though they entered the correct domain name.
That’s one scenario where the attacker has already compromised and taken control of the entire DNS server. There’s another scenario involving a Man-in-the-Middle (MITM) attack. In this case, an attacker could intercept the communication between a user and a DNS server and manipulate the DNS response, redirecting the user to a fraudulent destination instead of the legitimate one. From a local network perspective, an attacker can also perform DNS Cache Poisoning using MITM tools like Ettercap or Bettercap. I won’t be demoing this part, since there are already plenty of articles and resources covering these tools and techniques. So, feel free to do some Googling and explore them on your own. :v
Domain Takeovers:
Besides the techniques we’ve discussed, there’s one more technique that I think is much harder to pull off nowadays, especially against large organizations. However, it can still happen with smaller companies or startups. That technique is domain takeover. Domain takeover is registering a non-existent domain name to gain control over another domain. If attackers find an expired domain, they can claim that domain to perform further attacks such as hosting malicious content on a website or sending a phishing email leveraging the claimed domain.
Domain takeover is also possible with subdomains called subdomain takeover. A DNS’s canonical name (CNAME) record is used to map different domains to a parent domain. Many organizations use third-party services like AWS, GitHub, Akamai, Fastly, and other content delivery networks (CDNs) to host their content. In this case, they usually create a subdomain and make it point to those services.
The domain name (e.g., sub.target.com) uses a CNAME record to another domain (e.g., anotherdomain.com). Suppose the anotherdomain.com expires and is available for anyone to claim the domain since the target.com‘s DNS server has the CNAME record. In that case, anyone who registers anotherdomain.com will have complete control over sub.target.com until the DNS record is updated.
Attacking SMTP
SMTP stands for Simple Mail Transfer Protocol, and it is a protocol for delivering emails from clients to servers and from servers to other servers.
A mail server is a server that handles and delivers email over a network, usually over the Internet. A mail server can receive emails from a client device and send them to other mail servers. A mail server can also deliver emails to a client device. A client is usually the device where we read our emails (computers, smartphones, etc.). When we press the Send button in our email application, the program establishes a connection to an SMTP server on the network or Internet.
When we download emails to our email application, it will connect to a POP3 or IMAP4 server on the Internet, which allows the user to save messages in a server mailbox and download them periodically. By default, POP3 clients remove downloaded messages from the email server. This behavior makes it difficult to access email on multiple devices since downloaded messages are stored on the local computer. However, we can typically configure a POP3 client to keep copies of downloaded messages on the server. On the other hand, IMAP4 clients do not remove downloaded messages from the email server. This behavior makes it easy to access email messages from multiple devices.
Enumeration: I won’t be covering the enumeration process in this section, as I’ve already documented it in detail on my GitHub. That guide walks you through the enumeration phase, explains how to interact with an SMTP service, and introduces the common tools you’ll use to enumerate and assess the service. Here, we’ll assume you’ve already completed the enumeration stage and focus on what comes next.
Misconfigurations:
Email services use authentication to allow users to send emails and receive emails. A misconfiguration can happen when the SMTP service allows anonymous authentication or support protocols that can be used to enumerate valid usernames. SMTP has many commands that we can use to enumerate usernames, such as VRFY, EXPN, and RCPT TO. If we successfully enumerate valid usernames, we can attempt to password spray, brute-forcing, or guess a valid password. However, these commands do not always work. Depending on how the SMTP server is configured, the SMTP server may issue code 252 and confirm the existence of a user that does not exist on the system. A list of all SMTP response codes can be found here.
To be honest, nowadays it’s quite rare for companies to host their own email servers on-premises. Instead, they tend to use solutions such as Office 365, G Suite, etc. If a company does have an in-house mail server, the IT staff responsible for maintaining it are usually experienced; otherwise, the system would constantly run into issues.
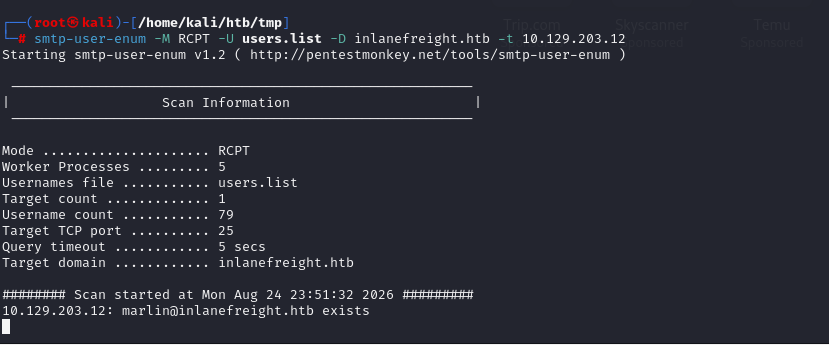
So, rather than manually enumerating users through each command via Telnet, I’d just recommend that you read through the process to understand how it works. I’m also too lazy to demo this part. However, I’ll recommend a few automated tools that you can use for SMTP user enumeration, that is smtp-user-enum. We can specify the enumeration mode with the argument -M followed by VRFY, EXPN, or RCPT, and the argument -U with a file containing the list of users we want to enumerate. Depending on the server implementation and enumeration mode, we need to add the domain for the email address with the argument -D. Finally, we specify the target with the argument -t. Using this tool will streamline the enumeration process, rather than having to Telnet into the SMTP server and manually enter each command to enumerate users.
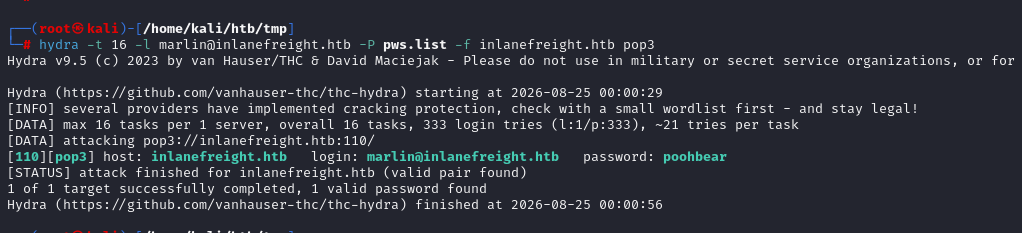
Once we have a valid username, the next step is to find the user’s password. However, with account lockout mechanisms in place, traditional brute-force attacks can be challenging nowadays. We can use Hydra to perform a password spray or brute force against email services such as SMTP, POP3, or IMAP4. First, we need to get a username and a password list and specify which service we want to attack. Let us see an example for POP3.
An open relay is a Simple Mail Transfer Protocol (SMTP) server, which is improperly configured and allows an unauthenticated email relay. Messaging servers that are accidentally or intentionally configured as open relays allow mail from any source to be transparently re-routed through the open relay server. This behavior masks the source of the messages and makes it look like the mail originated from the open relay server.
Now, let’s talk a little bit about open relay attacks. From an attacker’s standpoint, we can abuse open-relay for phishing by sending emails as non-existing users or spoofing someone else’s email. For example, imagine we are targeting an enterprise with an open relay mail server, and we identify they use a specific email address to send notifications to their employees. We can send a similar email using the same address and add our phishing link with this information.
Attacking RDP
Now, let’s talk about a very common remote access protocol: Microsoft RDP. Remote Desktop Protocol (RDP) is a proprietary protocol developed by Microsoft which provides a user with a graphical interface to connect to another computer over a network connection. It is also one of the most popular administration tools, allowing system administrators to centrally control their remote systems with the same functionality as if they were on-site
It’s not only used to remotely access machines within an internal network. If you use Shodan and search for port 3389, you’ll find quite a few systems exposing this port publicly so that users can conveniently connect to them instead of accessing internal servers through a VPN. Sometimes, this is simply due to network administrators being too lazy to set up a VPN; other times, these are Windows VPSs with public IP addresses. Exposing this port to the public Internet creates a fairly large attack surface and makes it a prime target for attackers looking to gain initial access to your server. By default, RDP uses port TCP/3389. Using Nmap, we can identify the available RDP service on the target host.
Misconfigurations:
Since RDP takes user credentials for authentication, one common attack vector against the RDP protocol is password guessing. Although it is not common, we could find an RDP service without a password if there is a misconfiguration.
One caveat on password guessing against Windows instances is that you should consider the client’s password policy. In many cases, a user account will be locked or disabled after a certain number of failed login attempts. In this case, we can perform a specific password guessing technique called Password Spraying. This technique works by attempting a single password for many usernames before trying another password, being careful to avoid account lockout.
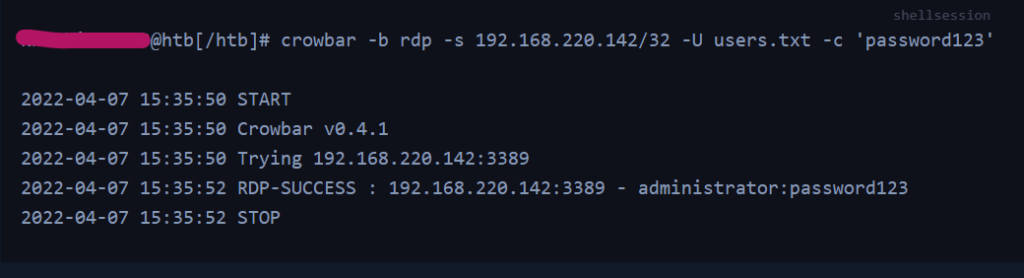
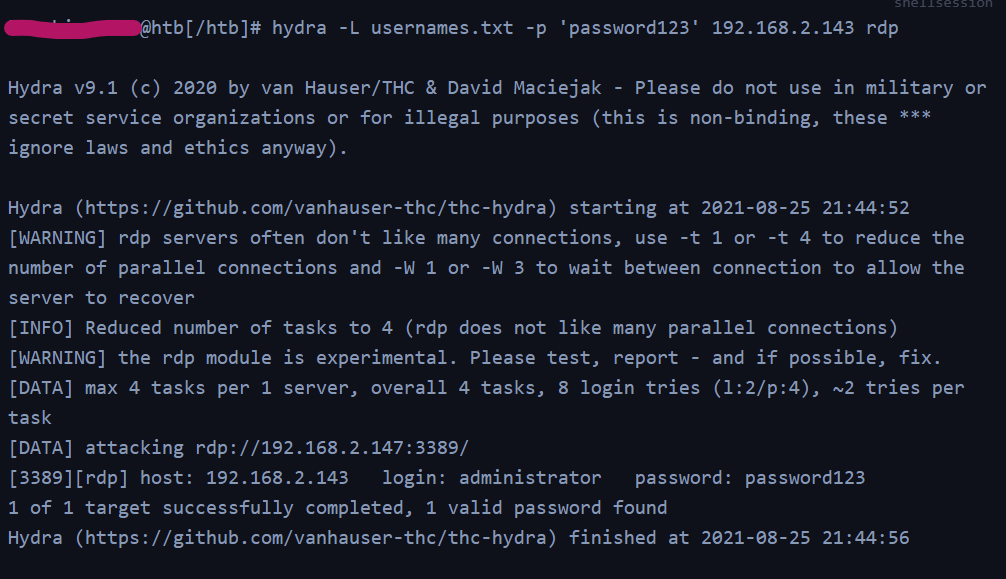
Using tools like Crowbar and Hydra, we can perform a password spraying or brute force attack against the RDP service.
RDP Pass-the-Hash (PtH):
Sometimes we can only dump the NT hash but fail to crack it. Does that mean we should just give up? Not this time. I’m going to talk about the Pass-the-Hash technique. In such a situation, I can use PtH to gain access to the target by using tools like xfreerdp.
However, nothing is ever that easy when we’re doing this. It’s not as simple as, “Okay, I don’t have the password, so I’ll just replace it with the NT hash as a parameter.” There are a few things we need to keep in mind when performing Pass-the-Hash over RDP:
Restricted Admin Mode, which is disabled by default, should be enabled on the target host; otherwise, we will be prompted with the following error:
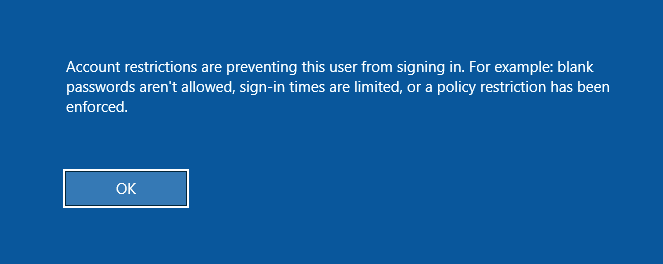
To do this, we need to modify the registry, and of course, you need certain privileges to modify the registry, such as being a local administrator or belonging to a group with permission to modify the registry. Suppose I’ve compromised an account that has permission to edit the registry. At this point, I’ll proceed to add a registry key DisableRestrictedAdmin (REG_DWORD) under HKEY_LOCAL_MACHINE\System\CurrentControlSet\Control\Lsa. It can be done using the following command:

Once the registry key is added, we can use xfreerdp with the option /pth to gain RDP access:
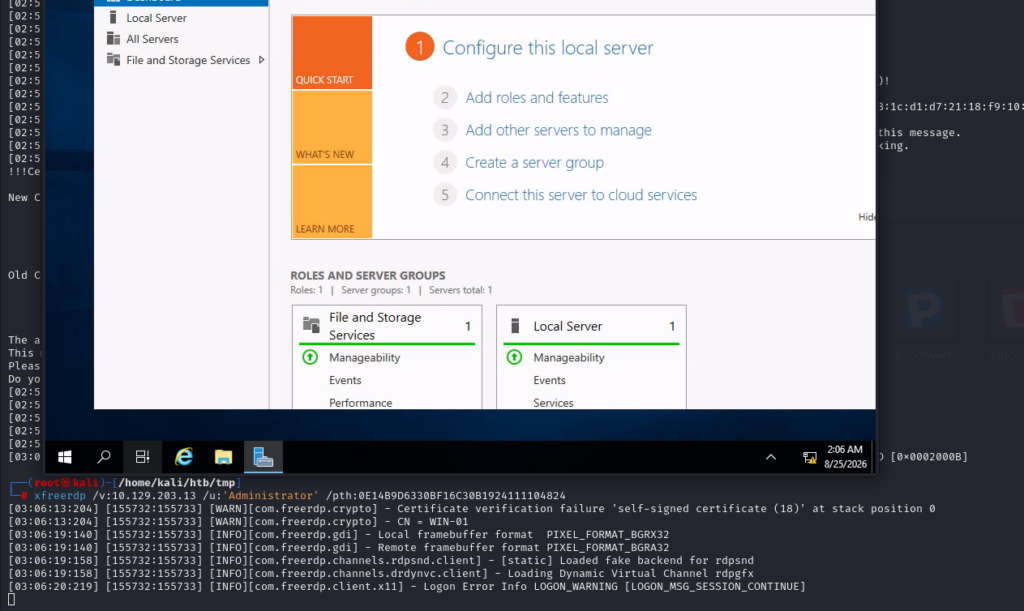
Keep in mind that this will not work against every Windows system we encounter, but it is always worth trying in a situation where we have an NTLM hash, know the user has RDP rights against a machine or set of machines, and GUI access would benefit us in some ways towards fulfilling the goal of our assessment.
Okay, I think I’ll wrap up Part 02 here. There’s actually one more service I wanted to cover, which is SQL databases, but I think I’ll make it a separate post rather than include it as a section in this Part 02 article. I’ll write that post soon, since SQL databases are also quite commonly encountered during pentest engagements.
Keep in mind that there are still many network services out there that I haven’t covered yet, such as SQL databases, as mentioned above, as well as SSH, SNMP, and so on. I’ll try to compile and write about these services whenever possible. Once again, the knowledge covered in these two articles isn’t really about exploiting the protocols themselves. For the most part, we’re simply taking advantage of misconfigurations to gain access to these services.
That doesn’t mean there aren’t vulnerabilities or CVEs associated with these protocols. You can simply search for the service name along with “CVE,” and you’ll find plenty of them. However, I won’t be covering those CVEs here, mainly because there are relatively few PoCs available that I could use to demonstrate them to you. You may encounter some of these service-related CVEs when working through lab rooms on TryHackMe or Hack The Box.
And now, see you in the next post!