R&E 05: Information Gathering - Website Part 1
Introduction
In the previous article, we stopped at gathering system information. I was thinking about writing more on that topic, but I decided instead to compile the commands into my GitHub repository so they remain available even if this website goes down someday (for example, if I forget to renew the hosting services).
Next, we’re going to gather information about another type of system—one that is highly visible and present in almost every organization. It serves as the company’s public face, but it also creates a large attack surface for potential attackers: the website.
So, what is website information gathering, and why do we need it?
Website information gathering is the process of collecting as much information as possible about a target website before attempting any deeper analysis or security testing. The goal is to understand how the website is built, what technologies it uses, how it is structured, and what potential entry points may exist.
Before you can assess or test a target website, you need to understand a great deal about it. This includes identifying the programming language it uses, determining whether it runs on a CMS such as WordPress or Drupal, discovering hidden directories, identifying related subdomains, and mapping potential entry points that may be relevant during a security assessment.
Imagine you’re an external attacker. You’re introverted, not particularly skilled at social engineering, phone calls, or crafting convincing emails. You’re much more comfortable behind a keyboard than interacting with people. In that situation, attempting to gain access through human-focused attacks may be difficult. A company’s public website, however, is often accessible to everyone and can become an attractive target for technical reconnaissance and testing. A successful compromise of a public-facing application can sometimes provide access to additional systems, services, or internal resources if network segmentation and security controls are not properly implemented. This is why organizations invest heavily in securing their web applications, continuously monitoring them, and reducing unnecessary exposure.
Types of Reconnaissance:
Active reconnaissance involves directly interacting with the target system. Because of this, you should be mindful of the amount of traffic you generate and the possibility of being detected during this phase. Common active reconnaissance techniques include: Port scanning, Vulnerability scanning, Network mapping, Banner grabbing,…The advantage of active reconnaissance is that it often provides more accurate and comprehensive information about the target environment. However, it also increases the likelihood of generating logs, alerts, or triggering defensive monitoring systems.
Passive reconnaissance focuses on gathering information without directly interacting with the target system. Instead, it relies heavily on publicly available information and third-party resources. Common passive reconnaissance sources include: WHOIS lookups, Search engine queries, Web archive analysis, Social media analysis, Public breach and exposure data,…This approach generally attracts much less attention because no direct communication with the target occurs. However, the information collected may not be as complete, up-to-date, or detailed as what can be obtained through active reconnaissance.
Okay, let’s go through a few common reconnaissance techniques. Some techniques, such as scanning, won’t be covered in detail here because I’ve already written a separate article about Nmap. You can simply apply the concepts and commands from that article when performing your own assessments.
WHOIS
WHOIS is a widely used query and response protocol designed to access databases that store information about registered internet resources. Primarily associated with domain names, WHOIS can also provide details about IP address blocks and autonomous systems. Think of it as a giant phonebook for the internet, letting you look up who owns or is responsible for various online assets.
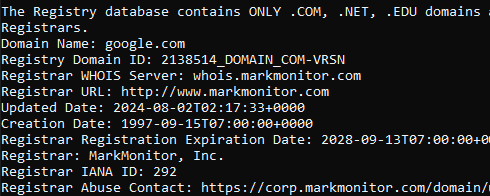
Each WHOIS record typically contains the following information:
Domain Name: The domain name itself (e.g., example.com)Registrar: The company where the domain was registered (e.g., GoDaddy, Namecheap)Registrant Contact: The person or organization that registered the domain.Administrative Contact: The person responsible for managing the domain.Technical Contact: The person handling technical issues related to the domain.Creation and Expiration Dates: When the domain was registered and when it’s set to expire.Name Servers: Servers that translate the domain name into an IP address.
That raises an interesting question about WHOIS. To be honest, ever since I started learning cybersecurity, I’ve heard people talk about WHOIS quite frequently. However, it seems that WHOIS was far more useful in the past than it is today. Nowadays, most domain registrars offer privacy protection services at a very low cost—or even include them by default—which means much of the registrant information is no longer publicly visible.
So, what is the value of WHOIS today? Even though WHOIS records are often heavily redacted, they can still provide useful information, such as:
- Domain registration and expiration dates
- Registrar information
- Name server details
- Registration status and domain lifecycle information
- Historical ownership data (through third-party historical WHOIS services)
- Clues that can be correlated with other reconnaissance sources
For defenders and security researchers, WHOIS can also help identify domains that belong to the same organization, track infrastructure changes over time, or investigate suspicious domains during incident response.
For example, imagine an email claiming to be from a bank is sent to users within your organization. The email contains a link asking recipients to update their account information or perform some other action. Using WHOIS data, we might discover that the domain behind that link was registered only recently—perhaps just a few days ago. Additionally, the domain’s name servers may be associated with a known bulletproof hosting provider that has a history of being abused for malicious activities.
At that point, we already have several indicators that should raise suspicion. While none of these factors alone prove that the email is malicious, the combination of a newly registered domain, questionable hosting infrastructure, and a request for sensitive user actions is often enough to justify a closer investigation and treat the email as potentially malicious until proven otherwise.
Hand-on:
Now let’s move on to actually using WHOIS.
To perform a WHOIS lookup, we generally have two options:
Use a web-based WHOIS service directly from your browser.
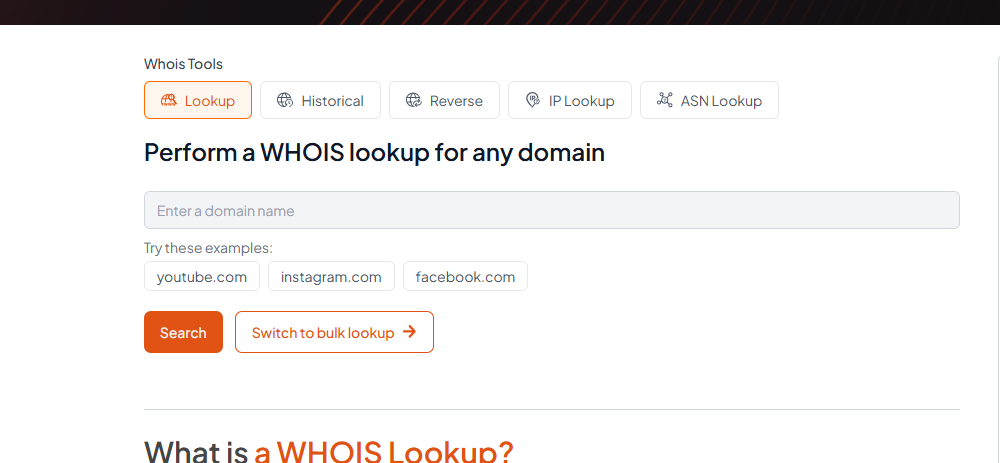
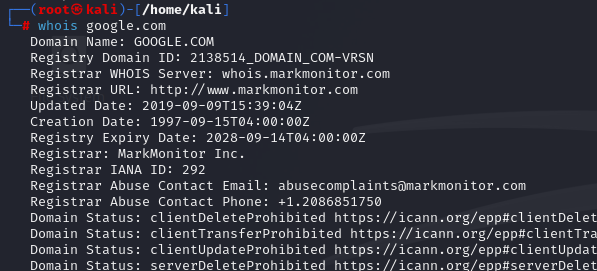
Install the WHOIS binary/tool locally on your machine and perform lookups from the command line.
DNS (Domain Name System)
Well, when it comes to DNS, I probably won’t go through the concepts again here. I’ve already covered them elsewhere, so feel free to check the GitHub link for a more explanation and related techniques.
Why DNS Matters for Web Recon?
DNS is not merely a technical protocol for translating domain names; it’s a critical component of a target’s infrastructure that can be leveraged to uncover vulnerabilities and gain access during a penetration test:
Uncovering Assets: DNS records can reveal a wealth of information, including subdomains, mail servers, and name server records. For instance, aCNAMErecord pointing to an outdated server (dev.example.comCNAMEoldserver.example.net) could lead to a vulnerable system.Mapping the Network Infrastructure: You can create a comprehensive map of the target’s network infrastructure by analysing DNS data. For example, identifying the name servers (NSrecords) for a domain can reveal the hosting provider used, while anArecord forloadbalancer.example.comcan pinpoint a load balancer. This helps you understand how different systems are connected, identify traffic flow, and pinpoint potential choke points or weaknesses that could be exploited during a penetration test.Monitoring for Changes: Continuously monitoring DNS records can reveal changes in the target’s infrastructure over time. For example, the sudden appearance of a new subdomain (vpn.example.com) might indicate a new entry point into the network, while aTXTrecord containing a value like_1password=...strongly suggests the organization is using 1Password, which could be leveraged for social engineering attacks or targeted phishing campaigns.
Subdomain Enumeration:
When exploring DNS records, we’ve primarily focused on the main domain (e.g., example.com) and its associated information. However, beneath the surface of this primary domain lies a potential network of subdomains. These subdomains are extensions of the main domain, often created to organise and separate different sections or functionalities of a website. For instance, a company might use blog.example.com for its blog, shop.example.com for its online store, or mail.example.com for its email services.
Subdomains often host valuable information and resources that aren’t directly linked from the main website. This can include:
Development and Staging Environments: Companies often use subdomains to test new features or updates before deploying them to the main site. Due to relaxed security measures, these environments sometimes contain vulnerabilities or expose sensitive information.Hidden Login Portals: Subdomains might host administrative panels or other login pages that are not meant to be publicly accessible. Attackers seeking unauthorised access can find these as attractive targets.Legacy Applications: Older, forgotten web applications might reside on subdomains, potentially containing outdated software with known vulnerabilities.Sensitive Information: Subdomains can inadvertently expose confidential documents, internal data, or configuration files that could be valuable to attackers.
Subdomain enumeration can also be divided into two main approaches: active subdomain enumeration and passive subdomain enumeration.
- Active Subdomain Enumeration: This involves directly interacting with the target domain’s DNS servers to uncover subdomains. One method is attempting a
DNS zone transfer, where a misconfigured server might inadvertently leak a complete list of subdomains. However, due to tightened security measures, this is rarely successful. A more common active technique isbrute-force enumeration, which involves systematically testing a list of potential subdomain names against the target domain. Tools likednsenum,ffuf, andgobustercan automate this process, using wordlists of common subdomain names or custom-generated lists based on specific patterns. - Passive Subdomain Enumeration: This relies on external sources of information to discover subdomains without directly querying the target’s DNS servers. One valuable resource is
Certificate Transparency (CT) logs, public repositories of SSL/TLS certificates. These certificates often include a list of associated subdomains in their Subject Alternative Name (SAN) field, providing a treasure trove of potential targets. Another passive approach involves utilisingsearch engineslike Google or DuckDuckGo. By employing specialised search operators (e.g.,site:), you can filter results to show only subdomains related to the target domain.
Subdomain Bruteforcing Hand-on:
I probably won’t go through this concepts. I’ve already covered them in my Github, so feel free to check the GitHub link for more related techniques.
Virtual Hosts:
Once the DNS directs traffic to the correct server, the web server configuration becomes crucial in determining how the incoming requests are handled. Web servers like Apache, Nginx, or IIS are designed to host multiple websites or applications on a single server. They achieve this through virtual hosting, which allows them to differentiate between domains, subdomains, or even separate websites with distinct content.
Types of Virtual Hosting:
Name-Based Virtual Hosting: This method relies solely on theHTTP Host headerto distinguish between websites. It is the most common and flexible method, as it doesn’t require multiple IP addresses. It’s cost-effective, easy to set up, and supports most modern web servers. However, it requires the web server to support name-basedvirtual hostingand can have limitations with certain protocols likeSSL/TLS.IP-Based Virtual Hosting: This type of hosting assigns a unique IP address to each website hosted on the server. The server determines which website to serve based on the IP address to which the request was sent. It doesn’t rely on theHost header, can be used with any protocol, and offers better isolation between websites. Still, it requires multiple IP addresses, which can be expensive and less scalable.Port-Based Virtual Hosting: Different websites are associated with different ports on the same IP address. For example, one website might be accessible on port 80, while another is on port 8080.Port-based virtual hostingcan be used when IP addresses are limited, but it’s not as common or user-friendly asname-based virtual hostingand might require users to specify the port number in the URL.
Server VHost Lookup:
Browser Requests a Website: When you enter a domain name (e.g.,www.inlanefreight.com) into your browser, it initiates an HTTP request to the web server associated with that domain’s IP address.Host Header Reveals the Domain: The browser includes the domain name in the request’sHostheader, which acts as a label to inform the web server which website is being requested.Web Server Determines the Virtual Host: The web server receives the request, examines theHostheader, and consults its virtual host configuration to find a matching entry for the requested domain name.Serving the Right Content: Upon identifying the correct virtual host configuration, the web server retrieves the corresponding files and resources associated with that website from its document root and sends them back to the browser as the HTTP response.

DNS Zone Transfers:
DNS zone transfers. This mechanism, designed for replicating DNS records between name servers, can inadvertently become a goldmine of information for prying eyes if misconfigured.
A DNS zone transfer is essentially a wholesale copy of all DNS records within a zone (a domain and its subdomains) from one name server to another. This process is essential for maintaining consistency and redundancy across DNS servers. However, if not adequately secured, unauthorised parties can download the entire zone file, revealing a complete list of subdomains, their associated IP addresses, and other sensitive DNS data.
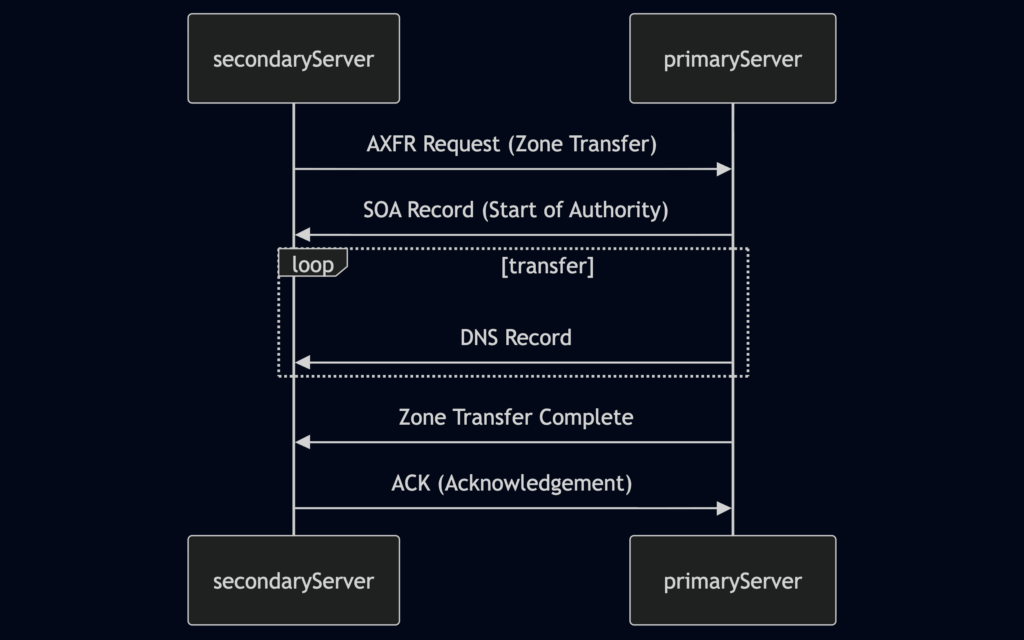
Zone Transfer Request (AXFR): The secondary DNS server initiates the process by sending a zone transfer request to the primary server. This request typically uses the AXFR (Full Zone Transfer) type.SOA Record Transfer: Upon receiving the request (and potentially authenticating the secondary server), the primary server responds by sending its Start of Authority (SOA) record. The SOA record contains vital information about the zone, including its serial number, which helps the secondary server determine if its zone data is current.DNS Records Transmission: The primary server then transfers all the DNS records in the zone to the secondary server, one by one. This includes records like A, AAAA, MX, CNAME, NS, and others that define the domain’s subdomains, mail servers, name servers, and other configurations.Zone Transfer Complete: Once all records have been transmitted, the primary server signals the end of the zone transfer. This notification informs the secondary server that it has received a complete copy of the zone data.Acknowledgement (ACK): The secondary server sends an acknowledgement message to the primary server, confirming the successful receipt and processing of the zone data. This completes the zone transfer process.
The information gleaned from an unauthorised zone transfer can be invaluable to an attacker. It reveals a comprehensive map of the target’s DNS infrastructure, including:
Subdomains: A complete list of subdomains, many of which might not be linked from the main website or easily discoverable through other means. These hidden subdomains could host development servers, staging environments, administrative panels, or other sensitive resources.IP Addresses: The IP addresses associated with each subdomain, providing potential targets for further reconnaissance or attacks.Name Server Records: Details about the authoritative name servers for the domain, revealing the hosting provider and potential misconfigurations.
You can use the dig command to request a zone transfer, feel free to check the GitHub link.
Certificate Transparency Logs:
Certificate Transparency (CT) logs are public, append-only ledgers that record the issuance of SSL/TLS certificates. Whenever a Certificate Authority (CA) issues a new certificate, it must submit it to multiple CT logs. Independent organisations maintain these logs and are open for anyone to inspect.
Think of CT logs as a global registry of certificates. They provide a transparent and verifiable record of every SSL/TLS certificate issued for a website. This transparency serves several crucial purposes:
Early Detection of Rogue Certificates: By monitoring CT logs, security researchers and website owners can quickly identify suspicious or misissued certificates. A rogue certificate is an unauthorized or fraudulent digital certificate issued by a trusted certificate authority. Detecting these early allows for swift action to revoke the certificates before they can be used for malicious purposes.Accountability for Certificate Authorities: CT logs hold CAs accountable for their issuance practices. If a CA issues a certificate that violates the rules or standards, it will be publicly visible in the logs, leading to potential sanctions or loss of trust.Strengthening the Web PKI (Public Key Infrastructure): The Web PKI is the trust system underpinning secure online communication. CT logs help to enhance the security and integrity of the Web PKI by providing a mechanism for public oversight and verification of certificates.
How Certificate Transparency Logs Work? You can read at this link.
Certificate Transparency logs offer a unique advantage in subdomain enumeration compared to other methods. Unlike brute-forcing or wordlist-based approaches, which rely on guessing or predicting subdomain names, CT logs provide a definitive record of certificates issued for a domain and its subdomains. This means you’re not limited by the scope of your wordlist or the effectiveness of your brute-forcing algorithm. Instead, you gain access to a historical and comprehensive view of a domain’s subdomains, including those that might not be actively used or easily guessable.
Furthermore, CT logs can unveil subdomains associated with old or expired certificates. These subdomains might host outdated software or configurations, making them potentially vulnerable to exploitation.
Searching CT Logs:
There are two popular ways to search Certificate Transparency (CT) logs: using Censys or crt.sh.
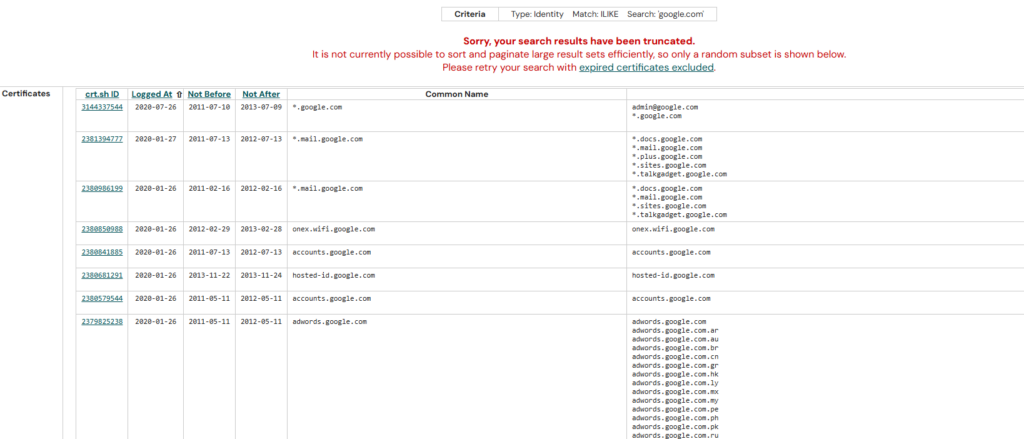
I’ll start with crt.sh first. Simply navigate to crt.sh:
From there, you can search for a domain name and review the certificates that have been issued for it. This often reveals subdomains that may not be easily discoverable through other reconnaissance techniques.
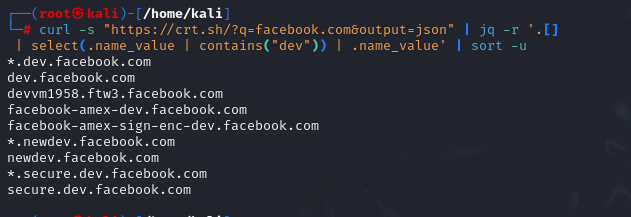
While crt.sh offers a convenient web interface, you can also leverage its API for automated searches directly from your terminal. Let’s see how to find all ‘dev’ subdomains on facebook.com using curl and jq:
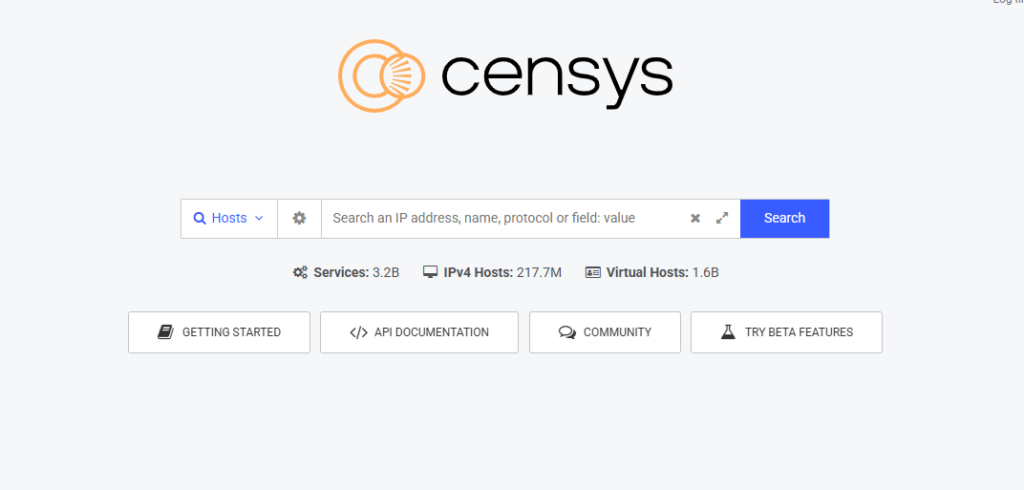
Censys also provides a web-based interface, making it easy to search for certificate and infrastructure data. Simply visit: Censys
Then enter the domain you want to investigate into the search bar. Censys will return information related to that domain, including certificates, subdomains, hosts, services, and other internet-facing assets that it has observed. This can be a valuable source of information during the reconnaissance phase.
Fingerprinting
Fingerprinting focuses on extracting technical details about the technologies powering a website or web application. Similar to how a fingerprint uniquely identifies a person, the digital signatures of web servers, operating systems, and software components can reveal critical information about a target’s infrastructure and potential security weaknesses. This knowledge empowers attackers to tailor attacks and exploit vulnerabilities specific to the identified technologies.
Fingerprinting serves as a cornerstone of web reconnaissance for several reasons:
Targeted Attacks: By knowing the specific technologies in use, attackers can focus their efforts on exploits and vulnerabilities that are known to affect those systems. This significantly increases the chances of a successful compromise.Identifying Misconfigurations: Fingerprinting can expose misconfigured or outdated software, default settings, or other weaknesses that might not be apparent through other reconnaissance methods.Prioritising Targets: When faced with multiple potential targets, fingerprinting helps prioritise efforts by identifying systems more likely to be vulnerable or hold valuable information.Building a Comprehensive Profile: Combining fingerprint data with other reconnaissance findings creates a holistic view of the target’s infrastructure, aiding in understanding its overall security posture and potential attack vectors.
Below are some common techniques used for web server enumeration and technology fingerprinting.
The goal of these techniques is to identify the technologies, frameworks, software versions, and infrastructure components that a website is using. This information can help us better understand the target environment and may reveal potential areas that require further investigation during a security assessment.
Banner Grabbing: Banner grabbing involves analysing the banners presented by web servers and other services. These banners often reveal the server software, version numbers, and other details.Analysing HTTP Headers: HTTP headers transmitted with every web page request and response contain a wealth of information. TheServerheader typically discloses the web server software, while theX-Powered-Byheader might reveal additional technologies like scripting languages or frameworks.Probing for Specific Responses: Sending specially crafted requests to the target can elicit unique responses that reveal specific technologies or versions. For example, certain error messages or behaviours are characteristic of particular web servers or software components.Analysing Page Content: A web page’s content, including its structure, scripts, and other elements, can often provide clues about the underlying technologies. There may be a copyright header that indicates specific software being used, for example.
A variety of tools exist that automate the fingerprinting process, combining various techniques to identify web servers, operating systems, content management systems, and other technologies: Wappalyzer, BuiltWith, WhatWeb, Nmap, Netcraft, wafw00f,….
Hand-on:
Banner Grabbing
Our first step is to gather information directly from the web server itself. We can do this using the curl command with the -I flag (or --head) to fetch only the HTTP headers, not the entire page content.
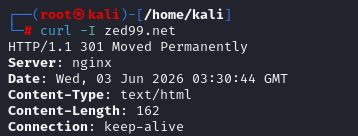
The output will include the server banner, which may reveal the web server software being used. However, in this example, you won’t see the exact version because the system administrator has configured the server to hide certain information from the response headers.
In some cases, administrators may even remove the Server header entirely. Because of this, using curl to inspect response headers will not always provide the information we’re looking for. While it can be a quick and useful technique, its effectiveness depends on how much information the target server chooses to expose.
In real-world environments, you’ll often encounter defensive measures like these. Many headers that could reveal useful information about the underlying technology stack are commonly removed or sanitized by administrators. As a result, identifying the platform or technologies in use often requires a bit more investigation and a different mindset. Rather than relying solely on HTTP headers, you may need to gather clues from multiple sources and correlate them together.
One technique I commonly use is simply viewing the page source in the browser. A quick look at the HTML, JavaScript, CSS paths, comments, metadata, or static asset locations can often provide strong hints about whether the site is running a CMS, a specific framework, or a custom application. (I’ll probably cover CMS identification in a separate article)
Web Application Firewalls (WAFs) are security solutions designed to protect web applications from various attacks. Before proceeding with further fingerprinting, it’s crucial to determine if the target website employs a WAF, as it could interfere with our probes or potentially block our requests. To detect the presence of a WAF, we’ll use the wafw00f tool: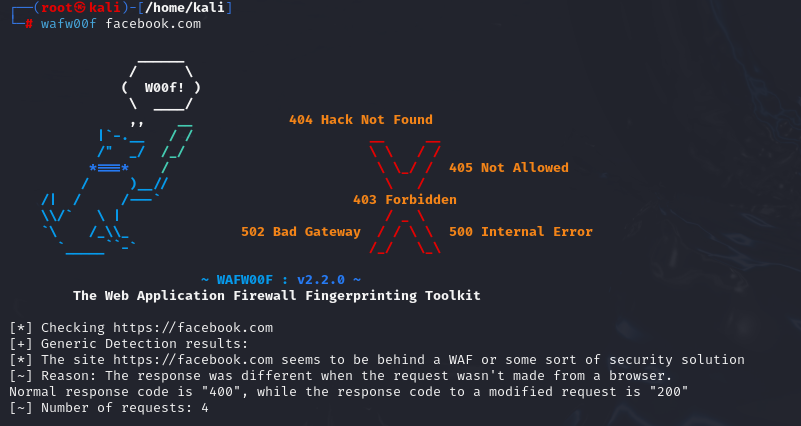
However, I should point out that tools will not always produce accurate results. During my own testing, I evaluated two different systems that were both protected by a WAF. The results were quite inconsistent: one site was reported as not using a WAF at all, while the other was correctly identified as having a WAF, but the tool failed to determine which specific WAF product was in use.
This highlights an important lesson: fingerprinting tools should be treated as a source of clues rather than absolute truth. Modern security solutions often hide identifying information, use custom configurations, or sit behind additional layers such as CDNs and reverse proxies, making accurate detection more difficult.
Because of this, it is always a good idea to verify tool output manually and correlate findings from multiple sources before drawing conclusions about the technologies protecting a target.
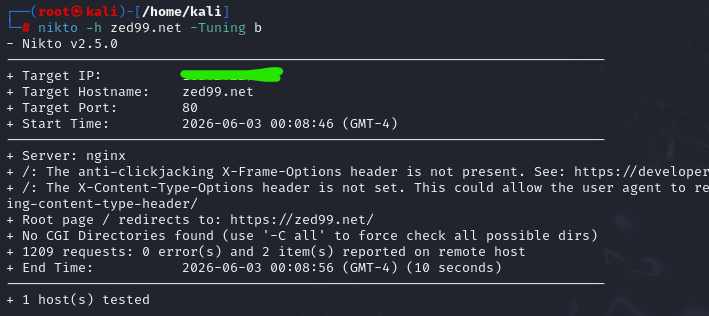
Nikto:
Nikto is a powerful web scanning tool. Its primary purpose is vulnerability assessment, helping identify common web server misconfigurations, exposed files, outdated software, and other security issues. However, Nikto also provides fingerprinting capabilities that can give us a general overview of the technology stack used by a website.
To scan target website using Nikto, only running the fingerprinting modules, execute the following command with The -Tuning b flag that tells Nikto to only run the Software Identification modules.
Okay, I think this article has become quite long already, so I’ll stop Part 1 here. I’ll try to publish Part 2 as soon as possible to cover additional techniques and topics that we haven’t discussed yet.
So far, we’ve looked at several fundamental website reconnaissance concepts, including information gathering methodologies, WHOIS, DNS-related resources, subdomain enumeration, Certificate Transparency logs, and technology fingerprinting. These techniques form a solid foundation for understanding a target’s attack surface before moving on to deeper analysis.