
Nmap #01
This section will give a brief introduction to Nmap and cover the most commonly used basic commands for enumerating and scanning a target.
Intro
Information gathering (enumeration and scanning are sub-categories of information gathering) is a critical phase in the attack chain. You can’t do much without knowing details about the target. Even if you have a sophisticated piece of malware that can evade detection, if you don’t understand your target, that malware will still end up as just a file on your computer.
So do people say Information gathering is the key to success? You could say that. The more information we have, the easier it will be for us to find attack vectors. There are plenty of tools out there to help with this, or you can write your own (Hmm, IMO, don’t reinvent the wheel). Many scanning tools simplify and speed up the process, so learn about them and use them effectively. One important note: there will be times when you get stuck and want to shout that these tools are trash. If that’s you, stop and spend a few hours before running your information-gathering phase to study the services, how they work, and what they’re meant for — doing so can save you hours or even days in reaching your goal and gaining access to the system.
Okay, to get to the point — as mentioned, there are plenty of initial tools for network enumeration like masscan, nmap, etc. And I’ll pick nmap. Hmm, why? Just Google it or check Reddit — you’ll find dozens of answers, so I won’t explain that here.
About Nmap
Let’s talk a little bit about Nmap. Network Mapper (Nmap) is an open-source network analysis and security auditing tool written in C, C++, Python, and Lua. It is designed to scan networks and identify which hosts are available on the network using raw packets, and services and applications, including the name and version, where possible. It can also identify the operating systems and versions of these hosts. Besides other features, Nmap also offers scanning capabilities that can determine if packet filters, firewalls, or intrusion detection systems (IDS) are configured as needed.
There are many use cases for Nmap, including: Audit the security aspects of networks, Simulate penetration tests, Network mapping, Identify open ports,…
I won’t go too deep into explaining Nmap, as I mentioned in my “About Me” section. I tend to forget things if I don’t use them for a while — especially command structures and parameter flags. So, most of my posts are just my way of summarizing and keeping the most commonly used use cases in one place. For everything else, I’ll probably just revisit the official Nmap website… or simply ask GPT :v
Host discovery
Host – discovery: When we need to conduct an internal penetration test for the entire network of a company, for example, then we should, first of all, get an overview of which systems are online that we can work with. To actively discover such systems on the network, we can use various Nmap host discovery options. There are many options Nmap provides to determine whether our target is alive or not. The most effective host discovery method is to use ICMP echo requests, which we will look into
sudo nmap 10.129.2.0/24 -sn -oA [filename_to_store]
sudo nmap -sn -oA [filename] -iL hosts.lst
-sn: Disables port scanning.
-oA: Stores the results in all formats starting with the
name.
-iL: Performs defined scans against targets in provided
‘hosts.lst’ list.
There are additional flags to give a more comprehensive and accurate view when performing host discovery:
sudo nmap 10.129.2.18 -sn -oA host -PE –packet-trace
sudo nmap 10.129.2.18 -sn -oA host -PE –reason
Nmap does indeed detect whether the host is alive or not through the ARP request and ARP reply alone. To disable ARP requests and scan our target with the desired ICMP echo requests, we can disable ARP pings by setting the “–disable-arp-ping” option. Then we can scan our target again and look at the packets sent and received.
sudo nmap 10.129.2.18 -sn -oA host -PE –packet-trace –disable-arp-ping
-PE: Performs the ping scan by using ‘ICMP Echo requests’
against the target.
–packet-trace: Shows
all packets sent and received
–reason: Displays the reason for specific result.
Discovering open TCP/UDP port
After we have found out that our target is alive, we want to get a more accurate picture of the system. The information we need includes: Open ports and its services, Service versions, Information that the services provided, Operating system.
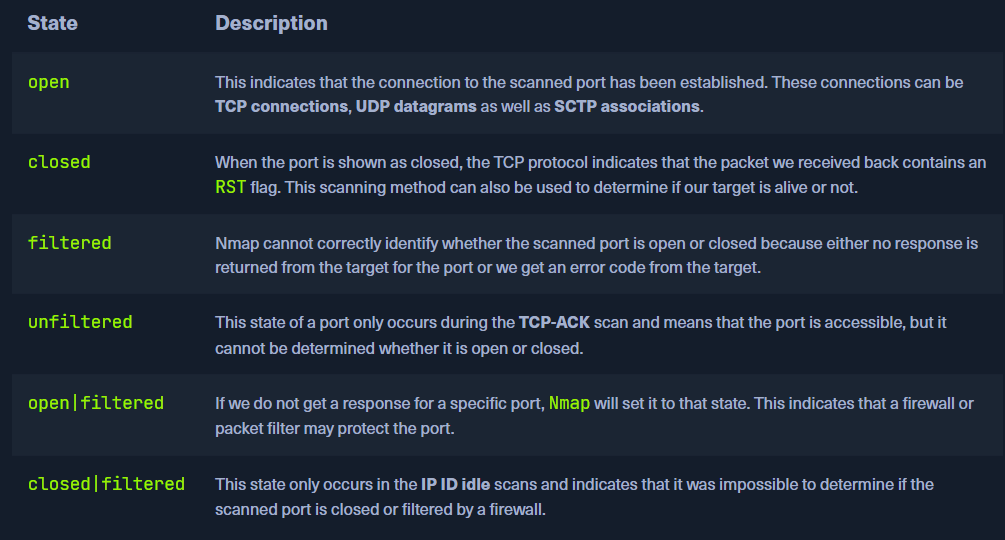
There are a total of 6 different states for a scanned port we can obtain:
By default, Nmap scans the top 1000 TCP ports with the SYN scan (-sS). This SYN scan is set only to default when we run it as root because of the socket permissions required to create raw TCP packets. Otherwise, the TCP scan (-sT) is performed by default. This means that if we do not define ports and scanning methods, these parameters are set automatically. We can define the ports one by one (-p 22,25,80,139,445), by range (-p 22-445), by top ports (–top-ports=10) from the Nmap database that have been signed as most frequent, by scanning all ports (-p-) but also by defining a fast port scan, which contains top 100 ports (-F).
sudo nmap 10.129.2.28 –top-ports=10
sudo nmap 10.129.2.28 -p 139 –packet-trace -n –disable-arp-ping -Pn
-p 139: Scans only the specified port.
–packet-trace: Shows all packets sent and received.
-n: Disables DNS resolution.
–disable-arp-ping: Disables ARP ping.
-Pn: Disables ICMP Echo requests.
Some system administrators sometimes forget to filter the UDP ports in addition to the TCP ones. Since UDP is a stateless protocol and does not require a three-way handshake like TCP. We do not receive any acknowledgment. Consequently, the timeout is much longer, making the whole UDP scan (-sU) much slower than the TCP scan (-sS).
sudo nmap 10.129.2.28 -F -sU
-F: Scans top 100 ports.
-sU: Performs a UDP scan.
Services enumeration
Another handy method for scanning ports is the -sV option which is used to get additional available information from the open ports. This method can identify versions, service names, and details about our target. Once the scan is complete, we will see all TCP ports with the corresponding service and their versions that are active on the system.
Primarily, Nmap looks at the banners of the scanned ports and prints them out. If it cannot identify versions through the banners, Nmap attempts to identify them through a signature-based matching system, but this significantly increases the scan’s duration. One disadvantage to Nmap’s presented results is that the automatic scan can miss some information because sometimes Nmap does not know how to handle it. Let us look at an example of this.
sudo nmap 10.129.2.28 -p- -sV -v
sudo nmap 10.129.2.28 -Pn -n –disable-arp-ping –packet-trace -p 445 –reason -sV
Nmap Scripting Engine
Nmap Scripting Engine (NSE) is another handy feature of Nmap. It provides us with the possibility to create scripts in Lua for interaction with certain services. There are a total of 14 categories into which these scripts can be divided. We have several ways to define the desired scripts in Nmap:
sudo nmap <target> -sC
sudo nmap <target> –script <category>
sudo nmap <target> –script <script-name>,<script-name>,…
sudo nmap 10.129.2.28 -p 25 –script banner,smtp-commands
sudo nmap 10.129.2.28 -p 80 -sV –script vuln
Nmap also gives us the ability to scan our target with the aggressive option (-A). This scans the target with multiple options as service detection (-sV), OS detection (-O), traceroute (–traceroute), and with the default NSE scripts (-sC).
sudo nmap 10.129.2.28 -p 80 -A
Preformence
When Nmap sends a packet, it takes some time (Round-Trip-Time – RTT) to receive a response from the scanned port. Generally, Nmap starts with a high timeout (–min-RTT-timeout) of 100ms. setting the initial RTT timeout (–initial-rtt-timeout) to too short a time period may cause us to overlook hosts.
sudo nmap 10.129.2.0/24 -F –initial-rtt-timeout 50ms –max-rtt-timeout 100ms
Another way to increase scan speed is by specifying the retry rate of sent packets (–max-retries). The default value is 10, but we can reduce it to 0. This means if Nmap does not receive a response for a port, it won’t send any more packets to that port and will skip it.
sudo nmap 10.129.2.0/24 -F –max-retries 0
During a white-box penetration test, we may get whitelisted for the security systems to check the systems in the network for vulnerabilities and not only test the protection measures. If we know the network bandwidth, we can work with the rate of packets sent, which significantly speeds up our scans with Nmap. When setting the minimum rate (–min-rate <number>) for sending packets, we tell Nmap to simultaneously send the specified number of packets. It will attempt to maintain the rate accordingly.
sudo nmap 10.129.2.0/24 -F -oN fileout.minrate300 –min-rate 300
Well, I think this is enough content for Section 01 for now. In future posts I’ll try to cover techniques to evade firewalls and IDS like decoys ,and other scan types such as ACK scan, Xmas scan, and so on.