Using cURL for basic web.....exploitation

GET Requests Using cURL

Applications like the browsers we use every day to access websites communicate with web servers using HTTP. Think of HTTP as the language for asking a server for resources (pages, images, JSON data) and getting answers back.

If we want to access a website, our browser sends an HTTP request to the web server. If the request is valid, the server replies with an HTTP response that contains the data needed to display the website. So in a case where, for example, I don’t have a browser, or I’m on a pure CLI server and want to make web requests, the simplest way is to use cURL.

cURL (client URL) is a command-line tool for crafting HTTP requests and viewing raw responses. It’s ideal when you need precision or when GUI tools aren’t available.

Okay, now let’s try using cURL in the most basic way. The first command will be: curl http|https://SERVER_IP/

For example: curl https://google.com

curl sends an HTTP GET request for the site’s home page. An HTTP response is received containing the body, which is then printed in the terminal. Because this is a terminal, instead of rendering the webpage, what you’ll see is the text representation of the page in HTML. Note that above, I’m using HTTPS. In this case, if the SSL/TLS certificates are valid, there will be no errors. If you are using self-signed certificates, then add the -k parameter.

POST Requests and Using Cookies and Sessions

When we don’t specify any parameters, by default curl uses the GET method. Now let’s move on to using POST.

With the POST method, the request includes a body payload. I’ll take an example to make it easier to understand: let’s say there is a /login endpoint. After we know the values of the username and password fields are user and pass (which we can see by using curl above to retrieve the source of the login index page), I will use curl to log in to the application.

Hmm, some of you might think: why use the CLI to log in to an application? The purpose here is to obtain the session cookie so that we can perform a series of actions after logging in—such as listing users if this account has the permission, or exploiting various types of web attacks like submitting reports or similar actions that can only be performed after login.

I think some of you might ask again: if that’s the case, why not just use a GUI and Burp Suite for faster work? Hmm, I honestly don’t know how to answer that, so let’s just keep going—you might need this at some point.

Ok, back to using POST with a body payload. The structure of this example will be as follows:

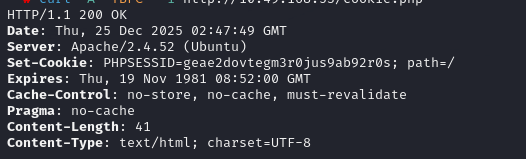
curl -i -X POST -d “user=alonewofl&pass=123456” https://SERVER_IP/login

Okay, after I get a response that contains the cookie header, I will save this value into a text file or something similar, then perform some slightly manual steps to keep this session cookie for subsequent requests. If you use a browser, the cookie will be sent automatically.

Step 1: Save the cookie to a file

curl -i –c cookie_chocolate.txt -X POST -d “user=alonewofl&pass=123456” https://SERVER_IP/login

The -c option writes any cookies received from the server into a file (cookie_chocolate.txt in this case).

Step 2: To reuse the cookie for requests, we just need to use the -b option, that tells cURL to send the saved cookies in the next request, just like a browser would.

curl -b cookie_chocolate.txt https://SERVER_IP/dashboard.php

Okay, those are the most basic operations to interact with a web application when we don’t have a browser :v

Besides that, when using curl you can also use it to brute-force passwords — I’ll leave the code in this GitHub link.

Start by creating a file called passwords.txt and place the following passwords inside it. Then, create a simple bash loop called bruteforce.sh to try each password against login.php and copy-paste the following code inside it.

This exact method underpins tools like HydraBurp Intruder, and WFuzz. By doing it manually, you understand what’s happening under the hood: a repetitive HTTP POST with variable data, waiting for a different response.

Bypassing User-Agent Checks

Okay, in the next part you’ll probably encounter this a lot if you’re working in SOC, and sometimes you’ll run into script kiddies like me :v who use web scanning tools but don’t change one thing: the User-Agent.

Application security solutions usually block User-Agents… how should I put it… the kind that you can immediately tell are suspicious just by looking at them, for example: curl, nikto, etc.

Whether you’re a sysadmin, netadmin, or dev, when you see this you can already tell something feels off, right? And yes, application security solutions will block requests with Scanner / Bot / Automated User-Agents.

Bypassing this is actually simple :v — you just change the User-Agent to a legitimate browser one. And another thing is that most web auto-scanning tools already have a feature that allows you to change the User-Agent during scans.

So, how do we do this with curl? To specify a custom user-agent, we can use the -A flag: curl -i -A “ZeddddNoooB” https://SERVER_IP/

Okay, I’ll just make a short and concise post like this to share. It’s still quite useful for those of you who are new to working with the CLI, so keep practicing. If you want to learn more, just use the -h flag.